Photography Guide
Thai Food Photography Guide
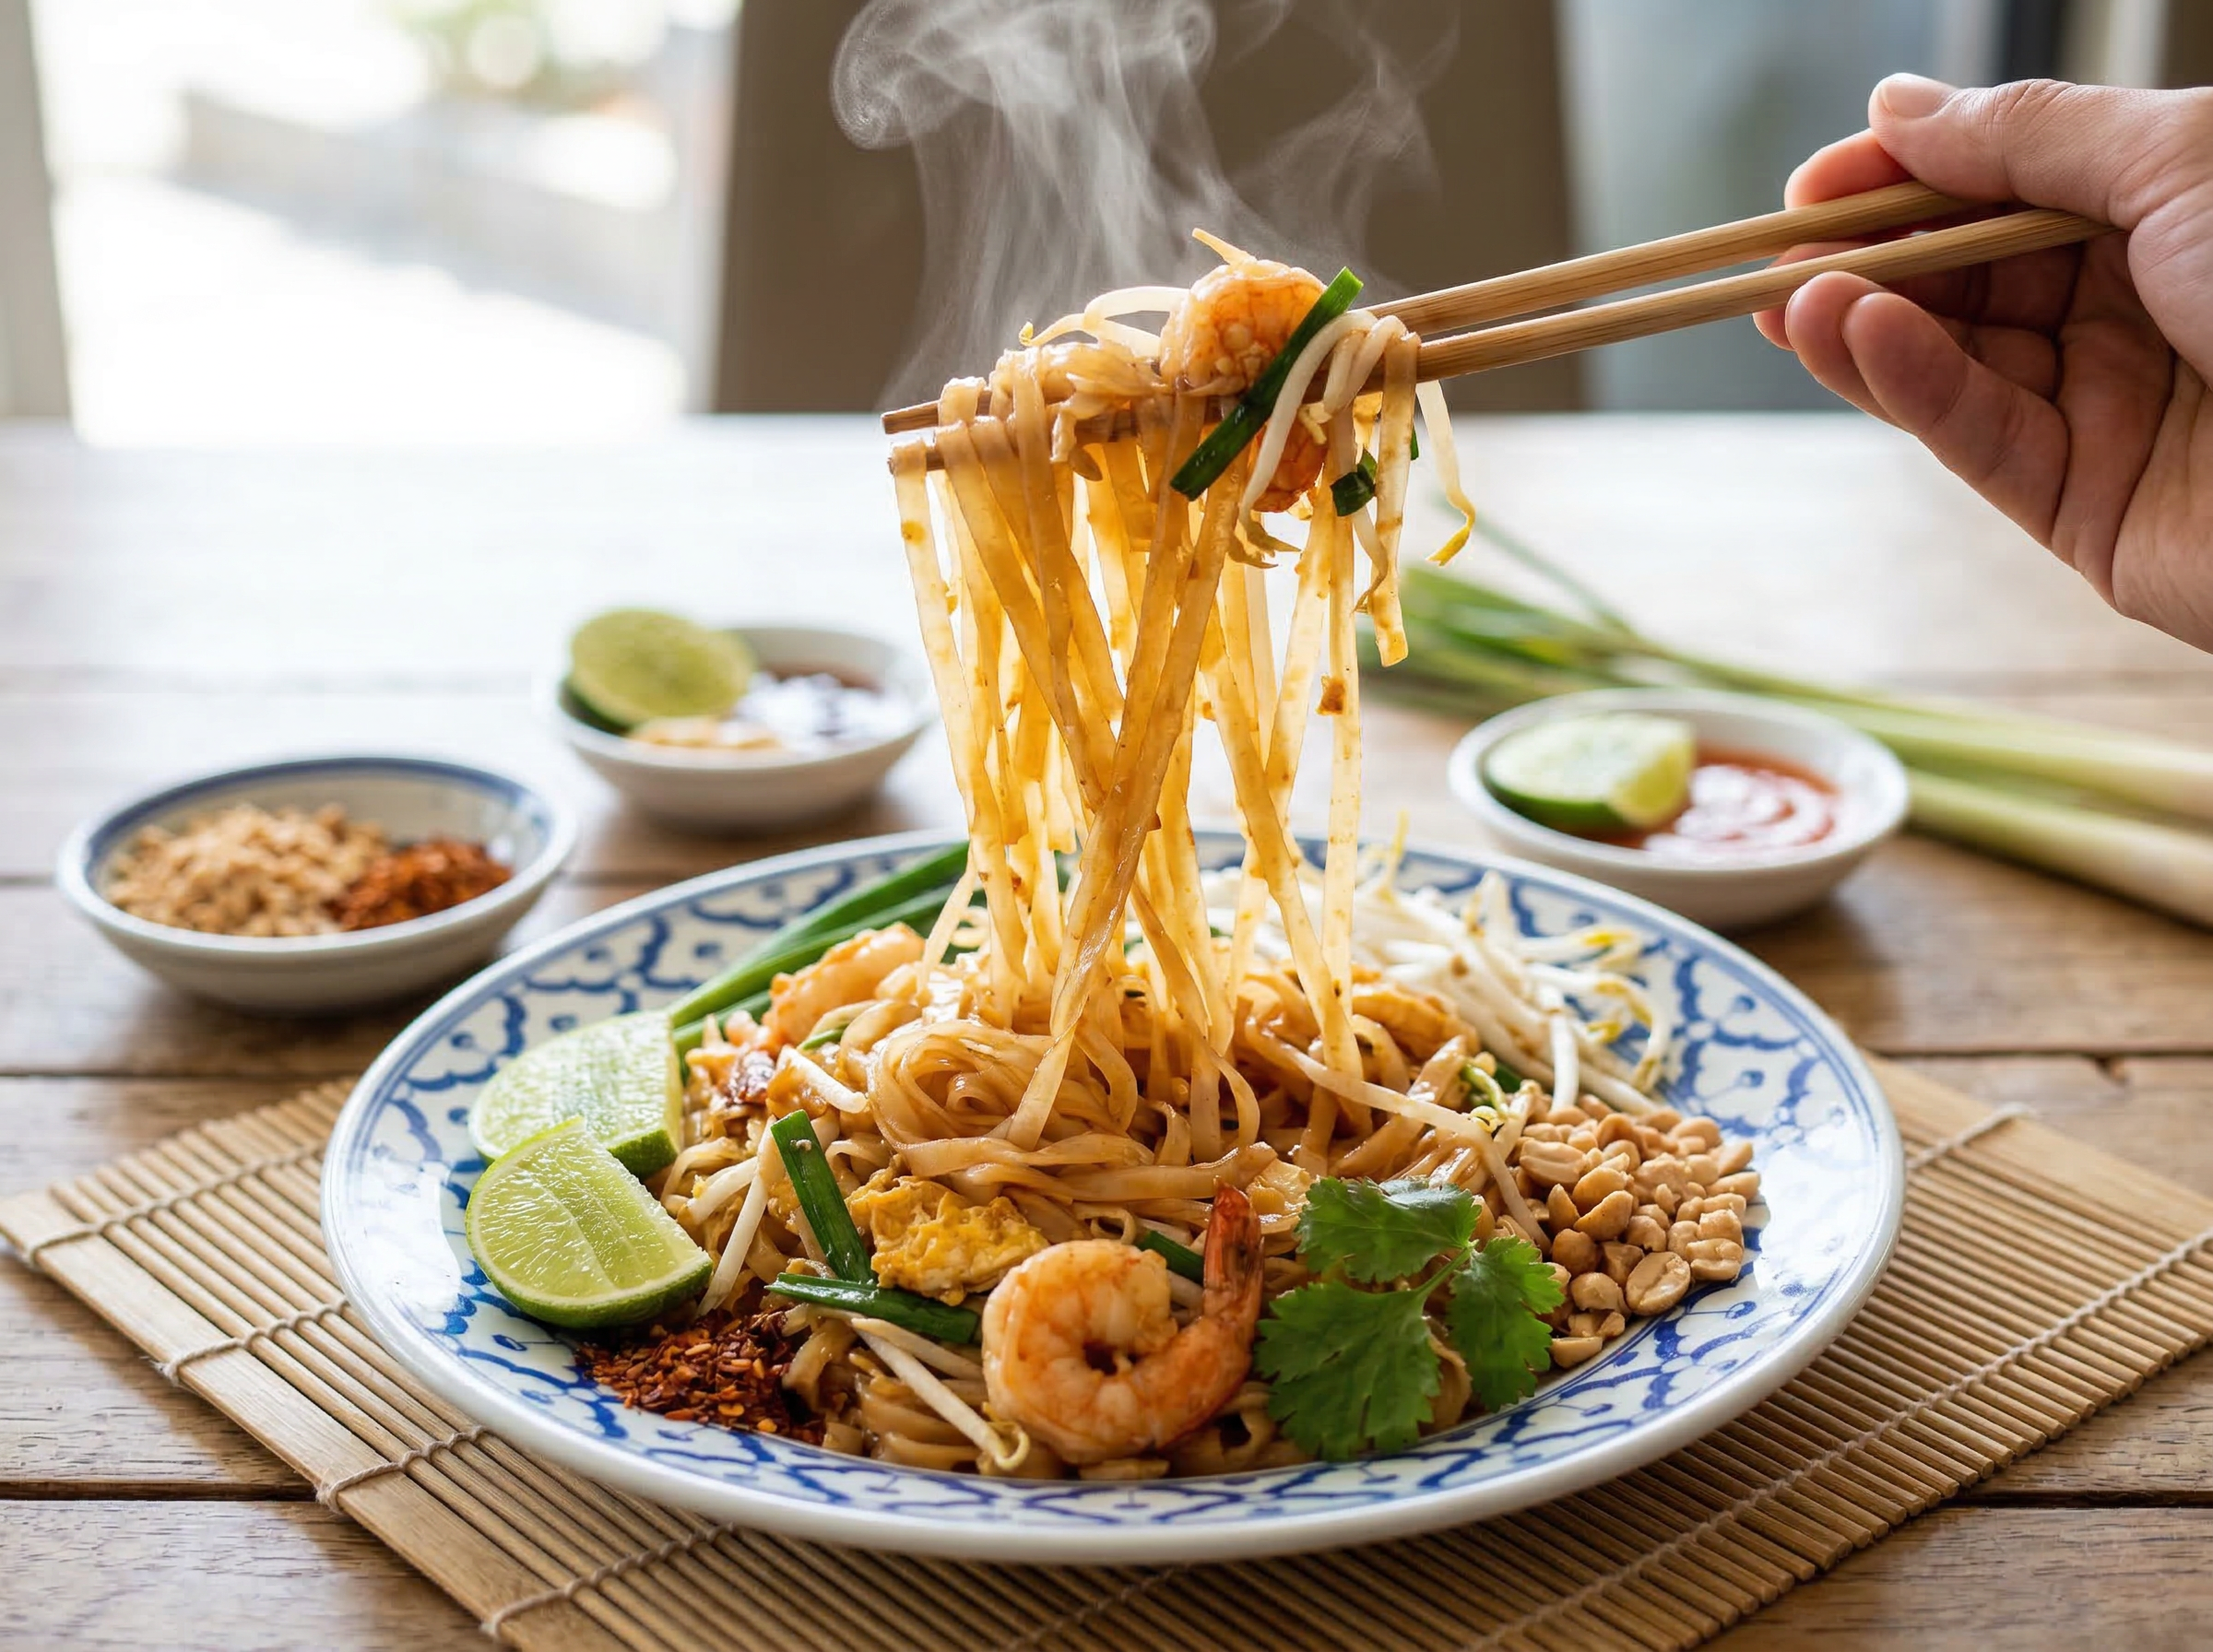
Timing the pad thai noodle lift for a dynamic toss shot while keeping fresh Thai herbs from wilting under studio lights.
Primary Angle
45-degree
Lighting
Bright natural window light for vibrant greens and oranges; avoid warm amber that shifts greens muddy
Read time
~8 min
Thai cuisine is one of the most color-saturated food categories in the world, and that is both its greatest photographic asset and its most demanding challenge. The vivid green of a fresh green curry, the orange-red of a tom yum broth, the pale gold of pad thai noodles with bright bean sprouts, and the purple-tinted mango sticky rice create a natural color palette that photographs beautifully when lit correctly and catastrophically when lit wrong. Fresh herbs - Thai basil, kaffir lime leaves, cilantro, and lemongrass - are the accents that define Thai food aesthetically, but they begin wilting within minutes under hot studio lighting. This guide covers the specific timing, lighting, and angle decisions for pad thai, green curry, tom yum, massaman curry, mango sticky rice, and other Thai dishes, so every shot captures the brightness and vibrancy that makes Thai food immediately recognizable.
What Makes Thai Challenging to Photograph
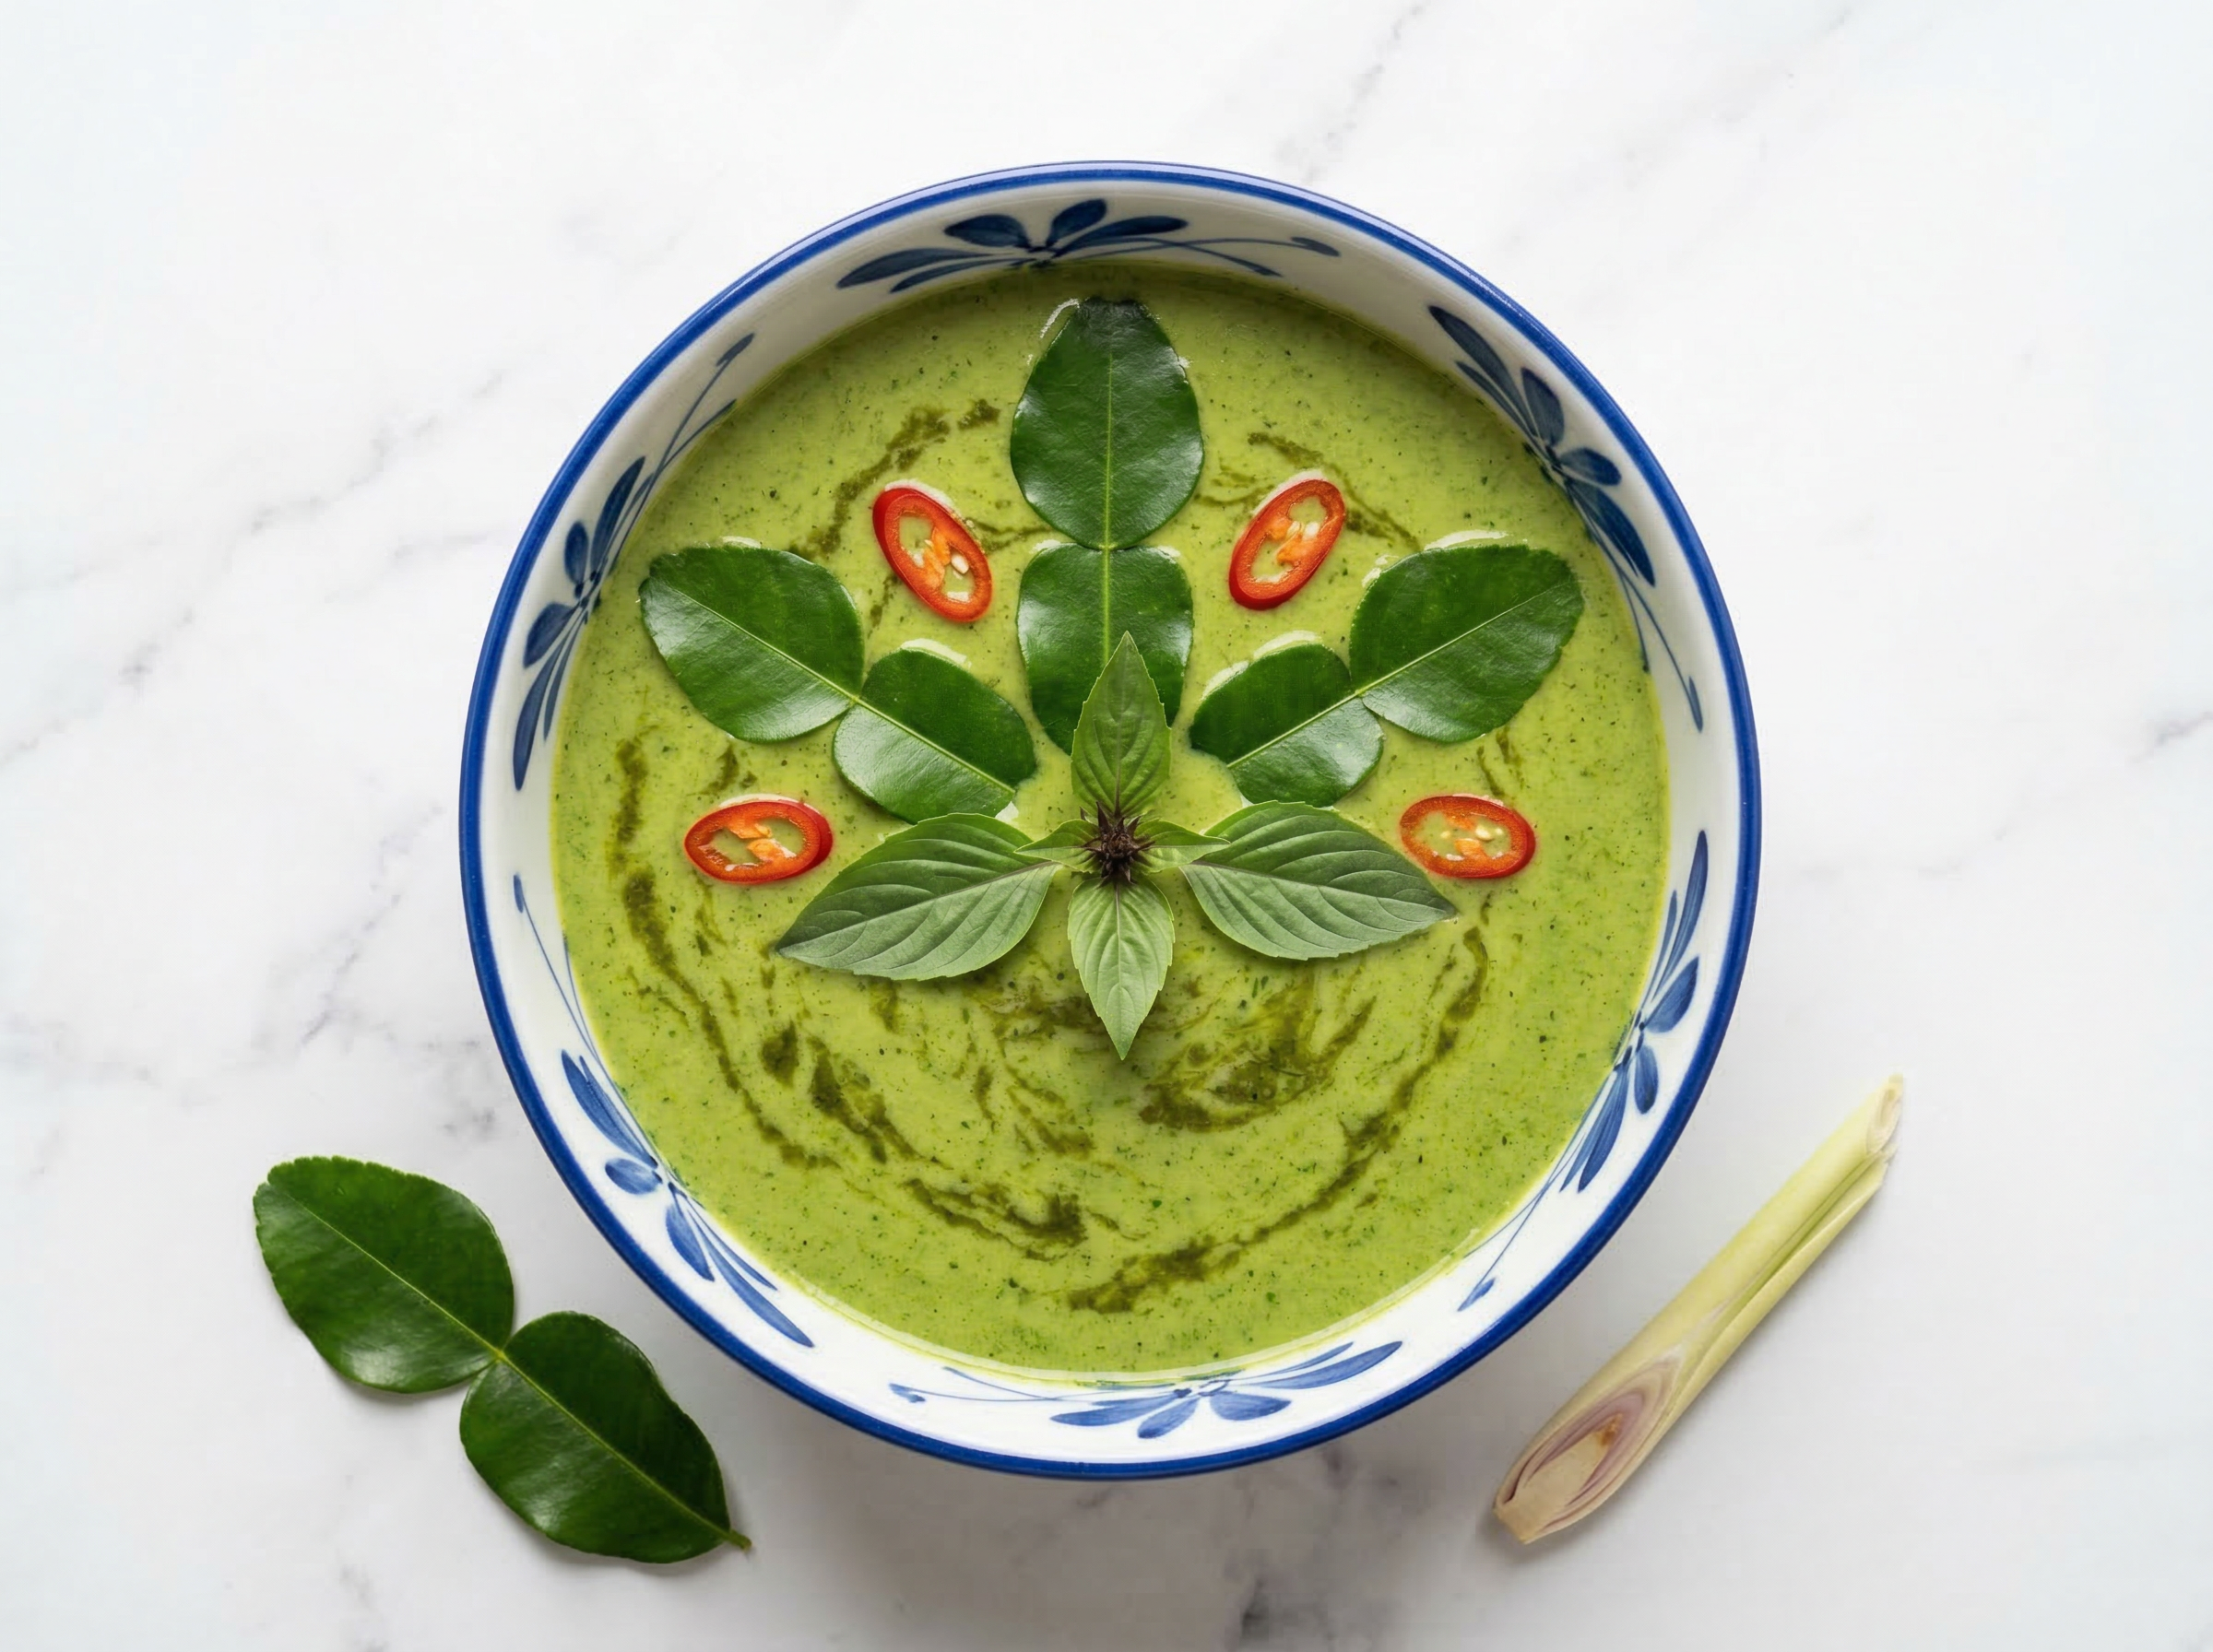
The pad thai noodle lift shot is the defining technical challenge of Thai food photography. A great pad thai photo shows the noodles in motion - slightly elevated by chopsticks, catching the light across their glossy surface - rather than lying flat in the bowl or plate. The challenge is that noodles must be hot enough to be pliable and slightly steam-releasing for the lift to look natural, but they cool and stiffen within four to five minutes of plating. The timing window for the lift shot is narrow. Use a pair of long bamboo chopsticks to practice the lift motion before the dish is placed - you need the noodles to come up in a loose, open twist, not a tight clump. A second challenge across Thai dishes is green saturation: green curry, green papaya som tum, and Thai basil stir-fries all feature a specific vivid green that cameras tend to either oversaturate into neon or undersaturate into olive drab. Bright, cool, neutral natural light preserves the green channel most accurately. Fresh herb wilt is the third timing pressure - Thai basil in particular wilts visibly within three to four minutes under a 500-watt studio LED.
Best Lighting for Thai Photography
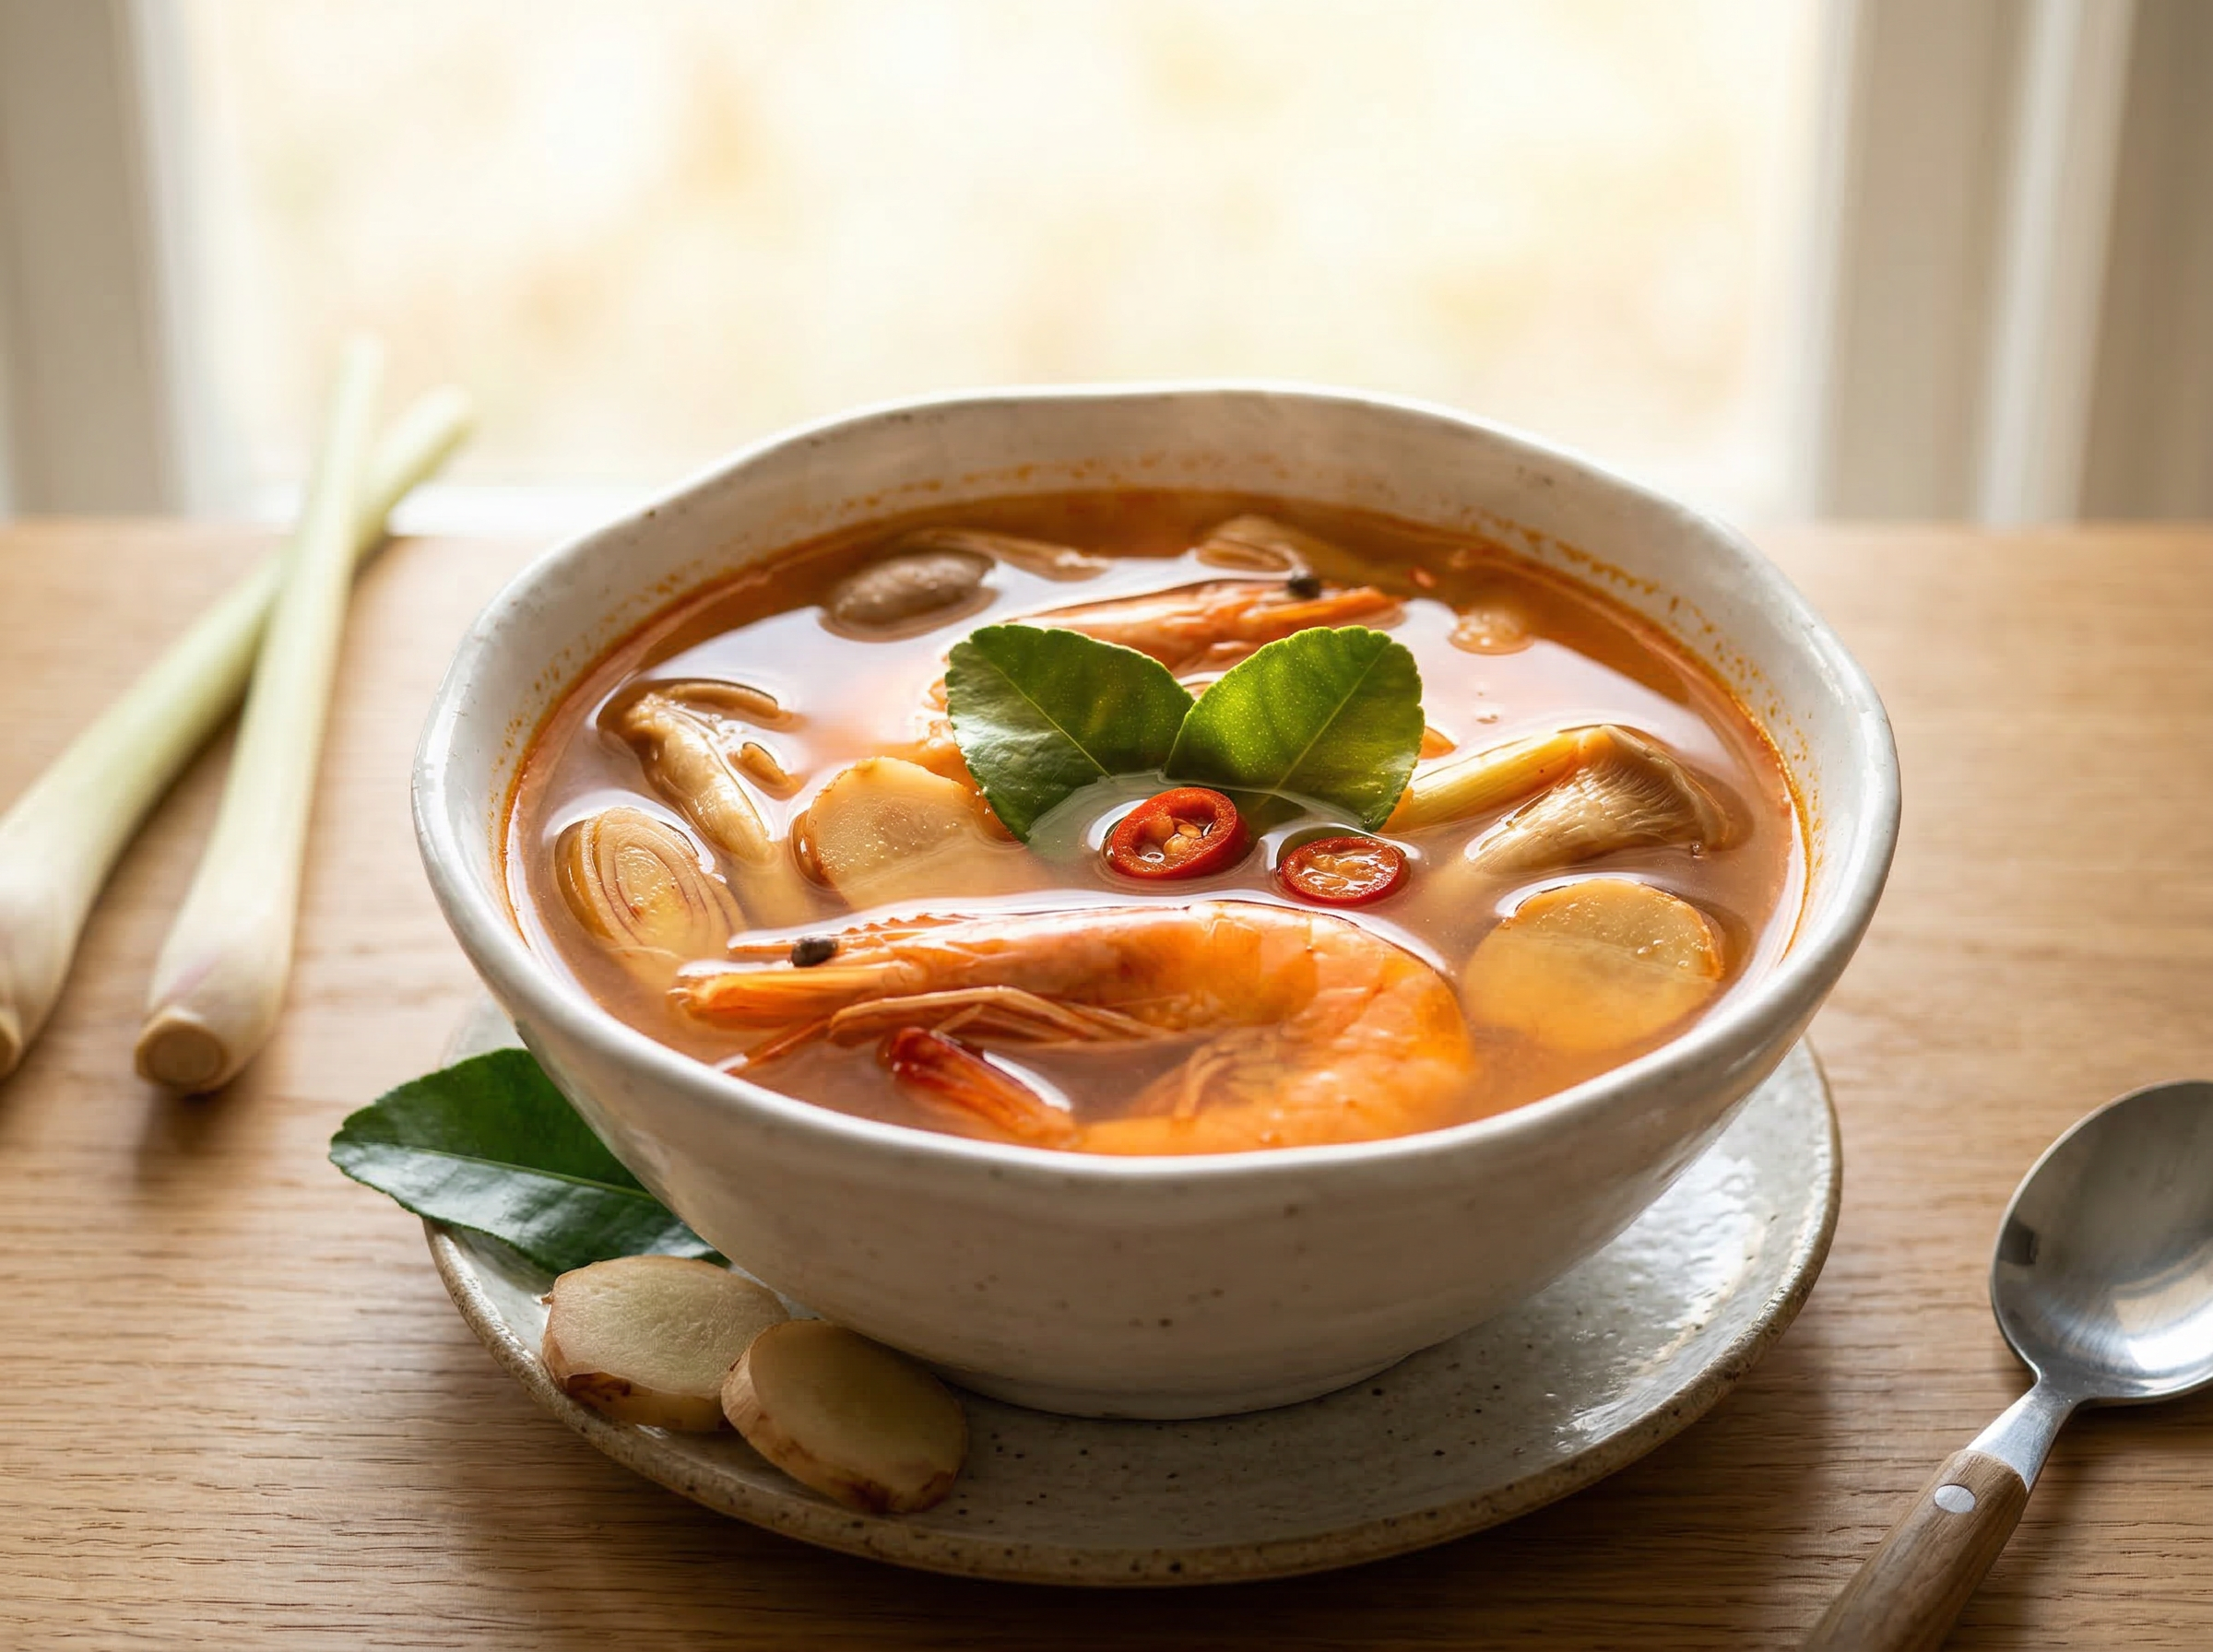
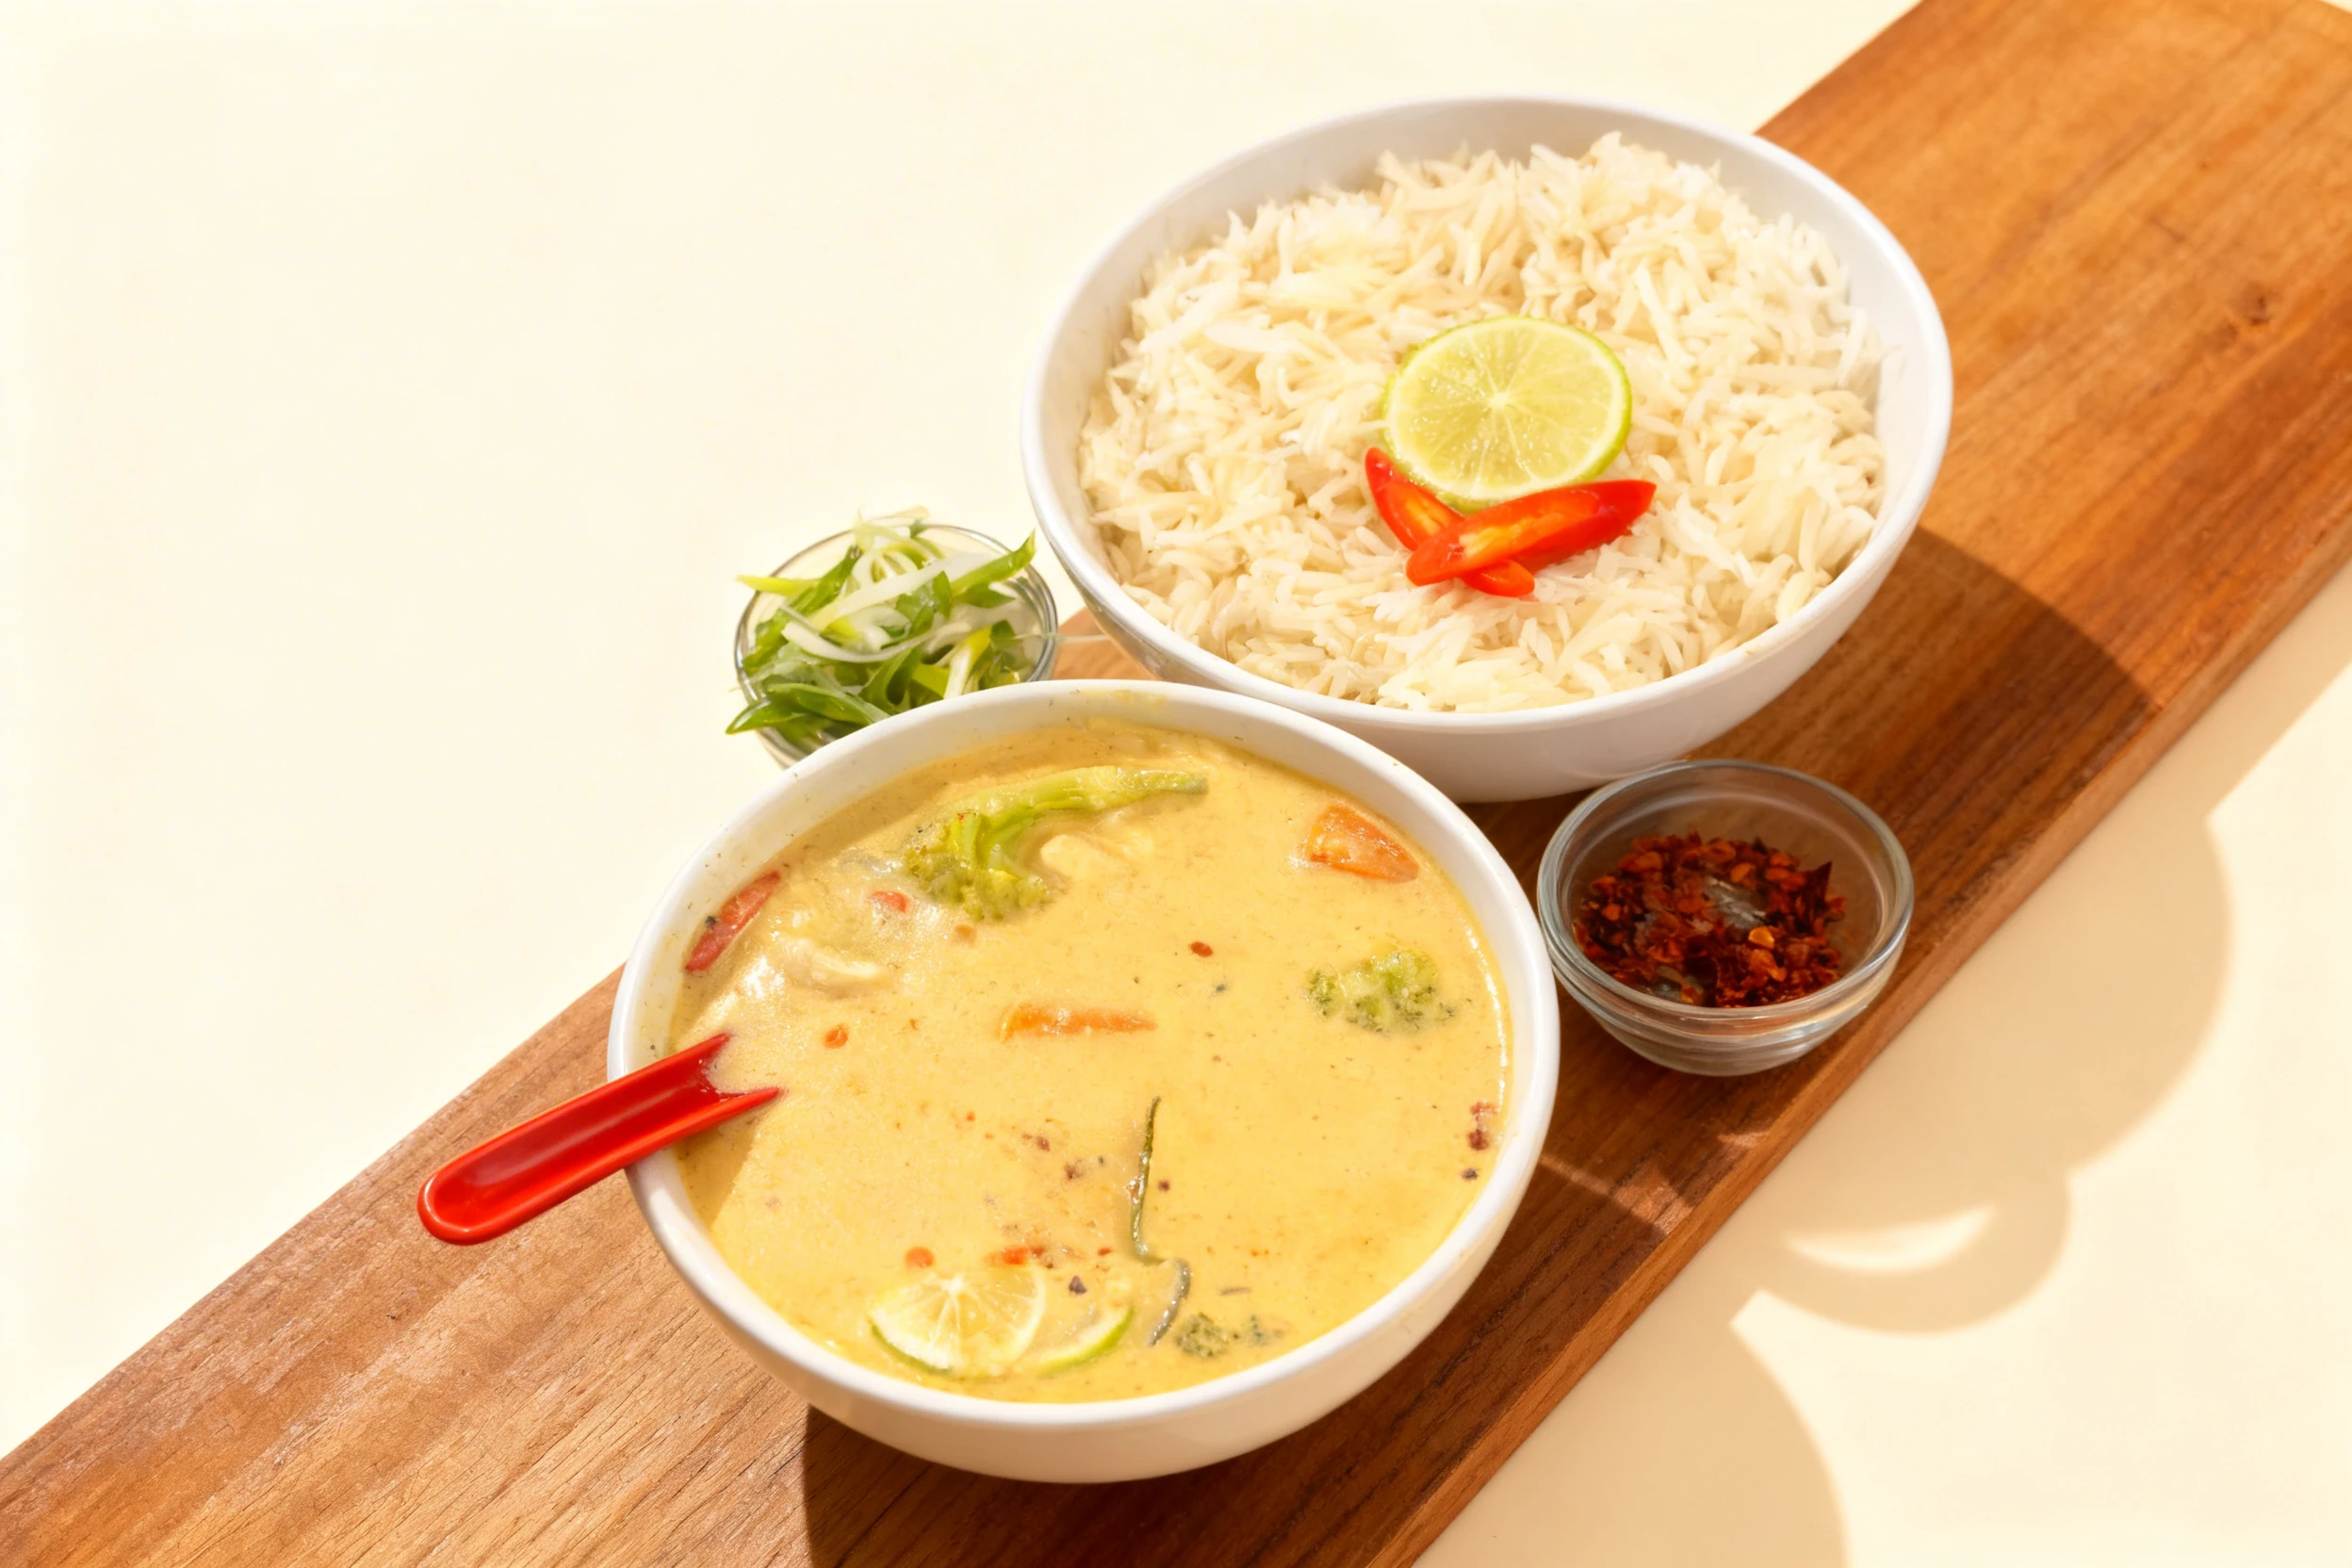
Bright natural window light is the correct choice for the majority of Thai dishes because Thai food colors are already high-saturation and benefit from neutral-to-cool illumination that preserves them accurately. A large east or north-facing window on a bright day produces the ideal quality of light - diffused, bright, and color-neutral. For green curry, this light preserves the vivid coconut-cream green without shifting it toward yellow (which warm light does) or toward grey (which shade does). Avoid warm amber gels or tungsten light sources on any Thai green dish: the amber combines with the yellow in the green channel and shifts the dish color toward olive, which reads as old and unappetizing. For massaman curry, which has deeper brown and orange tones rather than vivid greens, a warmer side light works well and enhances the richness of the peanut and tamarind tones. Tom yum soup benefits from backlighting - positioning the window behind the bowl creates a translucent glow through the red broth and makes the shrimp and mushroom silhouettes visible through the liquid.
Camera Angles for Thai
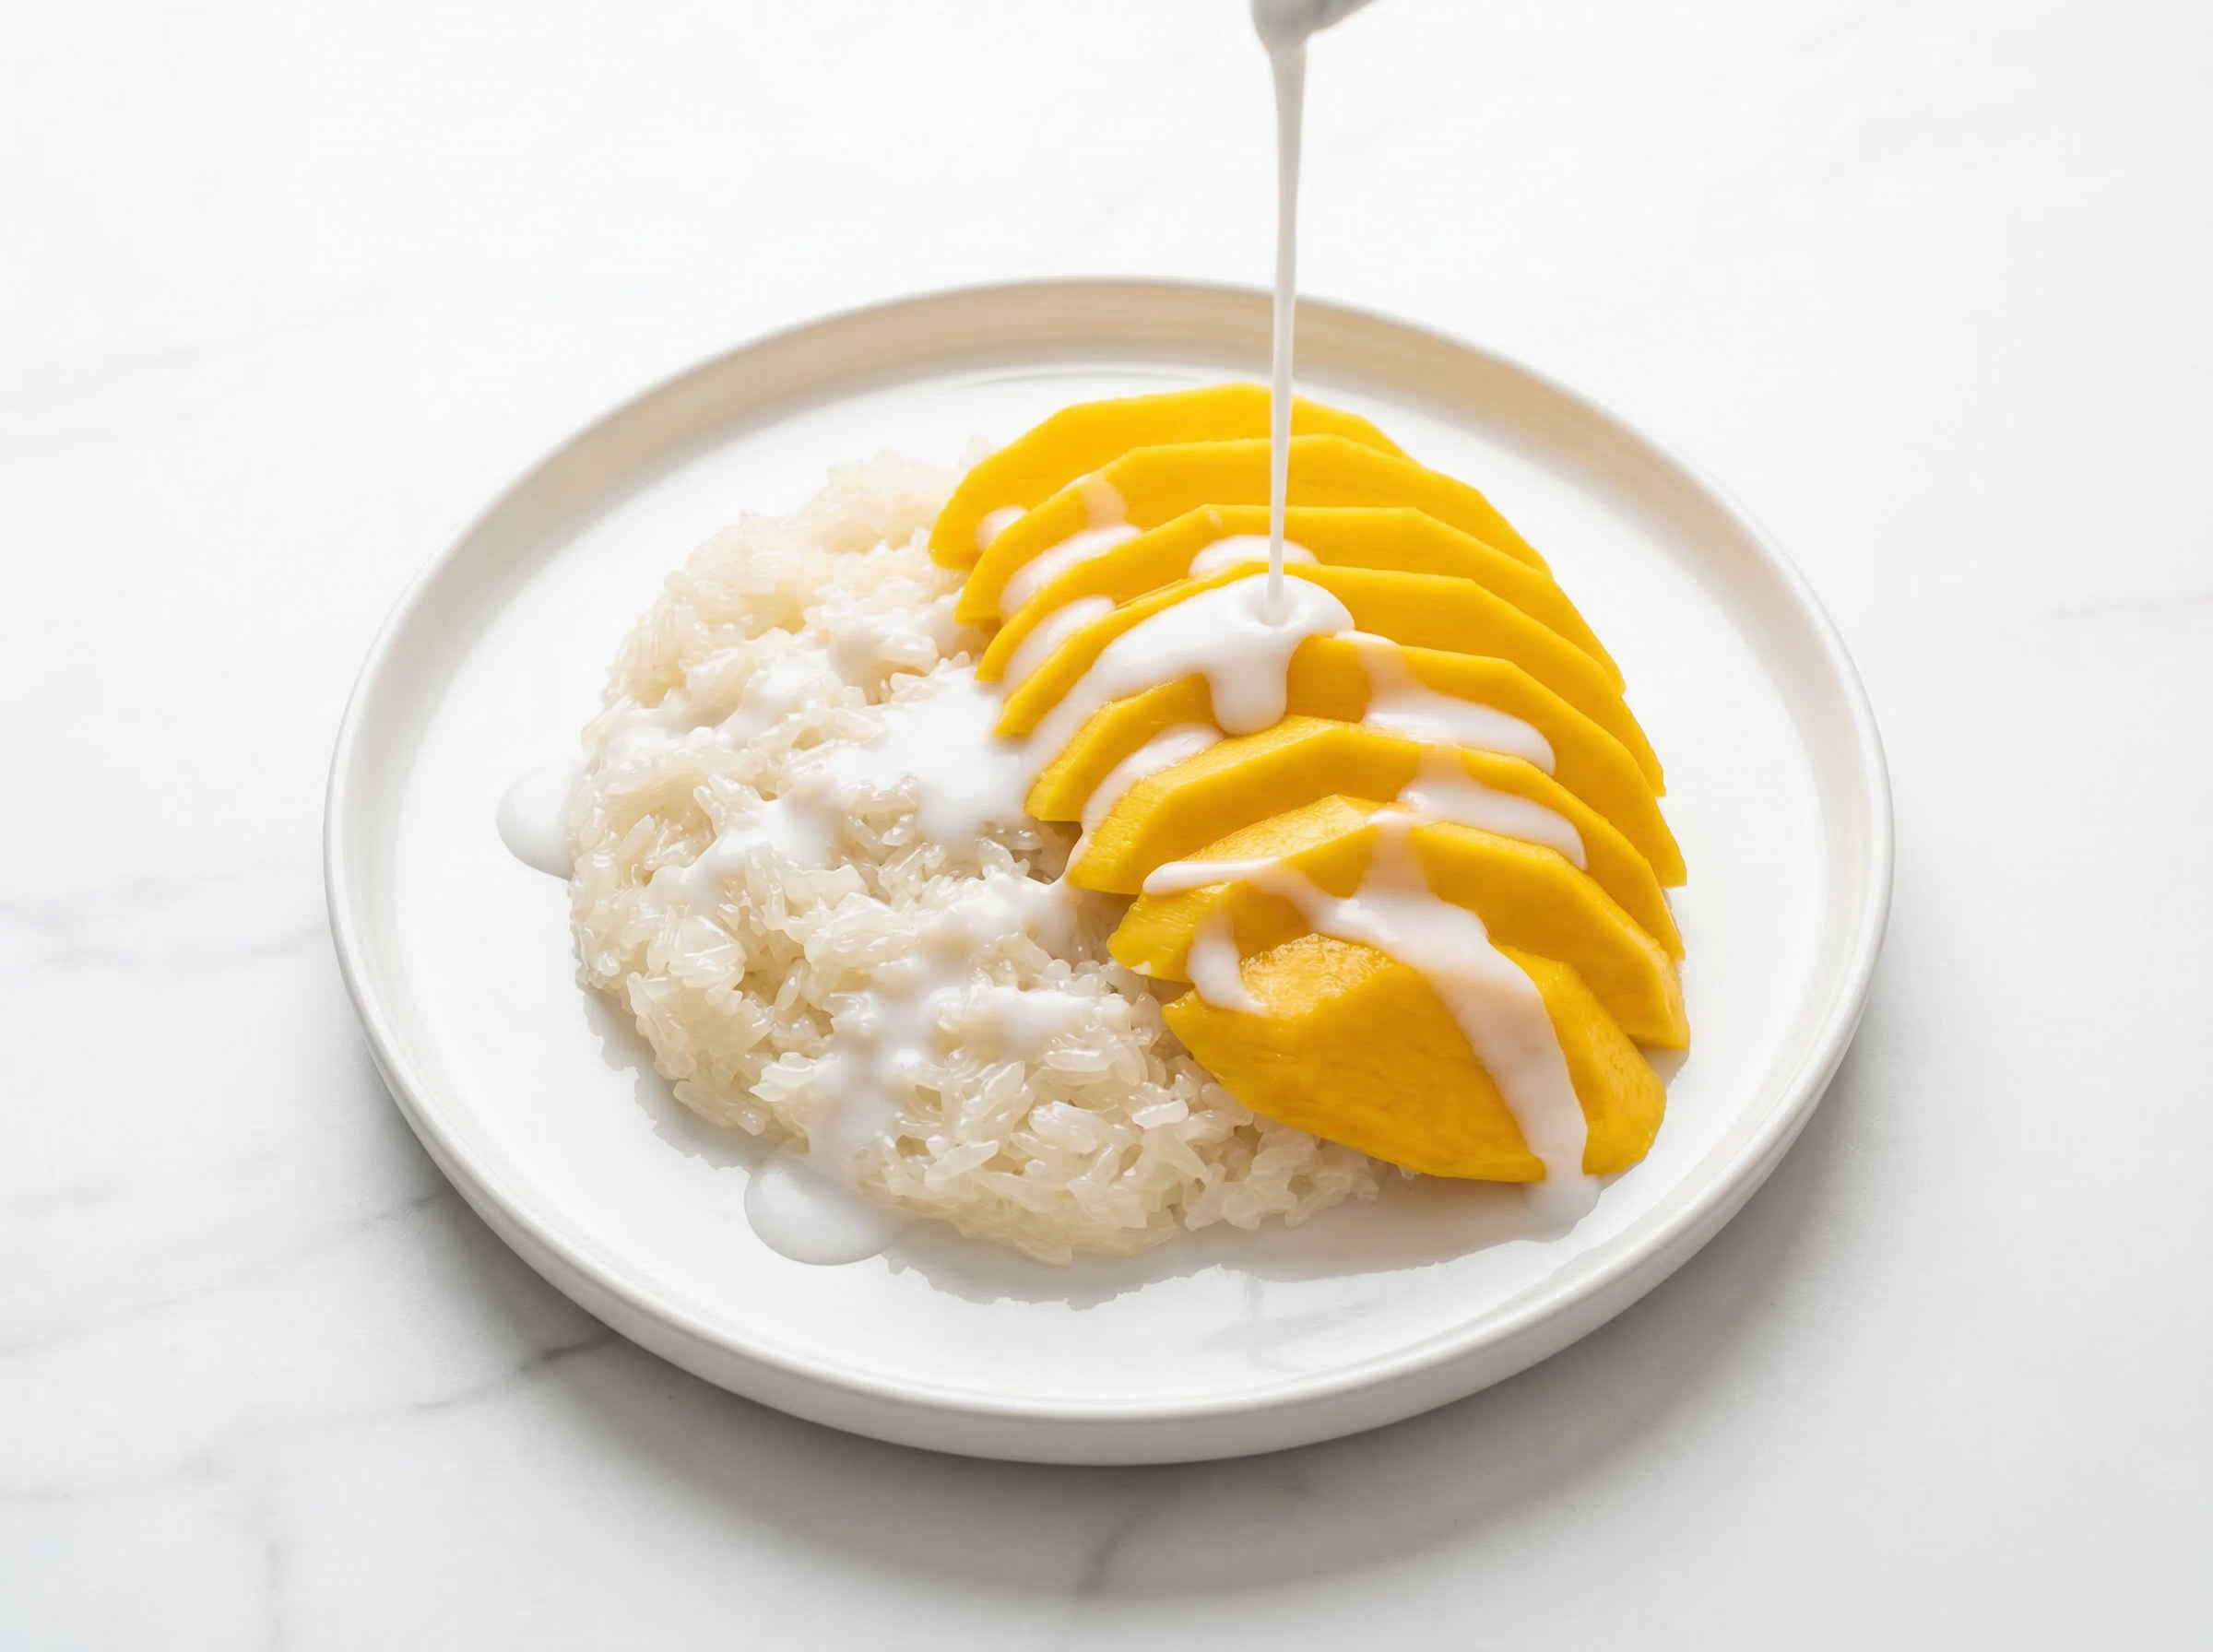
The 45-degree angle is the primary angle for Thai food photography because most Thai dishes have components that are interesting both on the surface and in cross-section - a green curry has a glossy garnished surface and a depth of sauce and protein beneath. At 45 degrees you capture both planes simultaneously. For pad thai, the 45-degree angle with chopstick elevation is the hero shot: the noodle lift from 45 degrees shows the full lift height, the gloss on the noodles, and the bean sprouts and lime wedge on the plate simultaneously. Green curry is better photographed overhead when the garnish pattern - kaffir lime leaf, red chili slice, fresh basil - is the visual story, or at 45 degrees when the coconut cream surface sheen is the story. Tom yum soup is shot at eye level looking slightly down from about 10 degrees - this angle communicates the depth of the broth and shows the color of the liquid most clearly while allowing the shrimp, mushrooms, and galangal pieces to sit at the visible surface. Mango sticky rice is a natural overhead subject: the mango fan on top of the white sticky rice with coconut cream drizzle reads as a flat, composed frame.
Food Styling and Props
Traditional Thai ceramic - hand-painted blue and white porcelain or terracotta - is the most authentic prop for Thai food photography and one that elevates a smartphone restaurant shot to menu quality. For pad thai, a flat-rimmed round plate or a traditional ceramic bowl with a slightly elevated rim allows the noodle lift to happen without the chopstick angle being blocked by deep bowl walls. A woven bamboo basket beside the plate adds a market reference for traditional dishes. Fresh Thai basil is the most important fresh herb prop: its purple stems and dark green leaves photograph distinctively and confirm the dish identity before any caption. Place kaffir lime leaves whole alongside or floating in a soup rather than cutting them - whole leaves show their distinctive double-lobed shape that is immediately recognizable. Lemongrass stalks propped against the bowl add height and a pale yellow-green color that complements most Thai dish palettes. Small ceramic ramekins for dipping sauces add depth to a frame when positioned slightly out of focus in the foreground or background - the blurred color reads as context without competing with the hero dish. Mango sticky rice benefits from nothing but the dish itself - its natural color composition of yellow mango, white rice, and coconut cream is already complete.
Recommended props
Equipment Guide
A 50mm prime is the versatile standard for Thai food at 45 degrees - it renders the dish at natural proportions without the telephoto compression that can make a bowl of green curry look oddly flattened. An 85mm prime works better for close-up details: the glossy surface of massaman curry, the crinkled surface of kaffir lime leaves, and the sugar crystal texture on mango sticky rice are all subjects that reward a longer lens and a shallower depth of field. For the pad thai noodle lift, use burst mode at high speed - 8 to 10 frames per second - so you can select the single frame where the noodle elevation is at its peak arc and the steam is visible. A tripod is useful for static overhead som tum or mango sticky rice shots but gets in the way of the fast-moving pad thai lift technique. For that shot, handheld at 1/250s minimum eliminates motion blur while allowing freedom of movement around the plate.
Skip the photoshoot — enhance the thai photos you already have
The techniques on this page take time to master. MenuPhotoAI applies the same lighting, color, and texture corrections — automatically — to the smartphone photos you already shot. Studio-quality results in 30 seconds.
Try free — 5 credits, no cardCommon Thai Photography Mistakes
Using warm light that turns green curry olive
A tungsten or amber-gelled light on green curry is the most damaging lighting mistake in Thai food photography. The warm light combines with the yellow in the green channel and shifts the curry from vibrant emerald to a dull olive that reads as old or overcooked. Always use neutral or cool natural light for any Thai dish that features green as a primary color.
Photographing herbs after they have wilted
Thai basil and fresh cilantro wilt visibly under studio lights within three to four minutes. Once wilted, they cannot be revived and editing cannot make them look fresh. Have fresh herb bunches in water until the moment of plating, add them last, and shoot immediately. For long sessions, swap herb garnishes between shots rather than using the same sprigs throughout.
Shooting pad thai flat in the bowl with no elevation
Pad thai photographed lying flat in a bowl shows only the surface of the noodles - no gloss, no texture separation, no dynamism. The dish looks like a clump of noodles rather than a well-made stir-fry. The chopstick elevation technique - even a modest two-inch lift - immediately changes the shot from static documentation to appetizing food photography.
Overhead angle for tom yum soup
Tom yum photographed from directly overhead looks like a red puddle with small objects floating in it. The depth of the broth - which is the primary sensory cue for a rich, deeply flavored soup - is completely invisible from above. Eye-level or near-eye-level is essential to communicate broth volume and depth, and to show the shrimp and mushrooms sitting at different depths within the liquid.
Oversaturating greens in editing
Thai food greens are already vivid in real life and do not need saturation boosts in editing. Increasing global saturation or vibrance on a Thai dish image often pushes the greens into neon territory that reads as artificial and unappetizing. Work in the HSL panel to make targeted adjustments rather than using the global vibrance slider, and check the green values against a reference shot taken in natural light.
Editing Tips
Thai food editing is primarily about green channel protection. In the HSL panel, pull green hue slightly toward yellow (about plus 5 to 10) to warm the greens from clinical to appetizing, but do not increase green saturation - Thai basil and green curry are already vivid and added saturation pushes them into artificial neon. Reduce yellow saturation slightly if pad thai noodles are reading too golden under warm light. For tom yum, increase red luminance to make the broth translucent rather than opaque, and lift shadows to show shrimp detail in the broth. Mango sticky rice benefits from a slight dehaze to cut any steam haze and a warm white balance to make the coconut cream read as rich rather than grey.
Platform-Specific Tips
For DoorDash and Uber Eats, pad thai in a square crop at 45 degrees is the highest-performing Thai thumbnail because the dish is instantly recognizable and the noodle texture reads clearly at small sizes. Use the mango sticky rice overhead frame for dessert category thumbnails - the color contrast is vivid and legible at 200 pixels. For Instagram, the pad thai noodle lift shot in a vertical format performs exceptionally well as a Reels cover - motion and gloss both read on mobile screens. Green curry overhead with a geometric kaffir lime leaf garnish pattern performs well as a static square post. For print menus, use the 85mm close-up of green curry surface or the tom yum broth depth shot at maximum resolution to show the quality of the broth and garnish that justifies the menu price. MenuPhotoAI can sharpen noodle texture and correct green channel drift on smartphone pad thai shots, so you can capture your full Thai menu during a quiet service period without a dedicated photography session.
Thai Photo Examples
Real thai photos from restaurants using MenuPhotoAI. Tap any category to see the full gallery and the before-and-after view.
Take your Thai photos further with AI
Once you have a solid shot using the techniques above, MenuPhotoAI can handle the finishing work. Our AI removes distracting backgrounds, corrects exposure and white balance, and applies cuisine-appropriate color grading — turning a good smartphone photo into something you'd be proud to put on your menu or delivery app listing. Start with 5 free photos, no credit card required.
Frequently Asked Questions
Skip the photoshoot — enhance the thai photos you already have
The techniques on this page take time to master. MenuPhotoAI applies the same lighting, color, and texture corrections — automatically — to the smartphone photos you already shot. Studio-quality results in 30 seconds.
Try free — 5 credits, no cardMore Cuisine Photography Guides
This guide reflects best practices for Thai food photography as of 2026. Techniques may vary based on specific dishes, equipment, and shooting conditions. MenuPhotoAI is an AI food photo enhancement platform.