Photography Guide
Ramen & Noodles Food Photography Guide
Noodles bloat and broth goes murky within three minutes of serving - steam management and pre-set composition are essential.
Primary Angle
Eye-level
Lighting
Side-backlighting to catch steam; warm tungsten to complement broth
Read time
~8 min
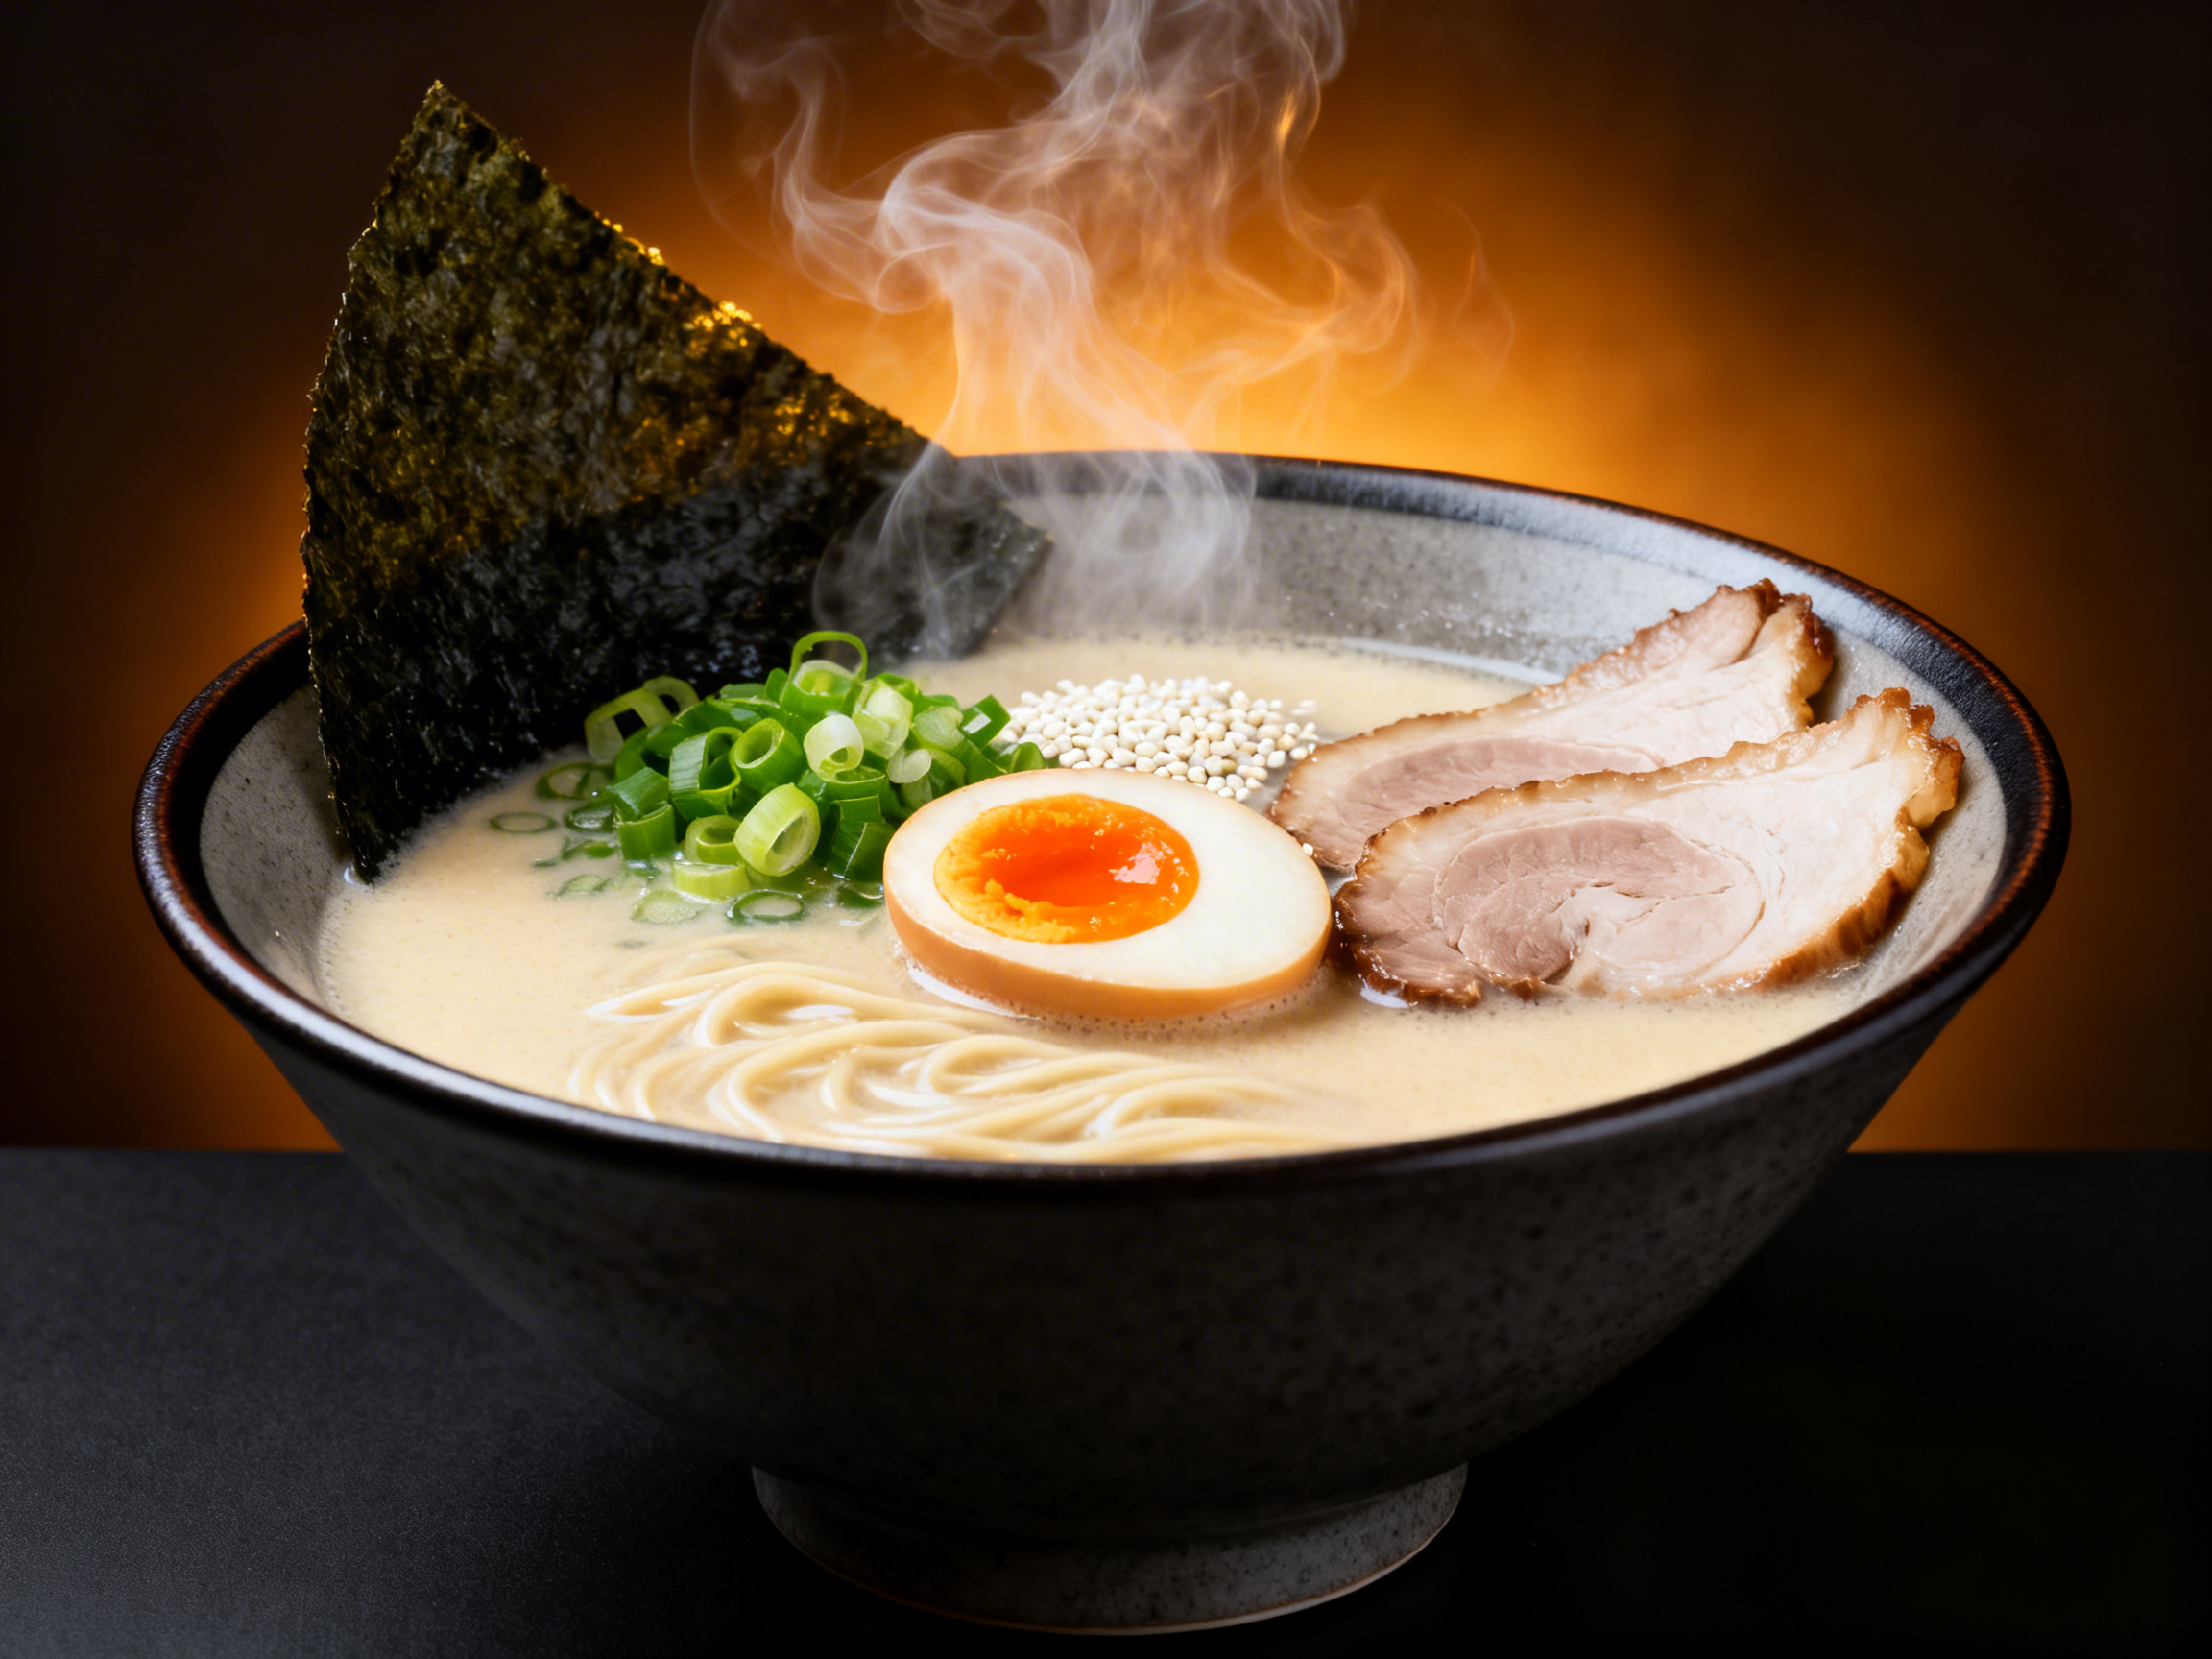
Ramen and noodle photography occupies a unique space in food photography: no other dish combines so many simultaneous technical challenges in a single bowl. You are managing live steam, bloating noodles, a rapidly clouding broth surface, toppings that sink or float unpredictably, and a three-minute window before all of it degrades beyond salvage. But when the timing is right - the steam wisps backlit in gold, the soft-boiled egg halved to reveal a jammy orange yolk, a clean chopstick lift of noodles rising from a glistening tonkotsu broth - ramen photography produces some of the most share-worthy food images in existence. This guide covers the specific techniques for photographing tonkotsu ramen, shoyu ramen, tsukemen, pho, pad thai, dan dan noodles, and udon - from the side-backlighting setup that makes steam visible to the exact timing for the chopstick lift shot that every ramen restaurant wants on their menu.
What Makes Ramen & Noodles Challenging to Photograph
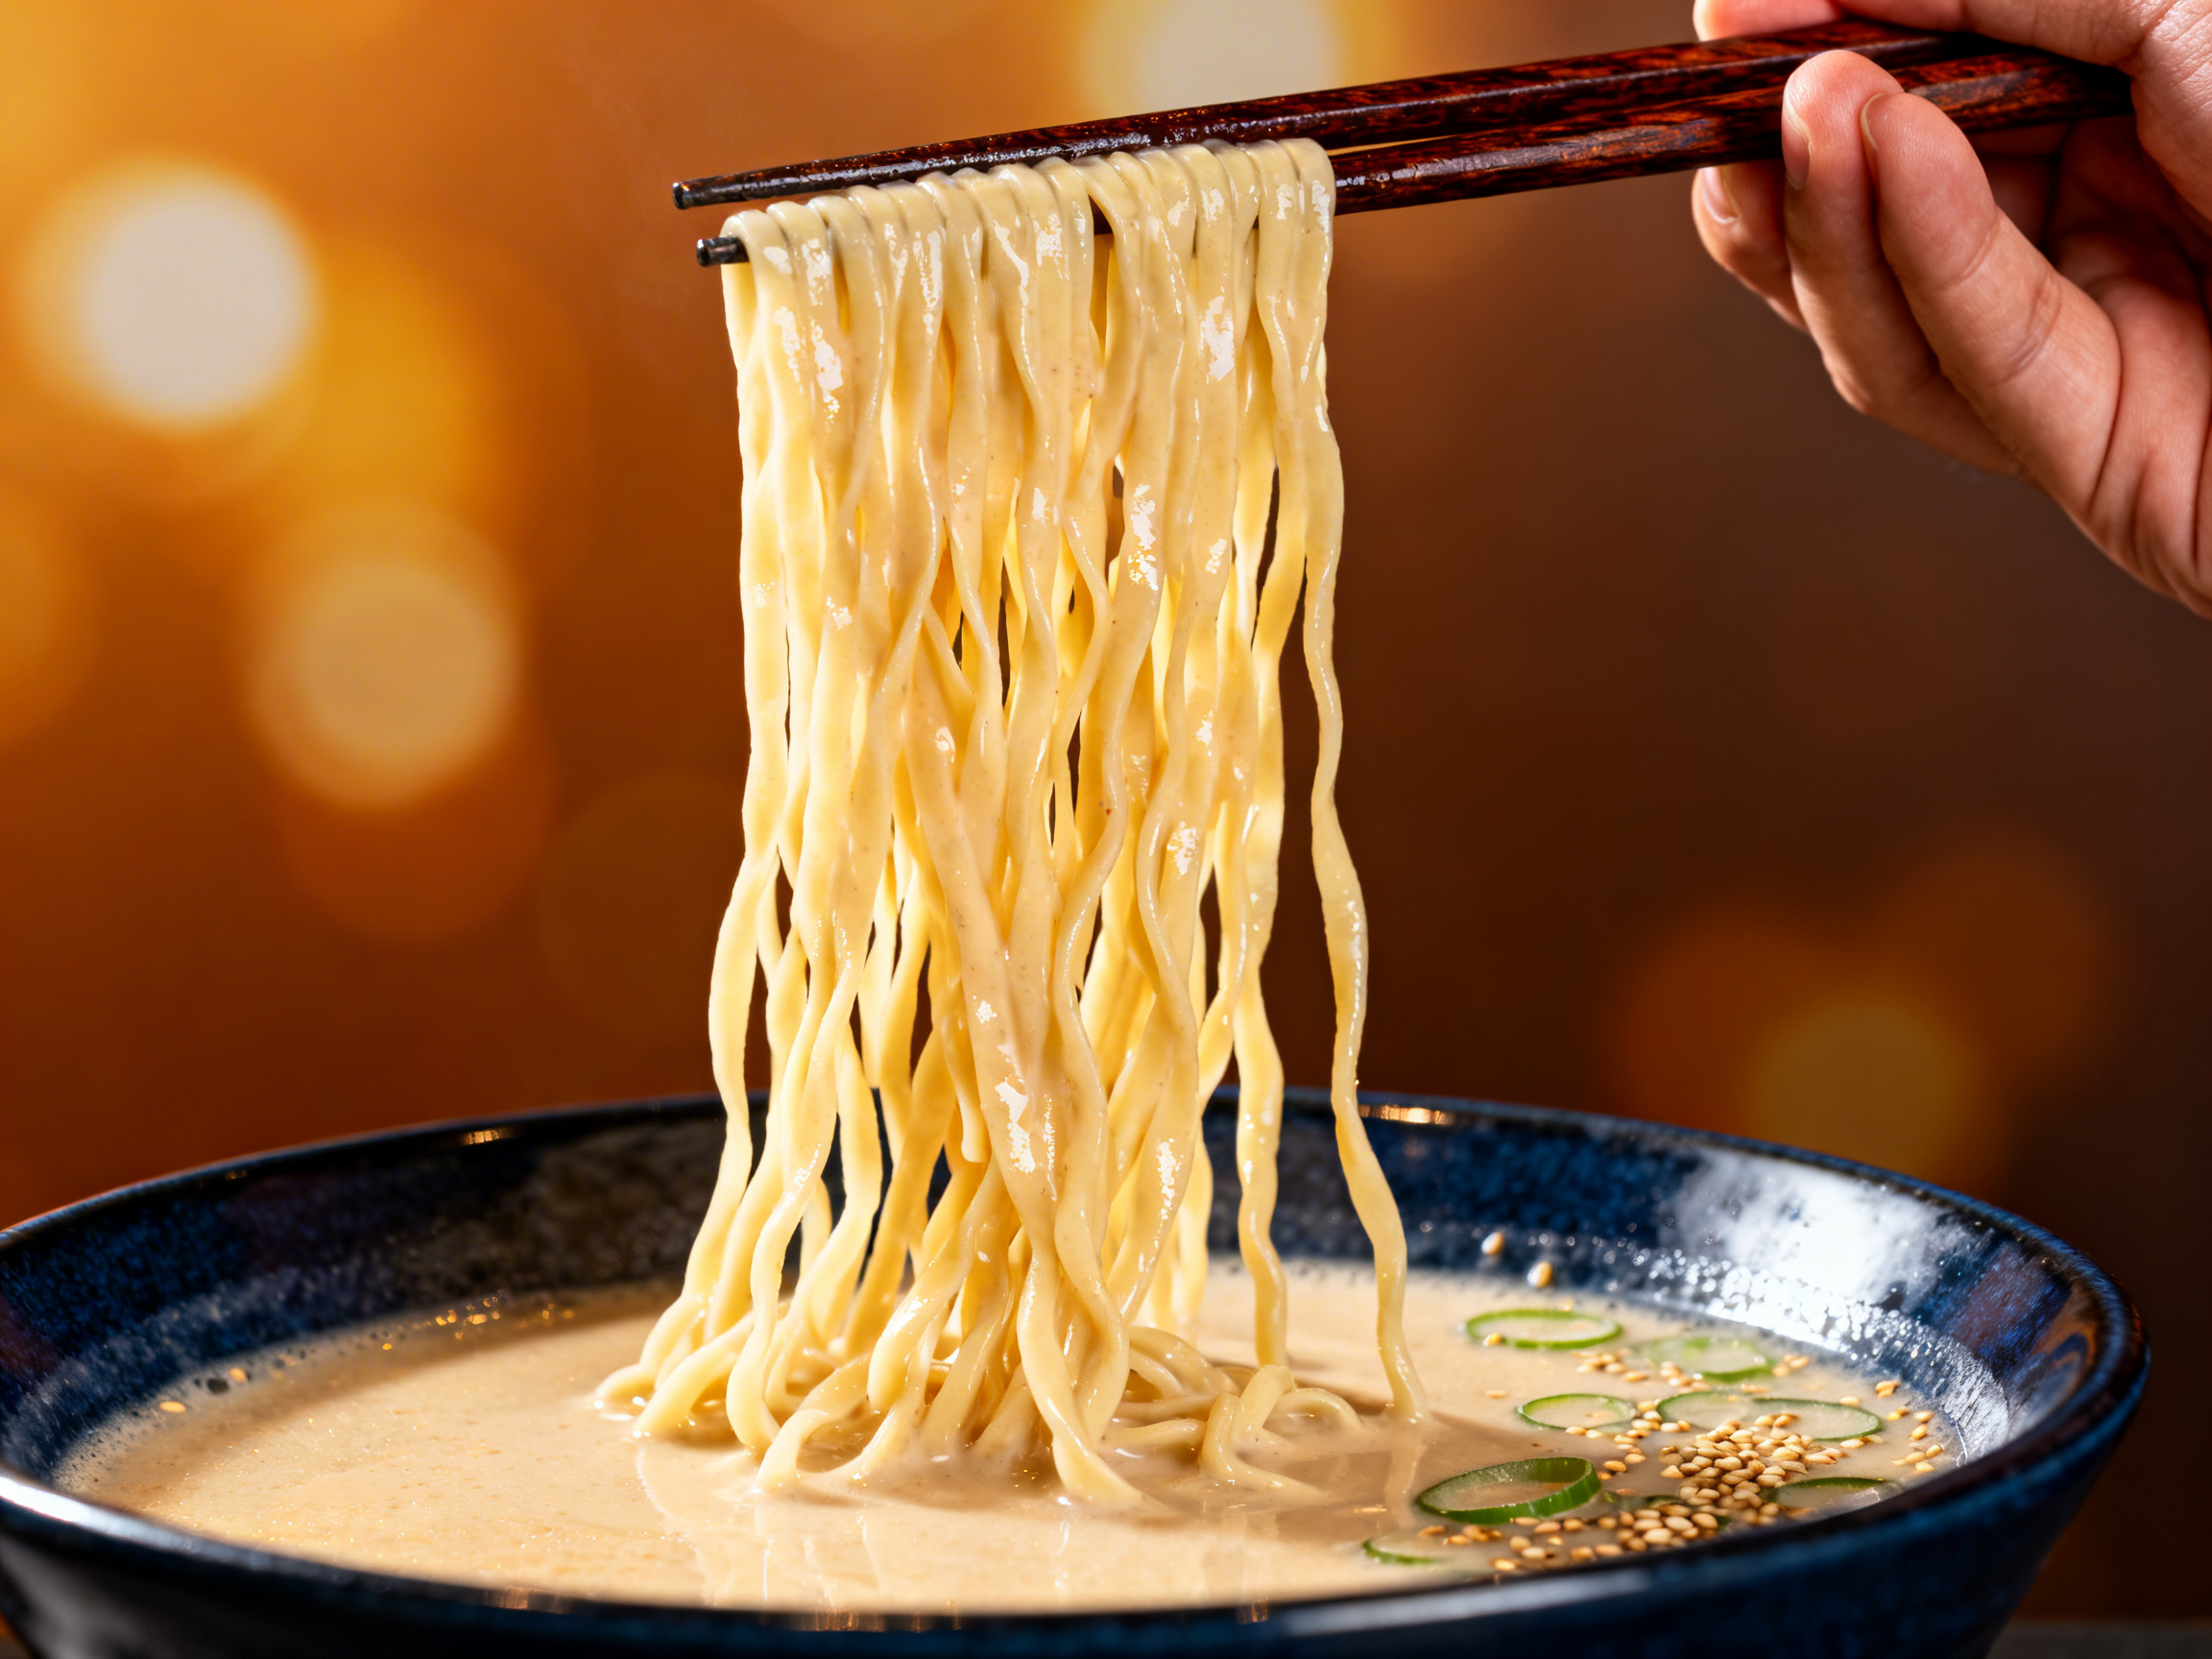
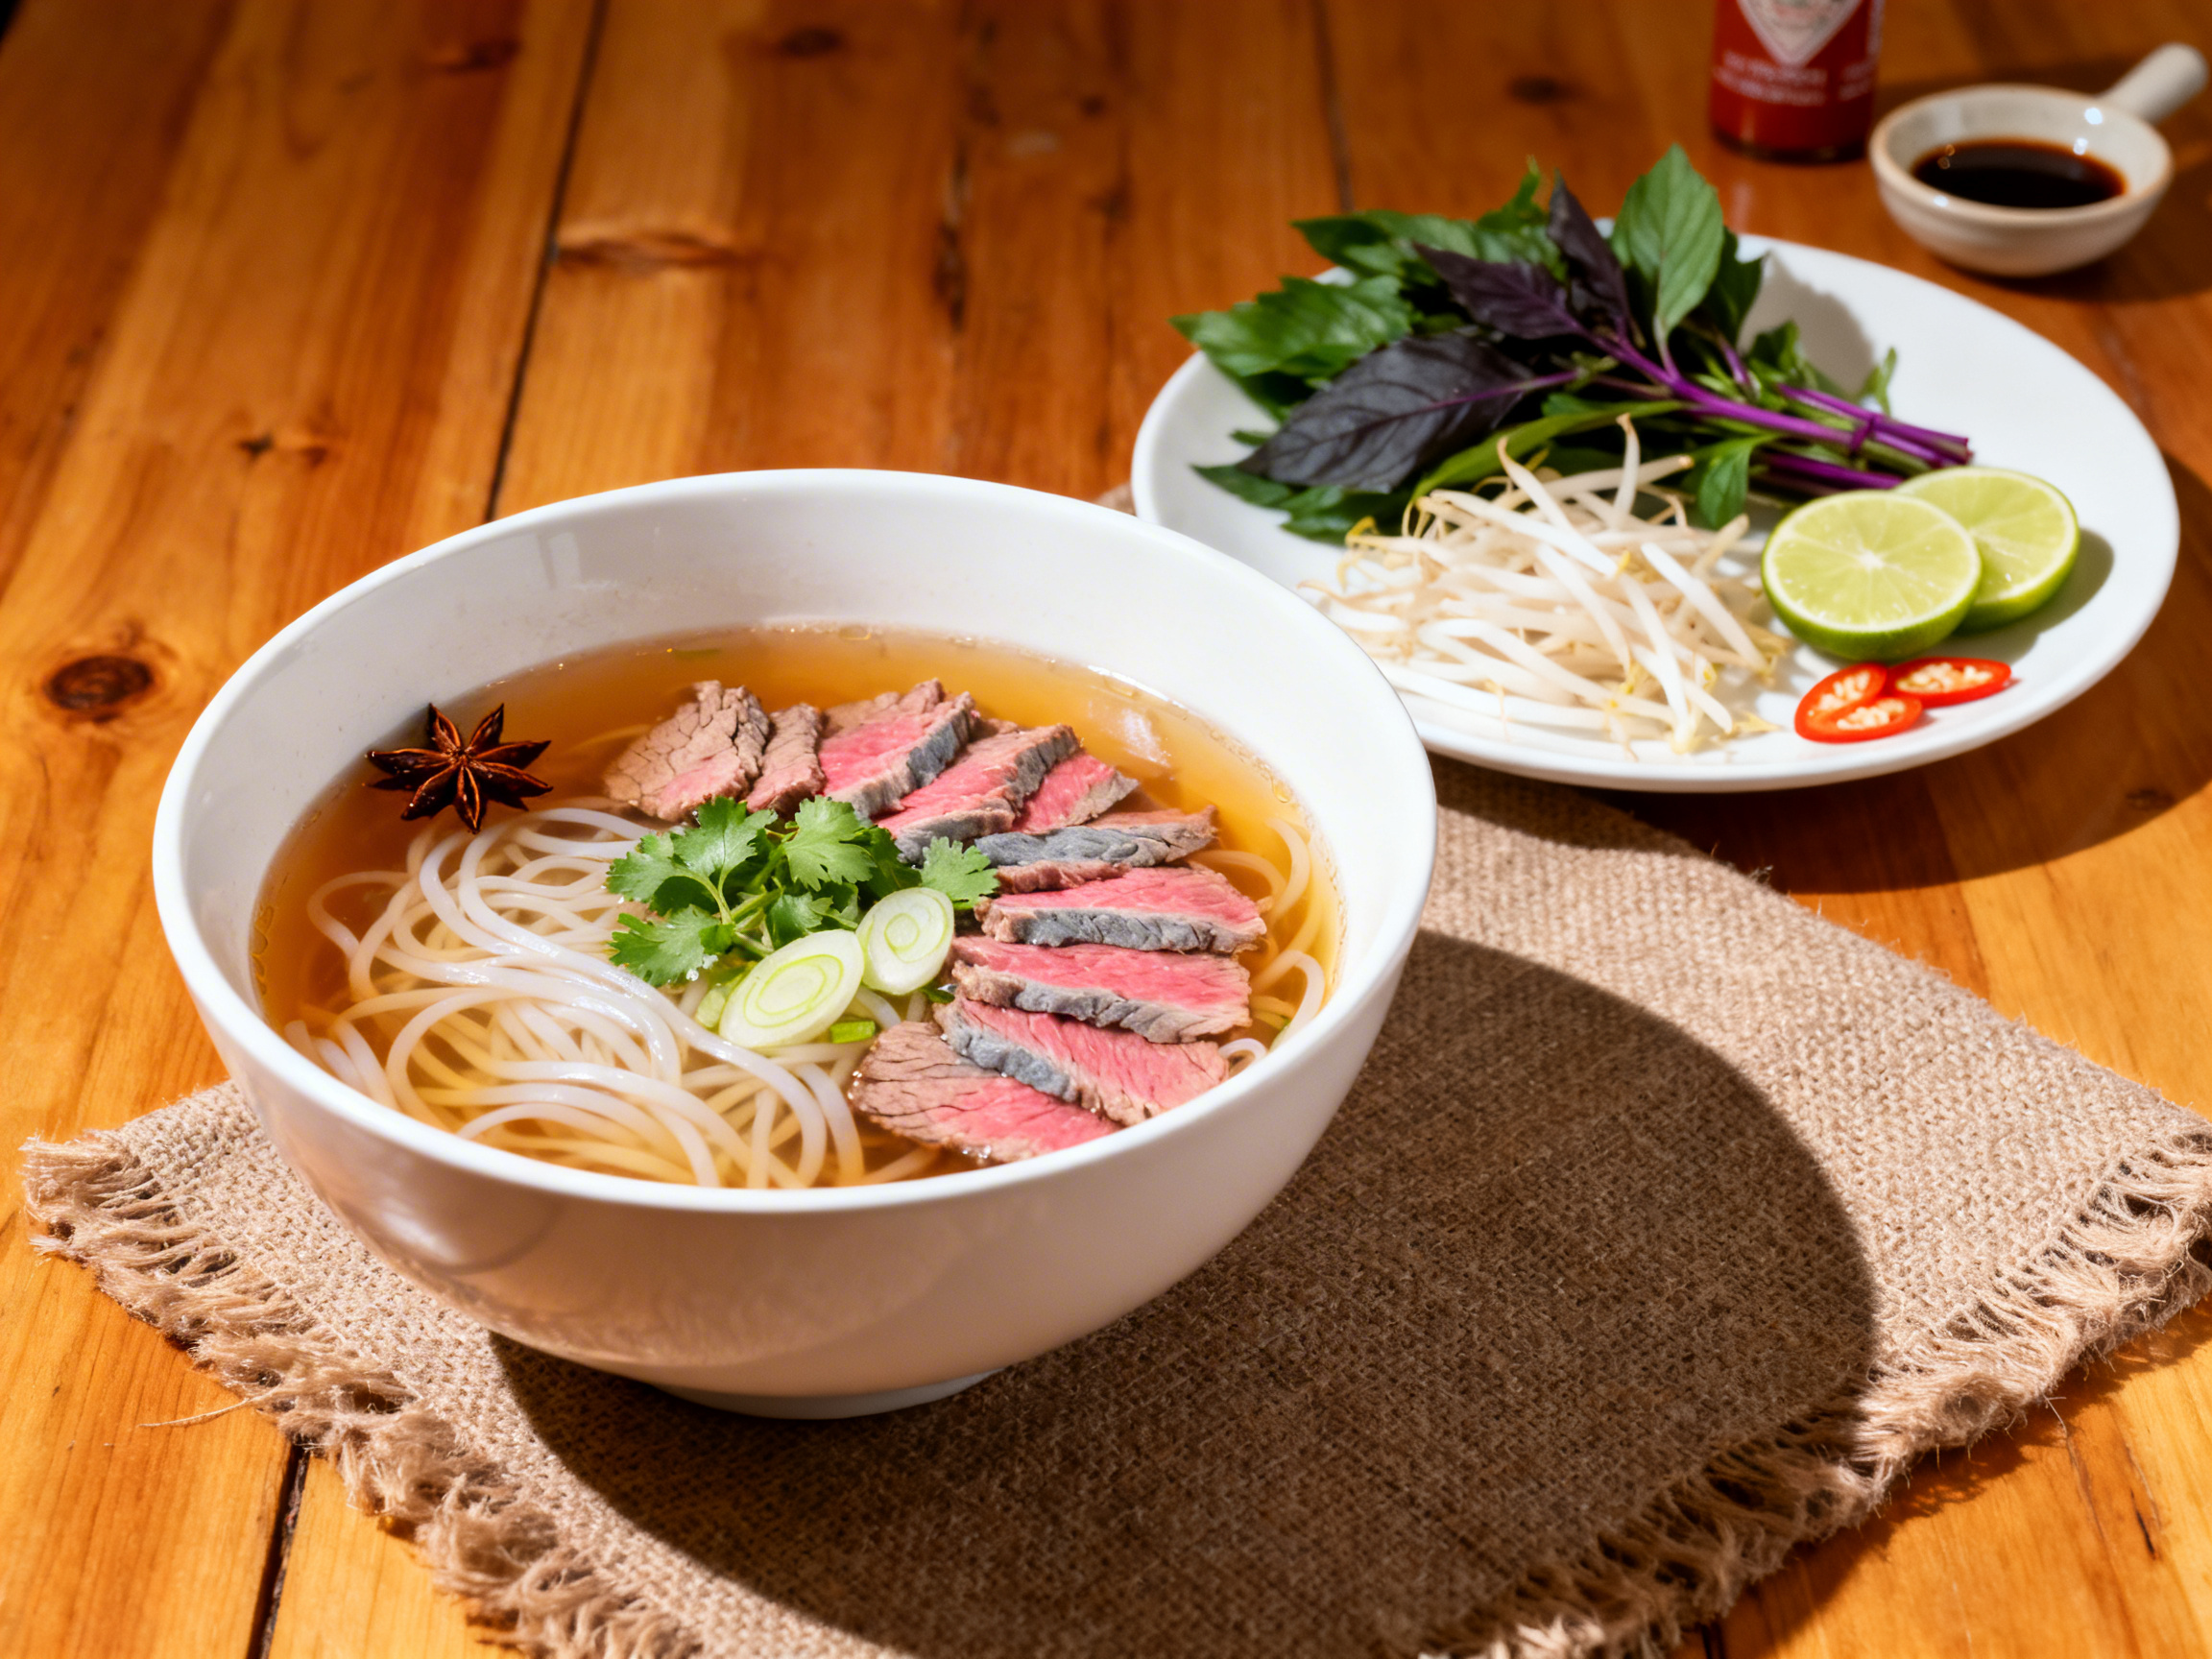
Ramen photography has the most unforgiving clock in noodle cuisine photography. From the moment a bowl of tonkotsu or shoyu ramen is placed on set, the countdown begins on three simultaneous processes. First, the noodles absorb broth and swell: within three minutes, ramen noodles in hot broth will noticeably change in texture and diameter, and within five minutes the broth surface that was clear enough to see through becomes a cloudy suspension of starch. Second, the steam rises intensely for the first 60 to 90 seconds and then reduces to invisible wisps - so your steam shots must be captured in the opening minute. Third, toppings like the soft-boiled egg, nori sheet, and bamboo shoots begin to settle into the broth surface. This three-minute window means your entire shooting setup - frame, focus, light - must be locked before the bowl arrives. Do your dry run with a bowl of hot water and stand-in props. For the chopstick lift shot, practice the motion on the stand-in so you know the camera angle, the lift height, and the focal point before the real noodles are in front of you. Pho and other Vietnamese noodle dishes have a slightly longer window because the broth is clearer and the noodles (rice vermicelli) absorb more slowly, but the same prep-before-plating discipline applies.
Best Lighting for Ramen & Noodles Photography
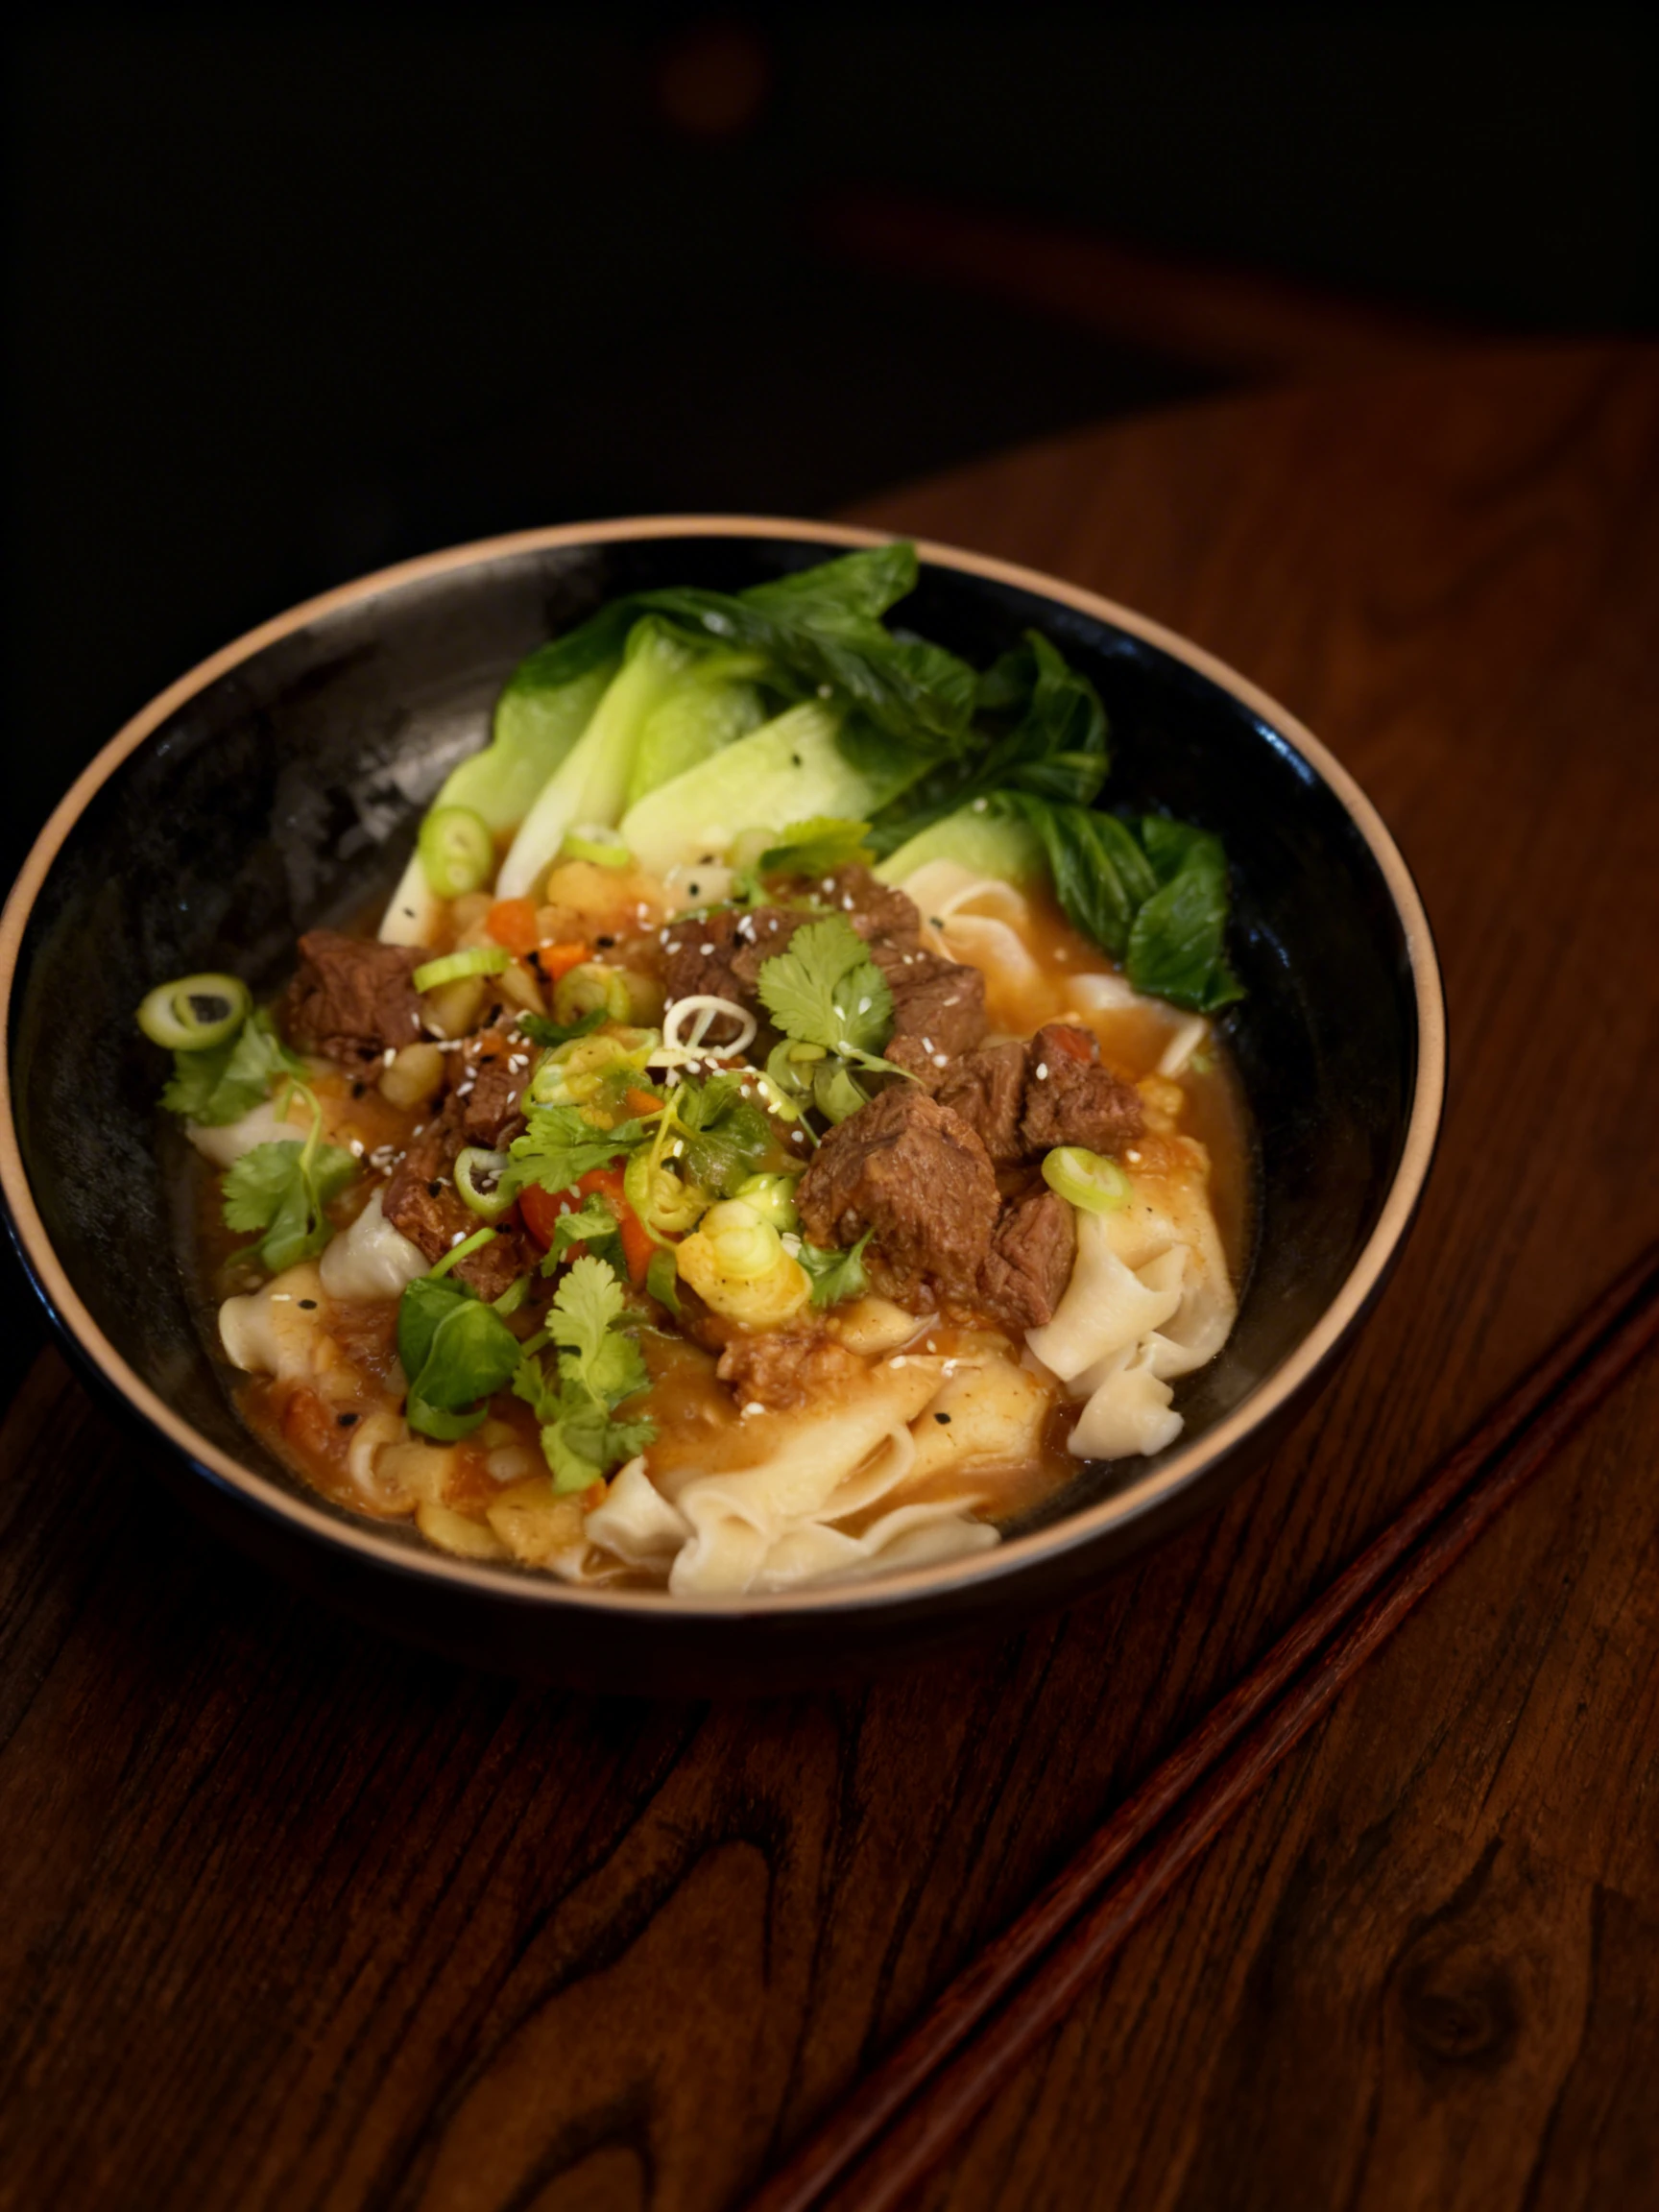
The signature lighting setup for ramen photography is side-backlighting - a light source positioned behind and to one side of the bowl, aimed at roughly 45 degrees into the back of the frame. This placement does two things: it illuminates the steam wisps from behind, making them visible as golden or white plumes against the darker background; and it creates a rim-lit glow on the broth surface that signals richness and warmth. Use a warm light source for the backlight - a tungsten-balanced LED panel at 3,200 to 3,500K or a standard tungsten source - because warm light complements the amber, brown, and ivory tones of most ramen broths. A cool daylight backlight on a tonkotsu bowl creates a grey, clinical look that is inconsistent with the dish's identity. Position a secondary soft fill light - a medium softbox at 60 centimeters wide - on the front-left of the bowl to illuminate the toppings facing the camera. Without front fill, the camera-facing surfaces of toppings like the halved egg, nori, and chashu pork will fall into deep shadow that reads as murky rather than atmospheric. Avoid overhead lighting as the primary source: it casts shadows directly into the depth of the bowl, hides the broth color, and eliminates the visual depth that makes a ramen bowl feel three-dimensional. For pad thai and dan dan noodles - drier dishes with less broth - a standard 45-degree window light from the left with a reflector card on the right is the correct setup; you do not need the backlit steam effect.
Camera Angles for Ramen & Noodles
Eye-level - with the camera lens at the exact height of the bowl's rim - is the definitive angle for ramen photography because it shows the full depth of the bowl: the noodles in the broth, the toppings floating above, and the steam rising beyond the rim. This angle communicates the experience of sitting in front of a bowl of ramen in a way that no overhead or elevated shot can. Position the camera so the far rim of the bowl is visible as a thin curve at the top of the frame; this reveals depth without adding too much background clutter. Elevate slightly to 15 to 20 degrees above the bowl rim if you want to show more of the topping arrangement, particularly when a beautifully arranged chashu slice, egg half, and nori sheet deserve to be seen from above. For the chopstick lift shot - noodles raised from the broth - shoot at eye level with the chopstick tips entering the frame from the top, the noodle mass mid-frame, and the bowl surface below. This creates a top-to-bottom journey the viewer's eye travels naturally. For flat noodle dishes like pad thai or dan dan noodles, a slightly elevated 30-degree angle from the front shows the sauce coating on the noodle strands more clearly than eye level. Overhead works only for a flat noodle dish where the entire composition is a top-down arrangement, such as a cold soba salad plated on a flat plate.
Food Styling and Props
Ramen styling starts with the topping placement sequence. Lay your toppings in a defined arrangement that creates color contrast across the surface: place the nori sheet vertically on the left side of the bowl where the camera can see its full face, position the soft-boiled egg halves cut-side up in the front-center where the yolk color is prominent, arrange chashu slices in a loose shingled fan, and place the bamboo shoots and green onion in contrasting clusters. The goal is to create a color map - dark nori, ivory egg white, orange yolk, pale chashu, bright green onion - that reads clearly from the camera angle. The chopstick lift shot requires the noodles to be arranged under the surface in a loose, untangled state: use long tweezers or a chopstick to create a loose coil before placing toppings. For the lift, insert chopsticks deep into the noodle mass, close gently, and raise slowly in a single smooth upward movement. Noodles that are tangled or matted will clump rather than cascade. For tsukemen (dipping noodles), the noodle portion in the separate plate or basket is the hero: arrange noodles in a controlled nest using two forks, and position the dipping broth bowl slightly behind and to the right. For pho, the fresh herb and condiment side plate - bean sprouts, Thai basil, lime wedges, chiles - deserves its own composition in the background frame, visible but not dominant.
Recommended props
Equipment Guide
For eye-level ramen shots, a 50mm to 85mm prime lens is the correct choice: it allows you to fill the frame from a natural, comfortable distance without the barrel distortion that a wide-angle lens would introduce into the round bowl shape. At f/2.8 to f/3.5, you get a shallow depth of field that keeps the front toppings in sharp focus while the back of the bowl and background blur softly, creating depth and atmosphere. A full-frame sensor handles the low-light, warm-tone shooting environment of ramen photography better than a crop sensor, particularly in the broth shadow areas. For the chopstick lift shot, use continuous autofocus if your camera supports it, or pre-focus at the height where the noodle mass will be mid-lift and switch to manual focus before the shot. Shoot burst at 3 to 5 frames per second to capture the peak moment. For the steam shots, set your shutter speed to 1/200 to 1/400 second - slower than this and steam wisps blur into a white veil; faster and they become sharp, frozen tendrils. A small LED panel on a low stand behind the bowl handles the backlight steam illumination. A 60-by-60-centimeter softbox on the front-left handles fill. A smoke machine or food-safe steam source (hot water in a cup hidden behind the bowl) is a legitimate food photography tool for reshoots when natural steam has dissipated.
Skip the photoshoot — enhance the ramen & noodles photos you already have
The techniques on this page take time to master. MenuPhotoAI applies the same lighting, color, and texture corrections — automatically — to the smartphone photos you already shot. Studio-quality results in 30 seconds.
Try free — 5 credits, no cardCommon Ramen & Noodles Photography Mistakes
Setting up the shot after the bowl arrives
Spending 60 to 90 seconds adjusting the camera angle, moving props, and checking the frame after the ramen bowl is placed means the steam window is already closing and the noodles are already bloating. Complete your entire setup - frame, focus, light, props - with a stand-in bowl of hot water. The real bowl should only ever be placed on a set that is completely ready to shoot.
Shooting from overhead with a deep ramen bowl
An overhead angle on a deep ramen bowl compresses all the visual depth into a flat disc. The broth, noodles, and toppings all appear at the same plane, and the bowl's depth - the very thing that makes ramen feel generous and hearty - disappears entirely. Eye-level or a maximum of 20 degrees above the rim is the correct angle for ramen; overhead only works for flat noodle dishes on shallow plates.
Using cool daylight light on a tonkotsu broth
Cool, blue-biased daylight light on a tonkotsu or miso ramen broth shifts the ivory and amber tones toward grey and blue, making a rich broth look watery and clinical. Tonkotsu specifically requires warm light - 3,000 to 3,500K - to make the creamy broth look unctuous and appealing. Reserve cool light for cold noodle dishes like zaru soba or cold ramen where the chill is part of the visual message.
Matted, tangled noodles in the chopstick lift
A chopstick lift shot where the noodles form a dense, matted clump rather than a flowing cascade looks heavy and unappetizing. Before placing toppings, use long chopsticks or a fork to loosen the noodle mass under the broth surface into a loose, airy coil. The lift should produce long individual strands cascading down rather than a brick of pasta.
Letting the soft-boiled egg sink below the broth surface
The halved soft-boiled egg - with its jammy, vivid orange yolk - is often the visual hero of a ramen composition. If it sinks into the broth or tilts yolk-down, the shot loses its most compelling color element. Use a small piece of noodle or a thin bamboo skewer hidden beneath the egg to prop it at the correct angle, cut-side facing the camera, yolk fully visible.
Editing Tips
Ramen editing is primarily about broth color and steam visibility. Broth color - the amber of shoyu, the ivory of tonkotsu, the deep brown of a rich miso - should look rich and saturated without appearing artificially colored. In the HSL panel, boost orange saturation by 10 to 15 points for tonkotsu broths and pull yellow toward orange for shoyu. For steam, increase the local contrast around the steam area using a graduated filter or brush with clarity at plus 20 to 25 - this brings out the wisp definition without brightening the surrounding background. Pull highlights down on the broth surface to avoid the bright window-glare look. Lift shadows to reveal topping detail in the dark parts of the bowl. Warmth at plus 200 to 300K in white balance adds the atmospheric quality that makes ramen feel like a satisfying winter bowl. MenuPhotoAI can apply dish-specific tone profiles that target broth color richness and steam definition simultaneously.
Platform-Specific Tips
On Instagram and TikTok, the chopstick lift video is the highest-performing ramen content format - it consistently generates saves and shares because it demonstrates the noodle texture and the sauce coating in a single motion. For static images, a tight eye-level shot with visible steam against a dark background is the platform's preferred ramen aesthetic. For DoorDash and Uber Eats listings, use a well-lit overhead or slight-elevation shot with all toppings clearly visible; avoid the dark, atmospheric setups that read as premium on Instagram but lose definition in small thumbnail formats. Delivery platforms reward clarity: the customer needs to identify every topping at a glance. For print menus, a full-page eye-level lifestyle shot with atmospheric side-backlighting, visible steam, and carefully arranged toppings is the strongest format - this is where the full ramen experience translates best to print at high resolution. For Google Business photos, a clean bright overhead showing the topping arrangement works best for driving direct clicks. MenuPhotoAI can auto-export the same base image optimized for each platform's specific aspect ratio and brightness requirements.
Ramen & Noodles Photo Examples
Real ramen & noodles photos from restaurants using MenuPhotoAI. Tap any category to see the full gallery and the before-and-after view.
Take your Ramen & Noodles photos further with AI
Once you have a solid shot using the techniques above, MenuPhotoAI can handle the finishing work. Our AI removes distracting backgrounds, corrects exposure and white balance, and applies cuisine-appropriate color grading — turning a good smartphone photo into something you'd be proud to put on your menu or delivery app listing. Start with 5 free photos, no credit card required.
Frequently Asked Questions
Skip the photoshoot — enhance the ramen & noodles photos you already have
The techniques on this page take time to master. MenuPhotoAI applies the same lighting, color, and texture corrections — automatically — to the smartphone photos you already shot. Studio-quality results in 30 seconds.
Try free — 5 credits, no cardMore Cuisine Photography Guides
This guide reflects best practices for Ramen & Noodles food photography as of 2026. Techniques may vary based on specific dishes, equipment, and shooting conditions. MenuPhotoAI is an AI food photo enhancement platform.