Photography Guide
Japanese & Sushi Food Photography Guide
Sushi rice dries and loses its sheen within 10 to 12 minutes, and raw fish begins to oxidize and dull even faster under studio lighting.
Primary Angle
45-degree
Lighting
Soft diffused light from 45° left, no overhead direct light
Read time
~8 min
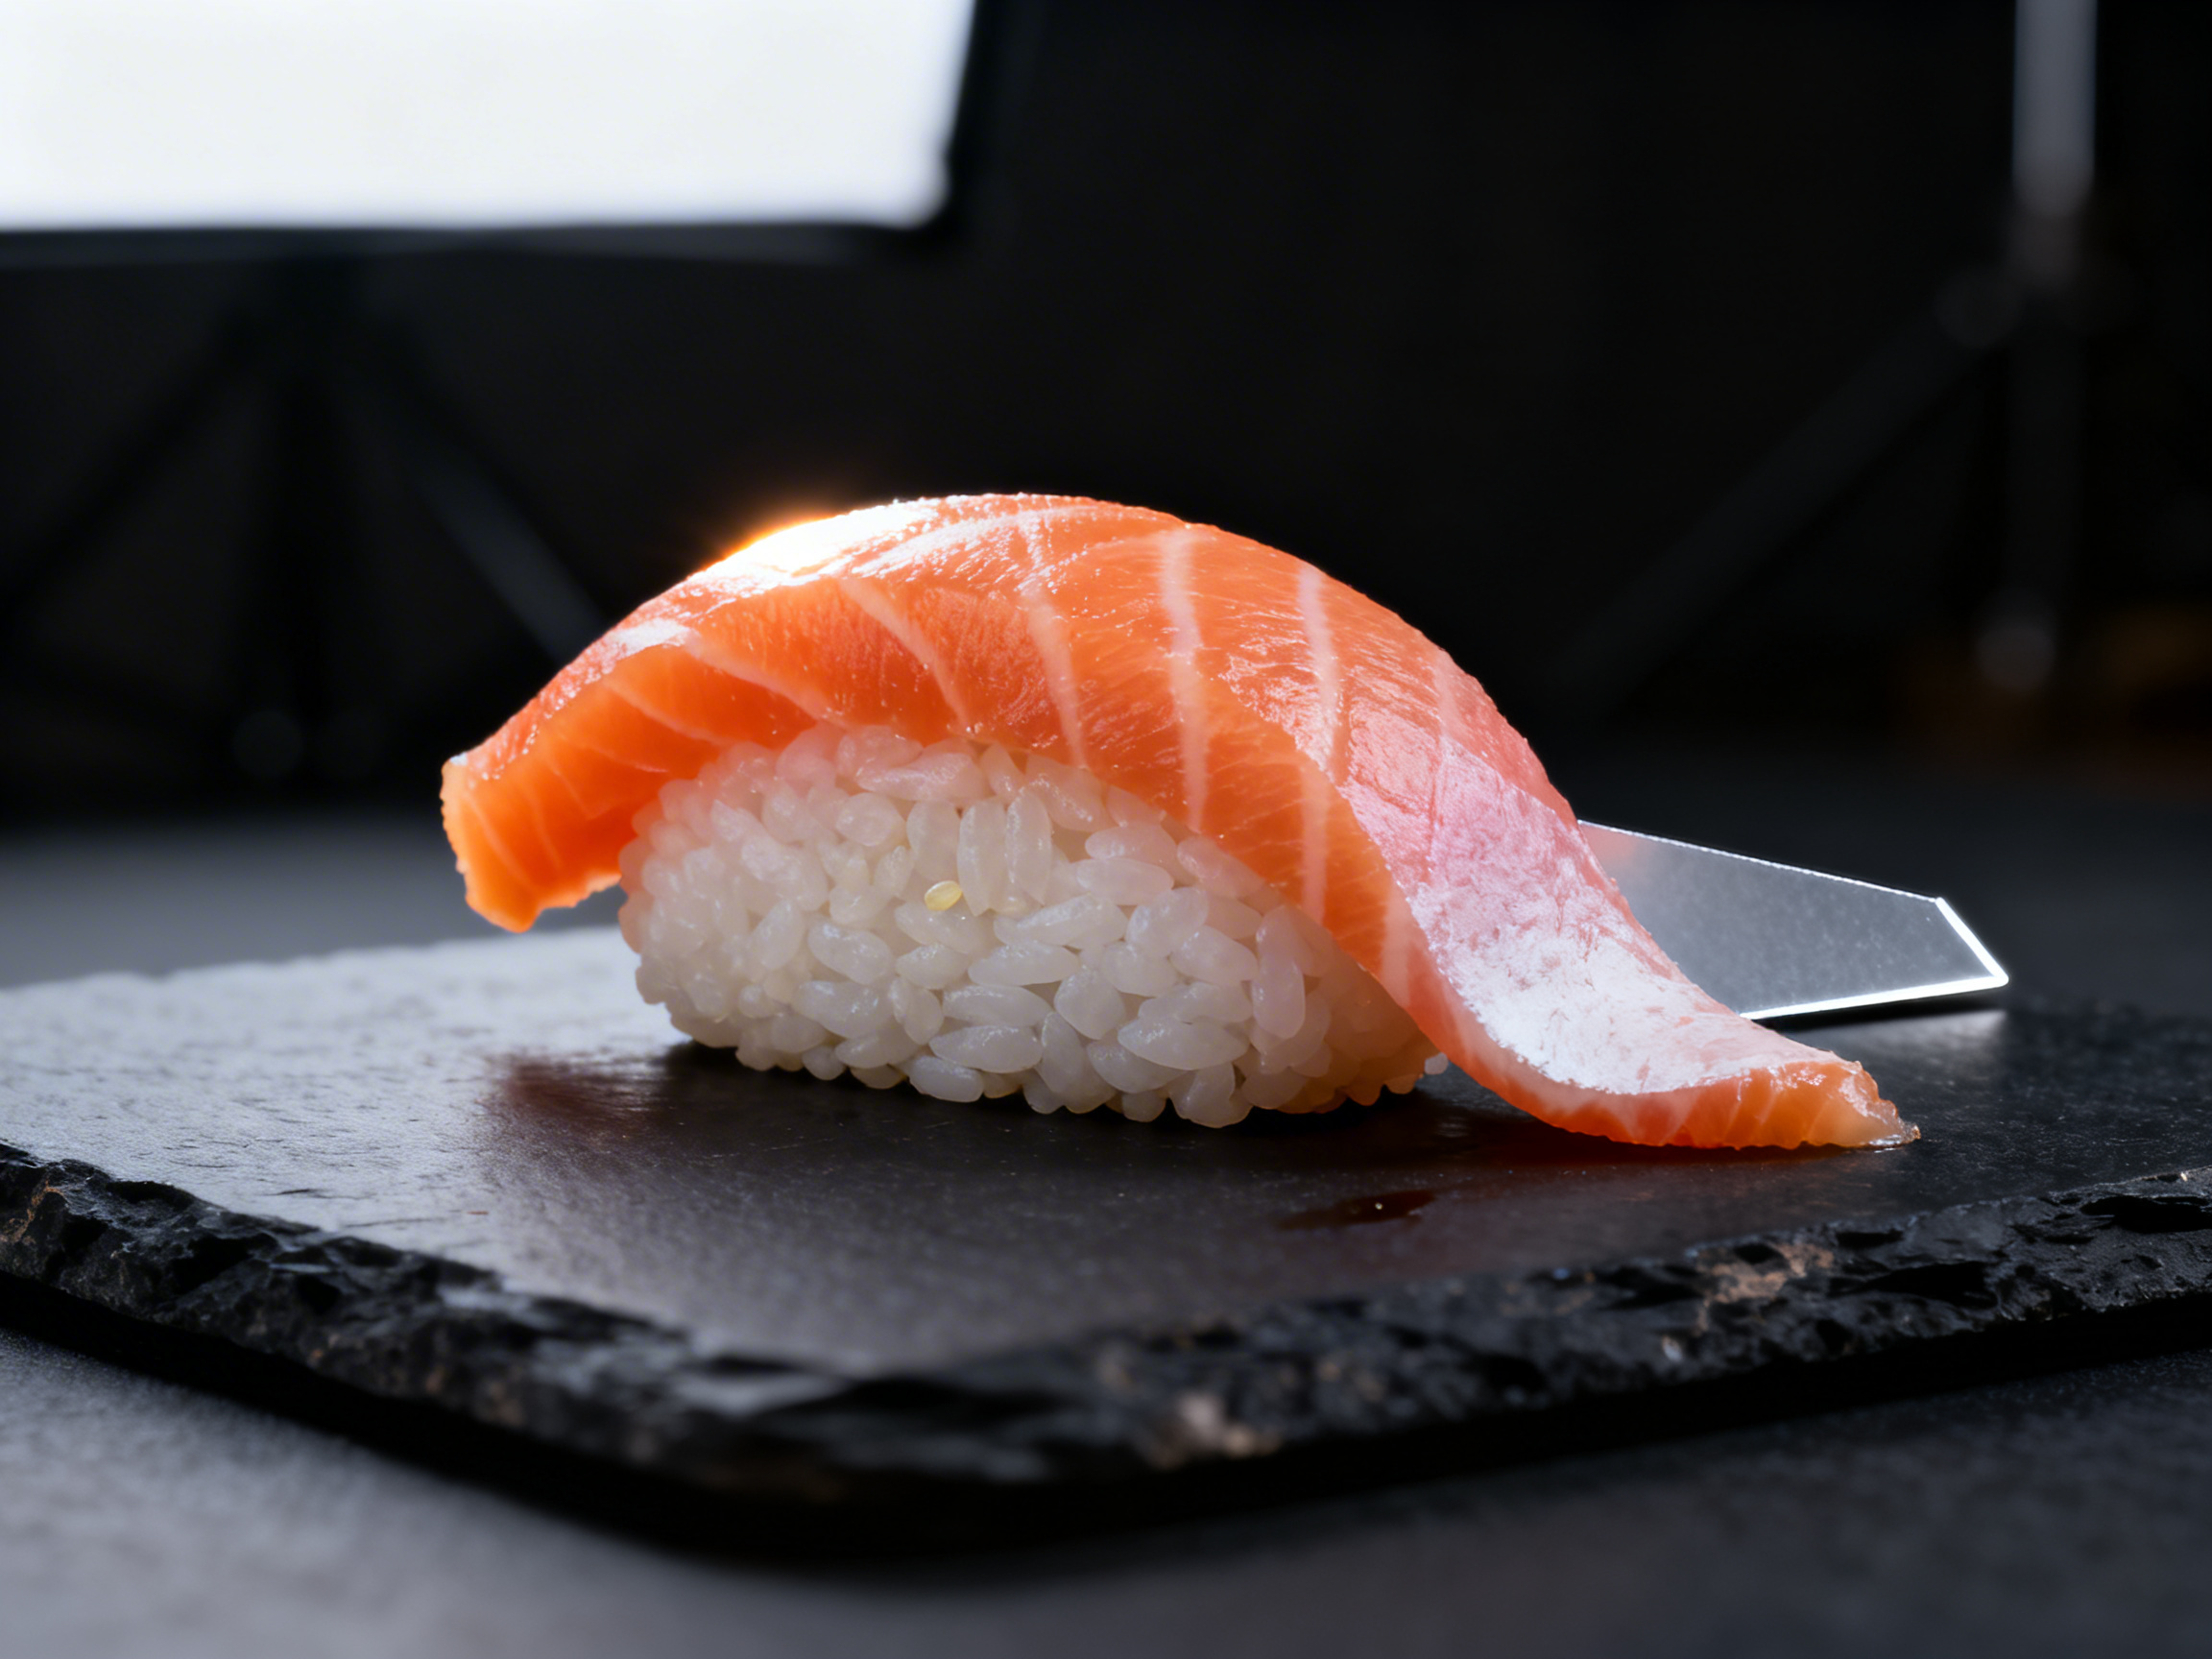
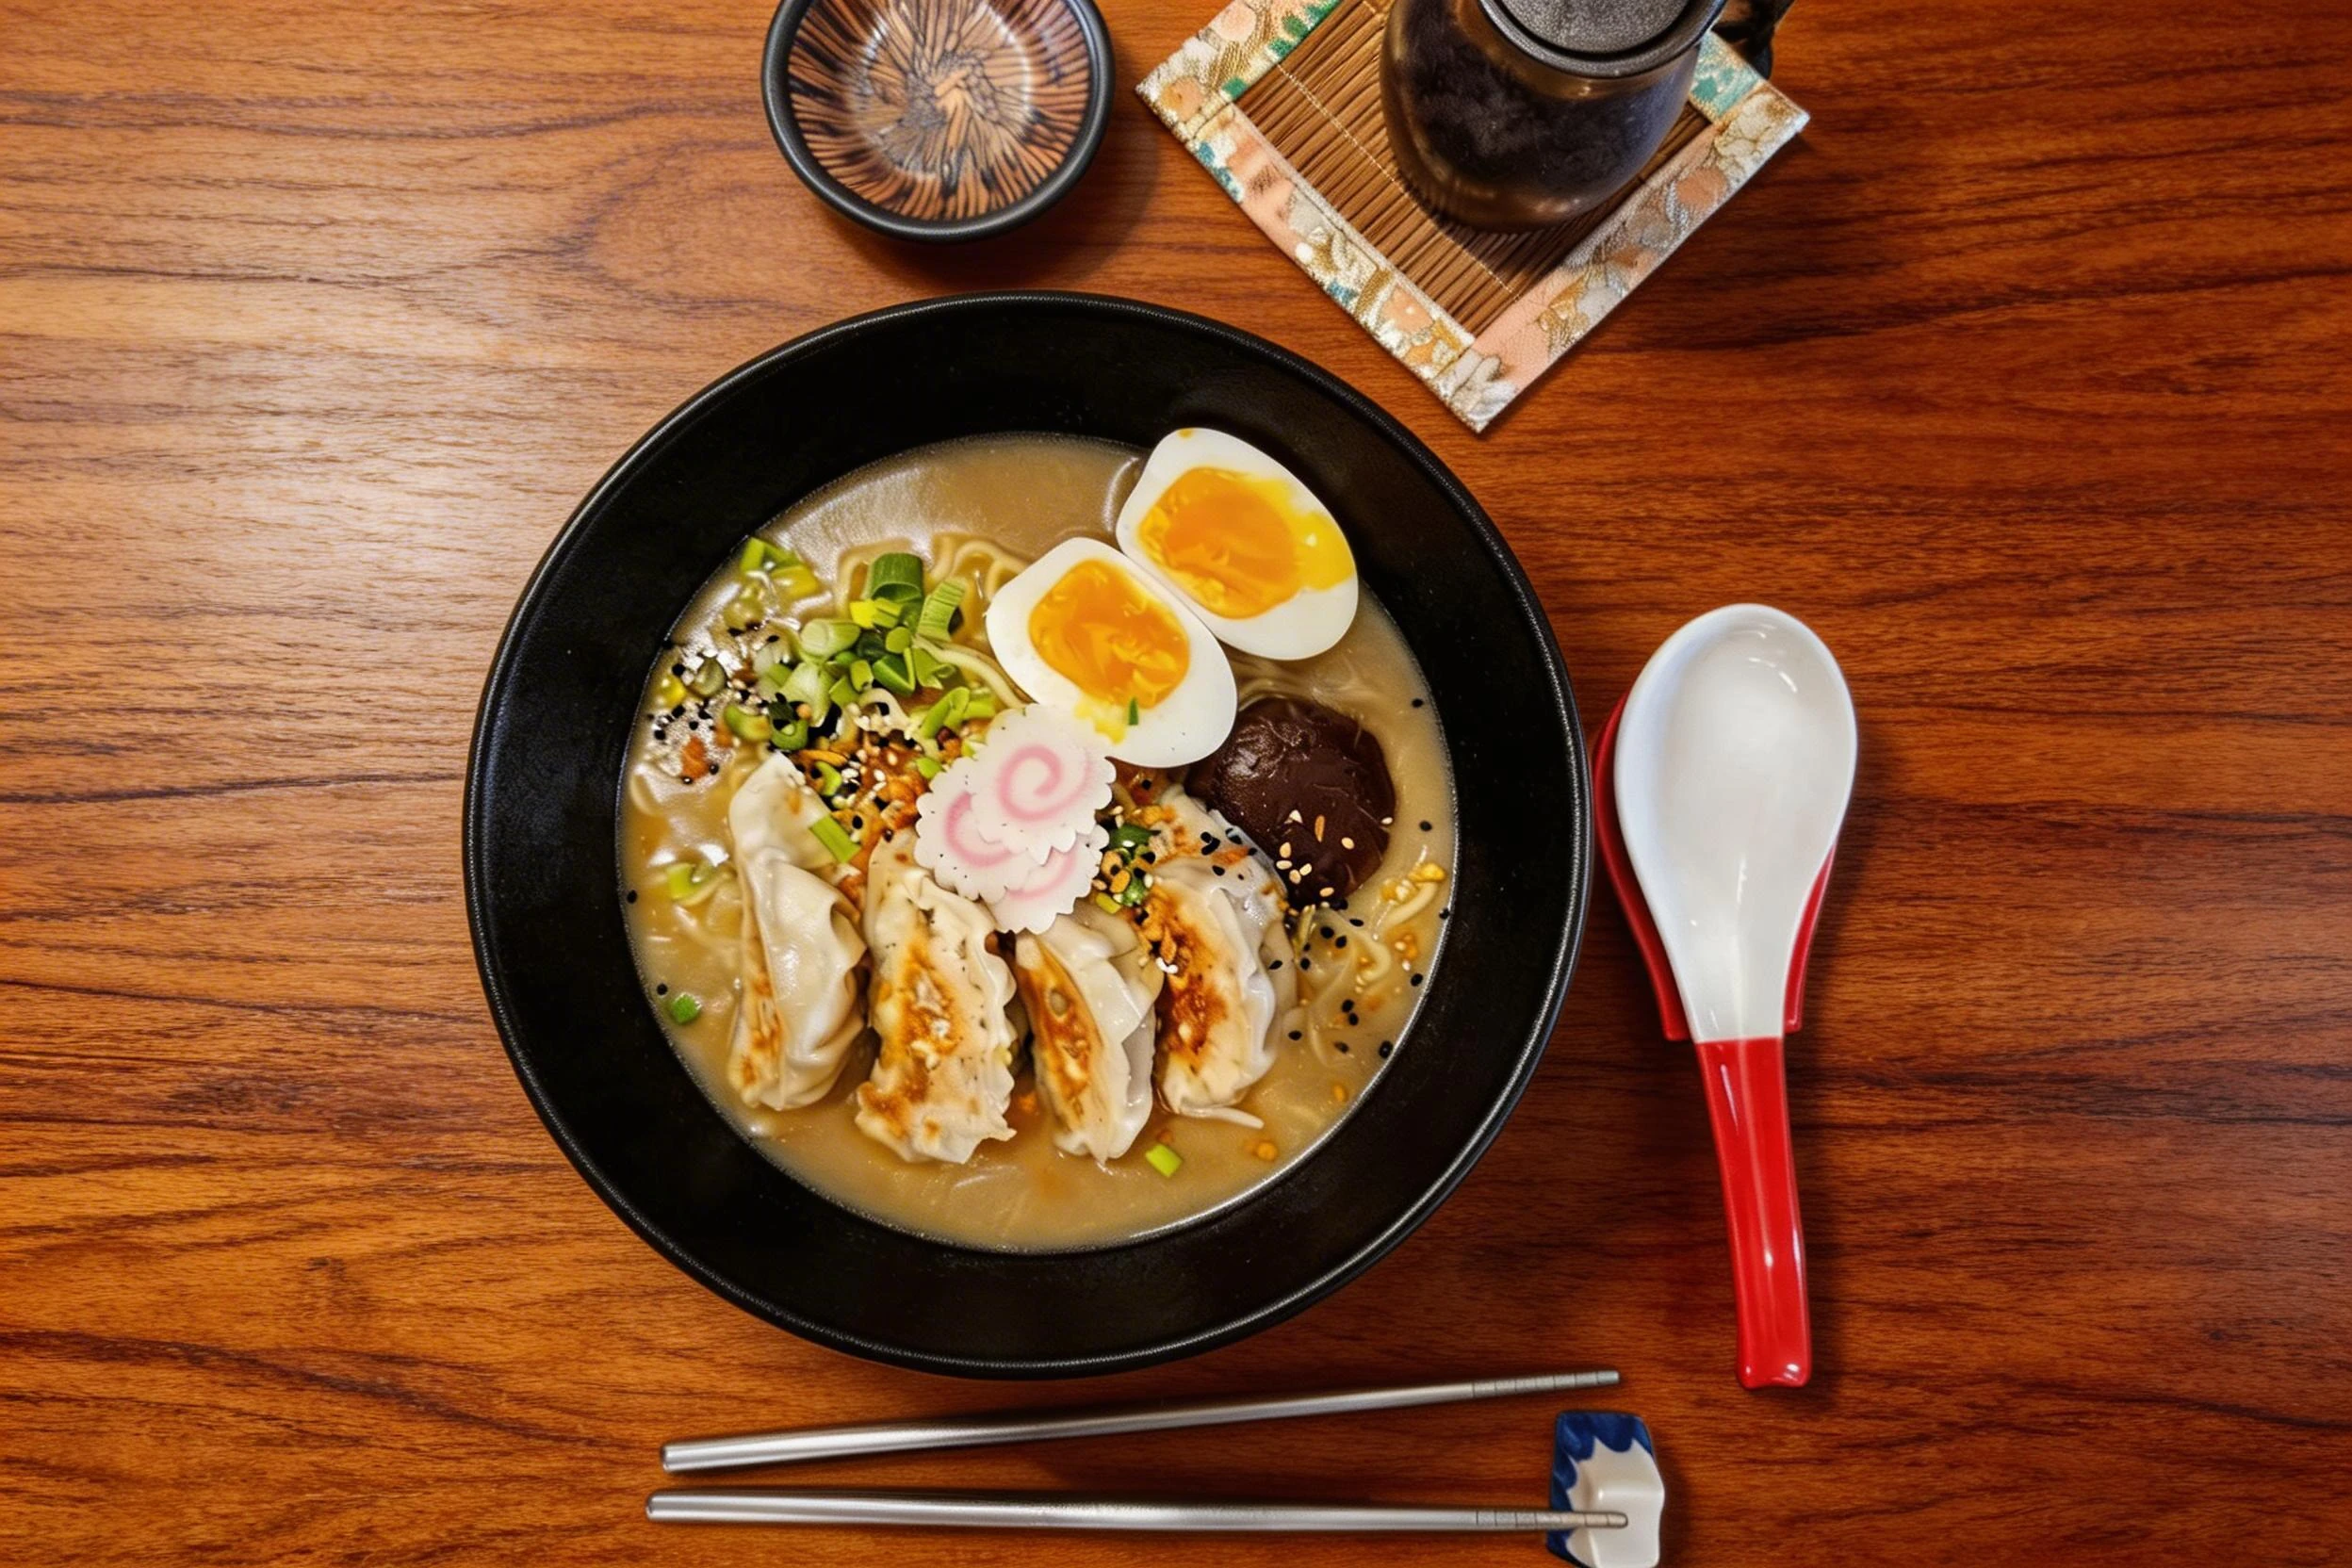
Sushi food photography is defined by restraint and precision - two qualities that also define the cuisine itself. A single salmon nigiri, photographed correctly, can communicate freshness, craft, and luxury in a single still image. But photographing sushi well is technically demanding: the ingredients are delicate, the time window is narrow, and the wrong light can make pristine otoro look grey and unappetizing within minutes. The core challenge is that sushi lives and dies by its appearance of freshness. Sushi rice that has dried even slightly loses the reflective sheen that signals it was just pressed. Fish that has been under hot studio lights for more than five or six minutes begins to oxidize at the surface, shifting from vibrant salmon-orange or tuna-crimson to a dull, washed-out version of itself. This guide covers the exact techniques professional food photographers use when shooting nigiri platters, maki cross-sections, sashimi arrangements, and omakase presentations - so your sushi photos read as fresh, precise, and premium from the first glance.
What Makes Japanese & Sushi Challenging to Photograph
The narrowest time window in sushi photography is the rice-shine problem. Freshly pressed shari - the vinegared rice beneath nigiri - has a gentle gloss from the rice starch and the slight moisture of the vinegar seasoning. Under any kind of heat, including studio lighting, that surface dries within 10 to 12 minutes and the shine disappears, leaving the rice looking sandy and old. The fish on top oxidizes even faster: salmon nigiri placed under a 500-watt modeling light will begin to show surface color change within five to six minutes. This means your entire shooting setup - camera angle, lens focus point, frame composition, and prop arrangement - must be finalized before the sushi arrives on set. Do your dry run with stand-in pieces. A second challenge is condensation on cold ingredients. Sashimi served on a bed of ice or a chilled slate plate will develop moisture droplets on the fish surface within two minutes of leaving the refrigerator in a warm room. A few droplets on a cucumber garnish are acceptable and even attractive; condensation beads on a tuna slice read as wet and unappetizing. Shoot cold preparations in a cool room if possible, and work quickly.
Best Lighting for Japanese & Sushi Photography
The correct light for sushi photography is soft, diffused, and directional - never hard and never directly overhead. Hard overhead light creates hot spots on the fish surface that destroy the subtle color variations that signal fish quality: the gradient from deep red to pink on a tuna slice, the marbling of an otoro piece, the iridescent sheen of a yellowtail slab. Position a large softbox or diffusion panel - at minimum 60 by 90 centimeters - at the 45-degree left position relative to the sushi, with the bottom of the light panel level with the top of the platter. This sends light across the surface at an angle that reveals the texture of the rice grains, illuminates the fish color from the side, and creates a soft shadow to the right that adds dimensionality. Place a small white reflector card on the right side to open shadows without adding a second light source. For a nigiri close-up, you can use a small silver reflector on the right to add a defined specular highlight along the top ridge of the fish slice - this creates a three-dimensional arc that signals freshness and delicacy. Avoid tungsten or very warm light sources: raw fish under warm light shifts toward orange and looks cooked rather than fresh. Aim for a neutral to slightly cool daylight white balance, 5,000 to 5,500K.

Camera Angles for Japanese & Sushi
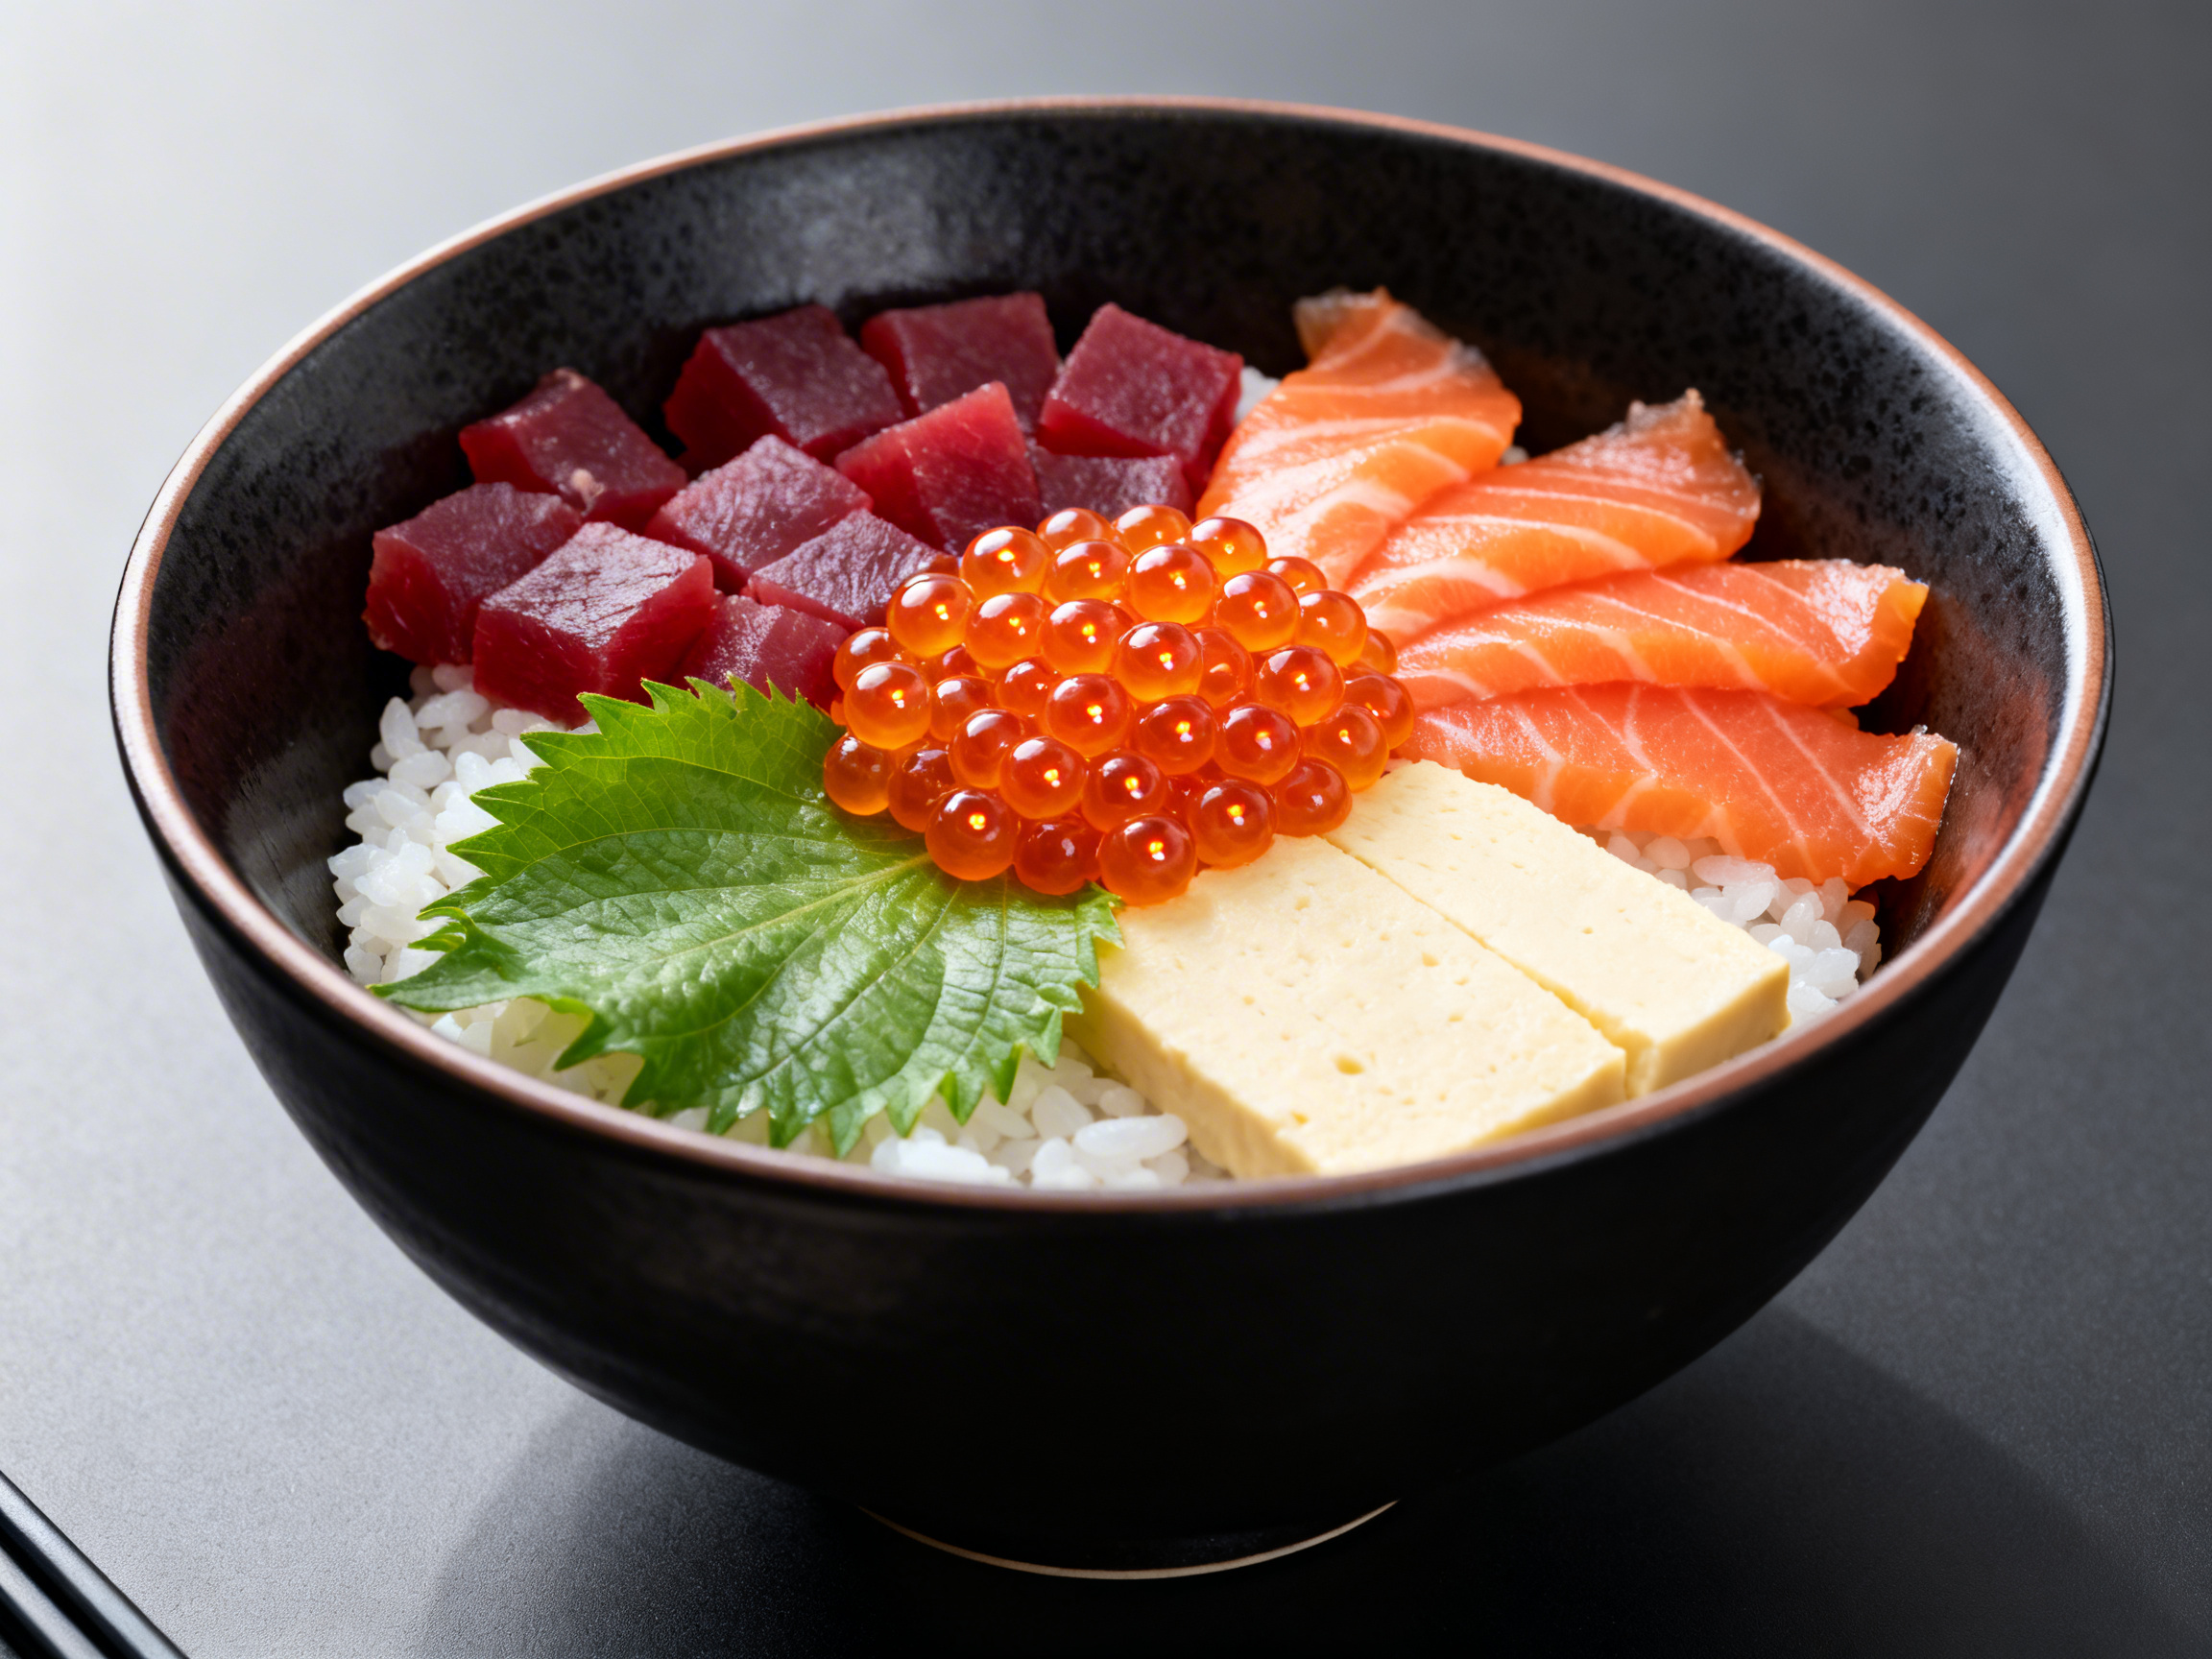
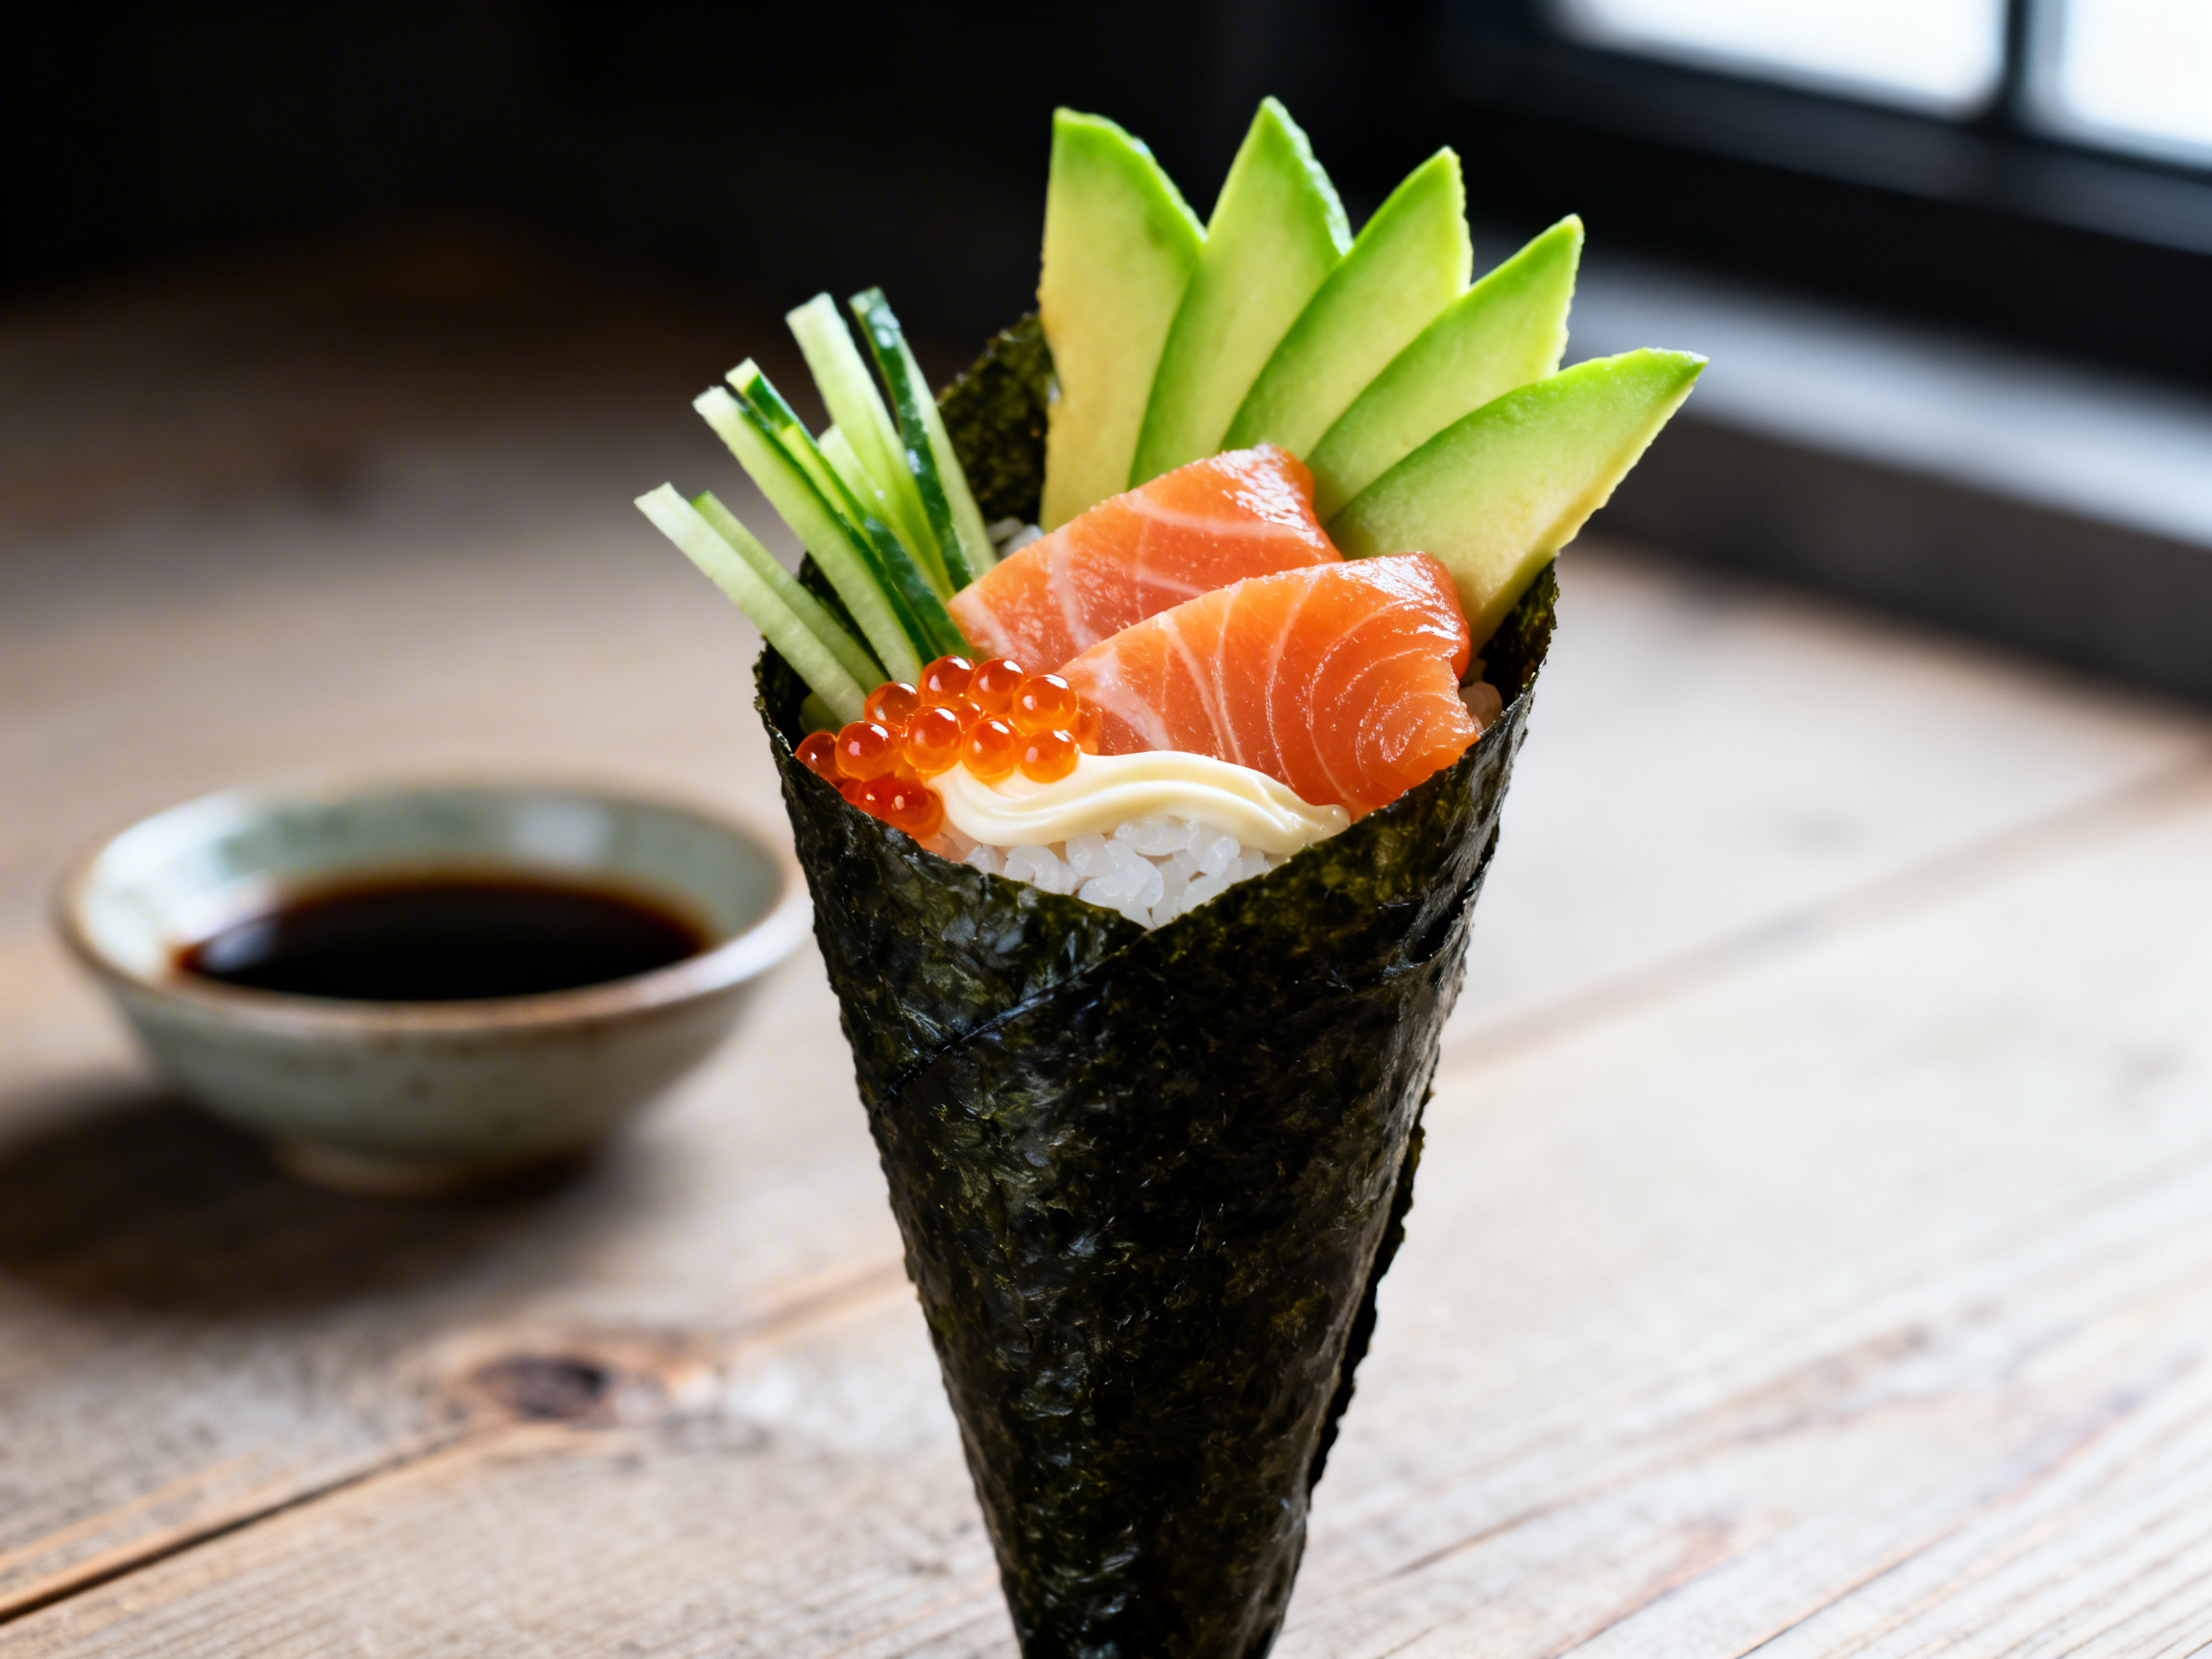
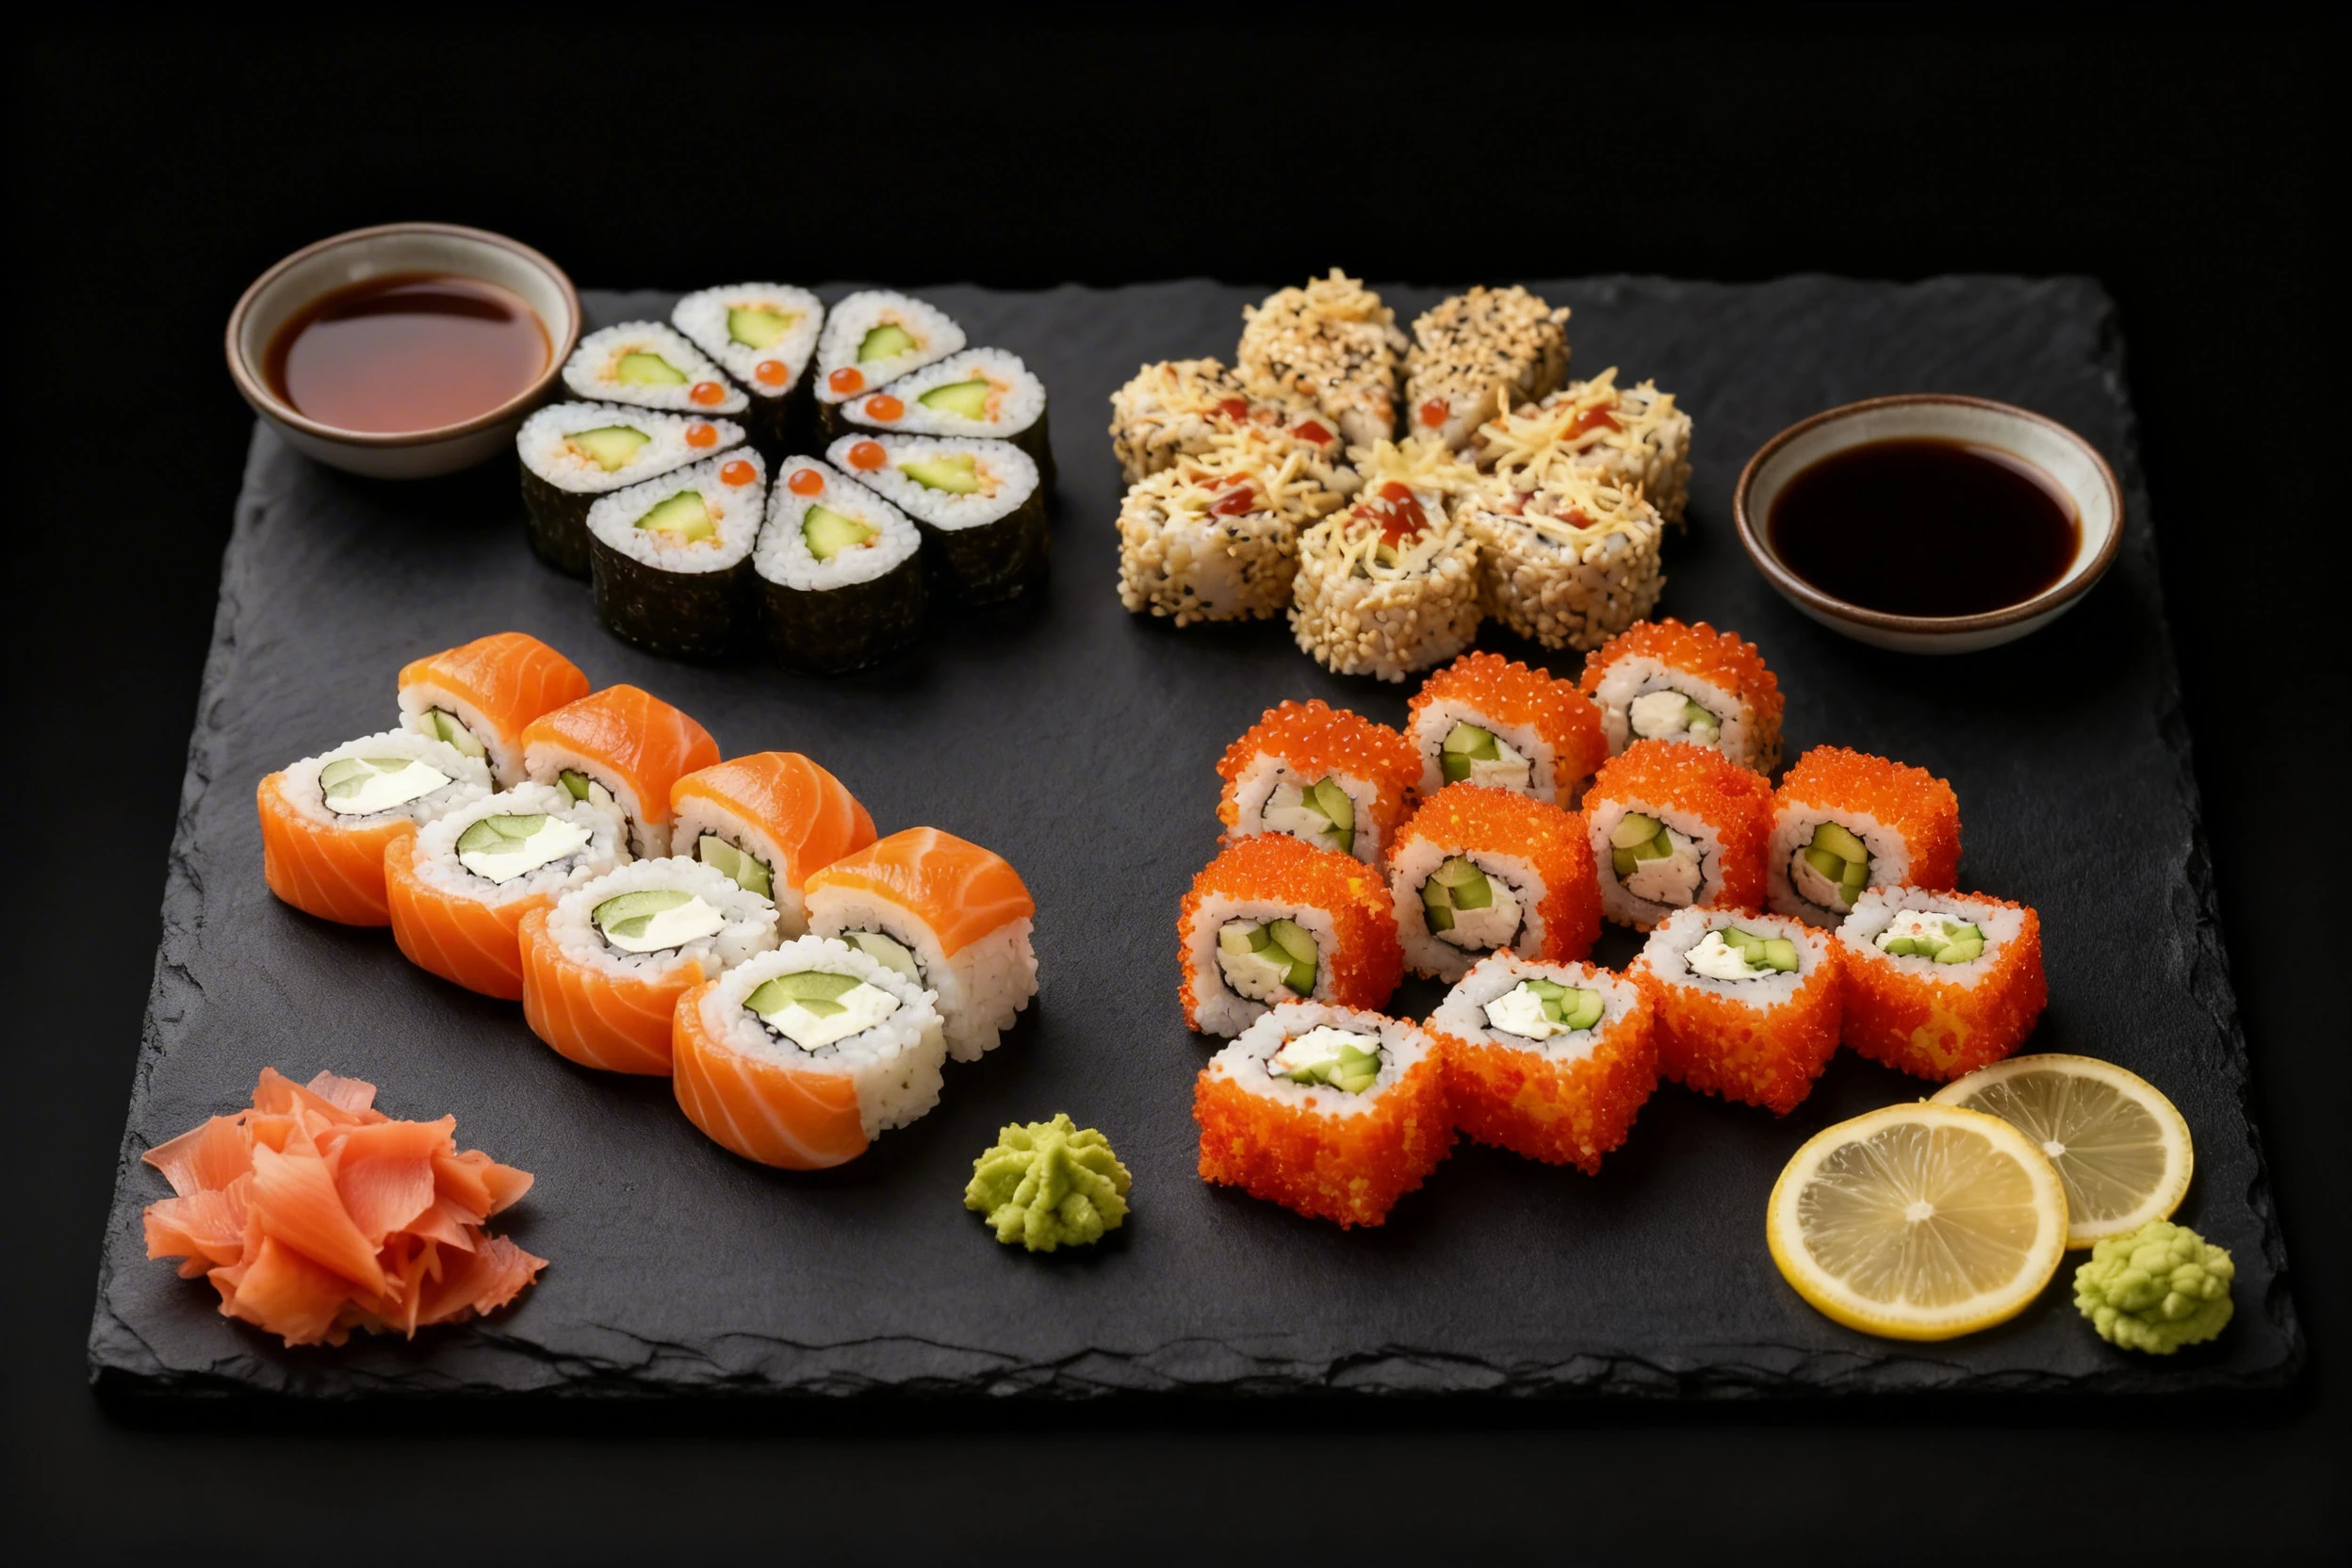
Nigiri - the pillar of most sushi menus - photographs best at a 45-degree angle from the front, slightly elevated. This angle shows the fish draping over the rice mound from above while also revealing the cylindrical shape of the pressed rice beneath. Shoot at the level of the top edge of the rice: this is the height where the fish slope, the neta-to-shari ratio, and any garnish like a wasabi smear or a thin ginger slice are all simultaneously visible. For maki rolls, the most revealing angle depends on what you want to show. A cross-section cut of a California roll or a spicy tuna maki - with the interior fillings exposed - shoots strongest from directly overhead, where the concentric ring pattern of nori, rice, and filling is fully visible. Intact maki logs shoot at 35 to 45 degrees to show the length and the tightly rolled structure. For an omakase platter or chirashi bowl, use a 30-to-35-degree angle: high enough to show the full arrangement without compressing items at the back, low enough to see the height of taller pieces. For temaki hand rolls, a straight-on eye-level shot shows the cone shape and the ingredients spilling from the top - the most appetizing angle for this format.
Food Styling and Props
Sushi styling is about the arrangement communicating precision and abundance simultaneously. For a nigiri lineup - say, five or seven pieces in a row - present them in a slight arc rather than a straight line, as a curve reads as more natural and less rigid. Space each piece so the rice bases are not quite touching; this prevents them from looking crammed and allows light to separate each piece individually. For the omakase platter, the chef's arrangement is usually the best starting point - work with it rather than rearranging, and use the photography to document it faithfully. Add only one or two controlled props: a ceramic soy sauce dish filled to just below the rim, a small mound of pale pink pickled ginger fanned at one edge, and a formed wasabi mound placed deliberately off-center rather than squashed flat. On the slate or dark stone plate, a smear of soy sauce applied with a pastry brush creates a subtle dark streak that provides contrast against the pale rice without overwhelming the composition. Bamboo chopstick rests with chopsticks placed parallel and slightly apart are a strong compositional prop for negative space to one side of the frame. For chirashi bowls, the top surface arrangement is the entire story: place premium ingredients - ikura pearls, tuna cubes, shiso leaves - at the geometric center and build outward in color-contrasting clusters.
Recommended props
Equipment Guide
Sushi photography rewards the use of a macro or short-telephoto lens more than almost any other cuisine because the details - the translucency of a uni slice, the marbling lines in otoro, the texture of rice grain surfaces - are the visual signals of quality. A 100mm macro lens at f/4 to f/5.6 lets you focus on the fish surface of a single nigiri piece while rendering the rice and background in gentle, non-distracting blur. For full platters, a 50mm prime at f/4 to f/5.6 keeps more of the arrangement in acceptable focus. A full-frame sensor captures the color depth of raw fish more faithfully than a crop-sensor camera, particularly in the reds and pinks. For lighting hardware, a 60-by-90-centimeter softbox with a front diffusion panel is the correct main light. A small silver reflector card - 30 by 40 centimeters - handles fill. For close-up nigiri shots, a Lastolite TriFlector or three small foam cards arranged around a single piece creates even, wrapped light that eliminates hot spots on fish skin. A focus rail is useful for macro shots where even small camera movements shift the focal plane off the leading edge of the fish. Shoot at ISO 100 to 400 and use a cable release or two-second timer to eliminate camera shake.
Skip the photoshoot — enhance the japanese & sushi photos you already have
The techniques on this page take time to master. MenuPhotoAI applies the same lighting, color, and texture corrections — automatically — to the smartphone photos you already shot. Studio-quality results in 30 seconds.
Try free — 5 credits, no cardCommon Japanese & Sushi Photography Mistakes
Shooting under warm tungsten lighting
Warm tungsten or amber restaurant lighting shifts raw fish from fresh-looking salmon-pink and tuna-crimson to an orange-yellow that reads as old or cooked. Always correct to a neutral 5,000 to 5,500K daylight white balance when shooting sushi. If you must shoot under tungsten restaurant lighting, use a custom white balance measured on a white card in the actual light, and correct further in post.
Letting the rice dry under studio lights
Setting up your shot after the sushi arrives means the rice is already drying while you adjust props and reframe. Finalize your entire composition, lighting, and prop placement with stand-in plates before the real sushi arrives. Once the actual platter is placed, you have 10 minutes at most before the rice sheen disappears and the shot is lost.
Using overhead direct light on fish
A direct overhead light source creates a flat hot spot on the top surface of each nigiri piece that washes out the color variation and translucency that signals fish quality. Soft 45-degree side light reveals marbling, gradient color, and surface sheen. The only overhead angle that works for sushi is a cross-section maki shot where the interior rings, not the fish surface, are the subject.
Overcrowding the plate in the composition
Sushi restaurants often present elaborate platters, but photographing the entire platter from close range compresses all the pieces together and loses the negative space that makes individual pieces legible. Either pull back to a wider angle to show the full platter with breathing room, or move in tight on three to five hero pieces and let the rest blur out of focus in the background.
Ignoring condensation on chilled fish
Sashimi plated on a chilled stone or ice surface develops visible condensation droplets on fish surfaces within two to three minutes in a warm room. Small droplets on garnishes are fine; beading on the fish itself reads as wet and unappetizing. Shoot in the coolest room available and work within the first two minutes of plating. A light blot with a clean paper towel on specific droplet spots immediately before shooting is acceptable.
Editing Tips
Sushi editing is conservative by necessity: the goal is to make raw fish look as fresh and naturally colored as possible, not to push vibrance or saturation. White balance is the most critical edit - if the image is even slightly warm, fish reads as cooked or old. Set the white balance to the grey of the slate plate or the white of the ginger garnish. In the HSL panel, boost red saturation by 5 to 8 points for tuna and salmon, and pull yellow back by 5 points if the rice looks golden rather than white. Highlights should be pulled down substantially on fish surfaces to recover surface translucency detail; shadows lifted slightly to reveal rice grain texture. Clarity at plus 8 to 12 adds micro-contrast without creating an over-processed look. MenuPhotoAI's AI enhancement applies food-specific color calibration to sushi images, accurately restoring the natural salmon-orange and tuna-crimson tones that warm restaurant lighting routinely distorts.
Platform-Specific Tips
On Instagram, sushi performs strongest as an overhead maki cross-section or a close-crop nigiri detail shot - both are visually precise formats that reward the high-resolution mobile display. A rainbow roll overhead or an omakase platter lifestyle shot at 35 degrees generates strong save rates for the aspirational, premium audience. On TikTok, the preparation and plating process - the chef pressing nigiri, slicing sashimi, torching aburi - outperforms static images significantly; if you can capture any motion element, prioritize it. For DoorDash and Uber Eats, use a clean overhead of the full platter against a neutral background for your hero listing image. Avoid dark slate plates on delivery platforms - the dark-on-dark look that reads as premium in restaurant photography compresses badly in small thumbnail formats. Use a white or very light background for delivery app images. For print menus, a 45-degree nigiri lineup or a full omakase platter at 30 degrees with atmospheric side lighting is the strongest format. Export at 300 DPI CMYK for accurate fish color reproduction. MenuPhotoAI can adjust the same base image for each platform's specific requirements automatically.
Japanese & Sushi Photo Examples
Real japanese & sushi photos from restaurants using MenuPhotoAI. Tap any category to see the full gallery and the before-and-after view.
Take your Japanese & Sushi photos further with AI
Once you have a solid shot using the techniques above, MenuPhotoAI can handle the finishing work. Our AI removes distracting backgrounds, corrects exposure and white balance, and applies cuisine-appropriate color grading — turning a good smartphone photo into something you'd be proud to put on your menu or delivery app listing. Start with 5 free photos, no credit card required.
Frequently Asked Questions
Skip the photoshoot — enhance the japanese & sushi photos you already have
The techniques on this page take time to master. MenuPhotoAI applies the same lighting, color, and texture corrections — automatically — to the smartphone photos you already shot. Studio-quality results in 30 seconds.
Try free — 5 credits, no cardMore Cuisine Photography Guides
This guide reflects best practices for Japanese & Sushi food photography as of 2026. Techniques may vary based on specific dishes, equipment, and shooting conditions. MenuPhotoAI is an AI food photo enhancement platform.