Photography Guide
Poke Bowls Food Photography Guide
Achieving distinct topping sections while preventing avocado browning within the 5-minute window.
Primary Angle
Overhead
Lighting
Bright overhead natural light with neutral white balance
Read time
~8 min
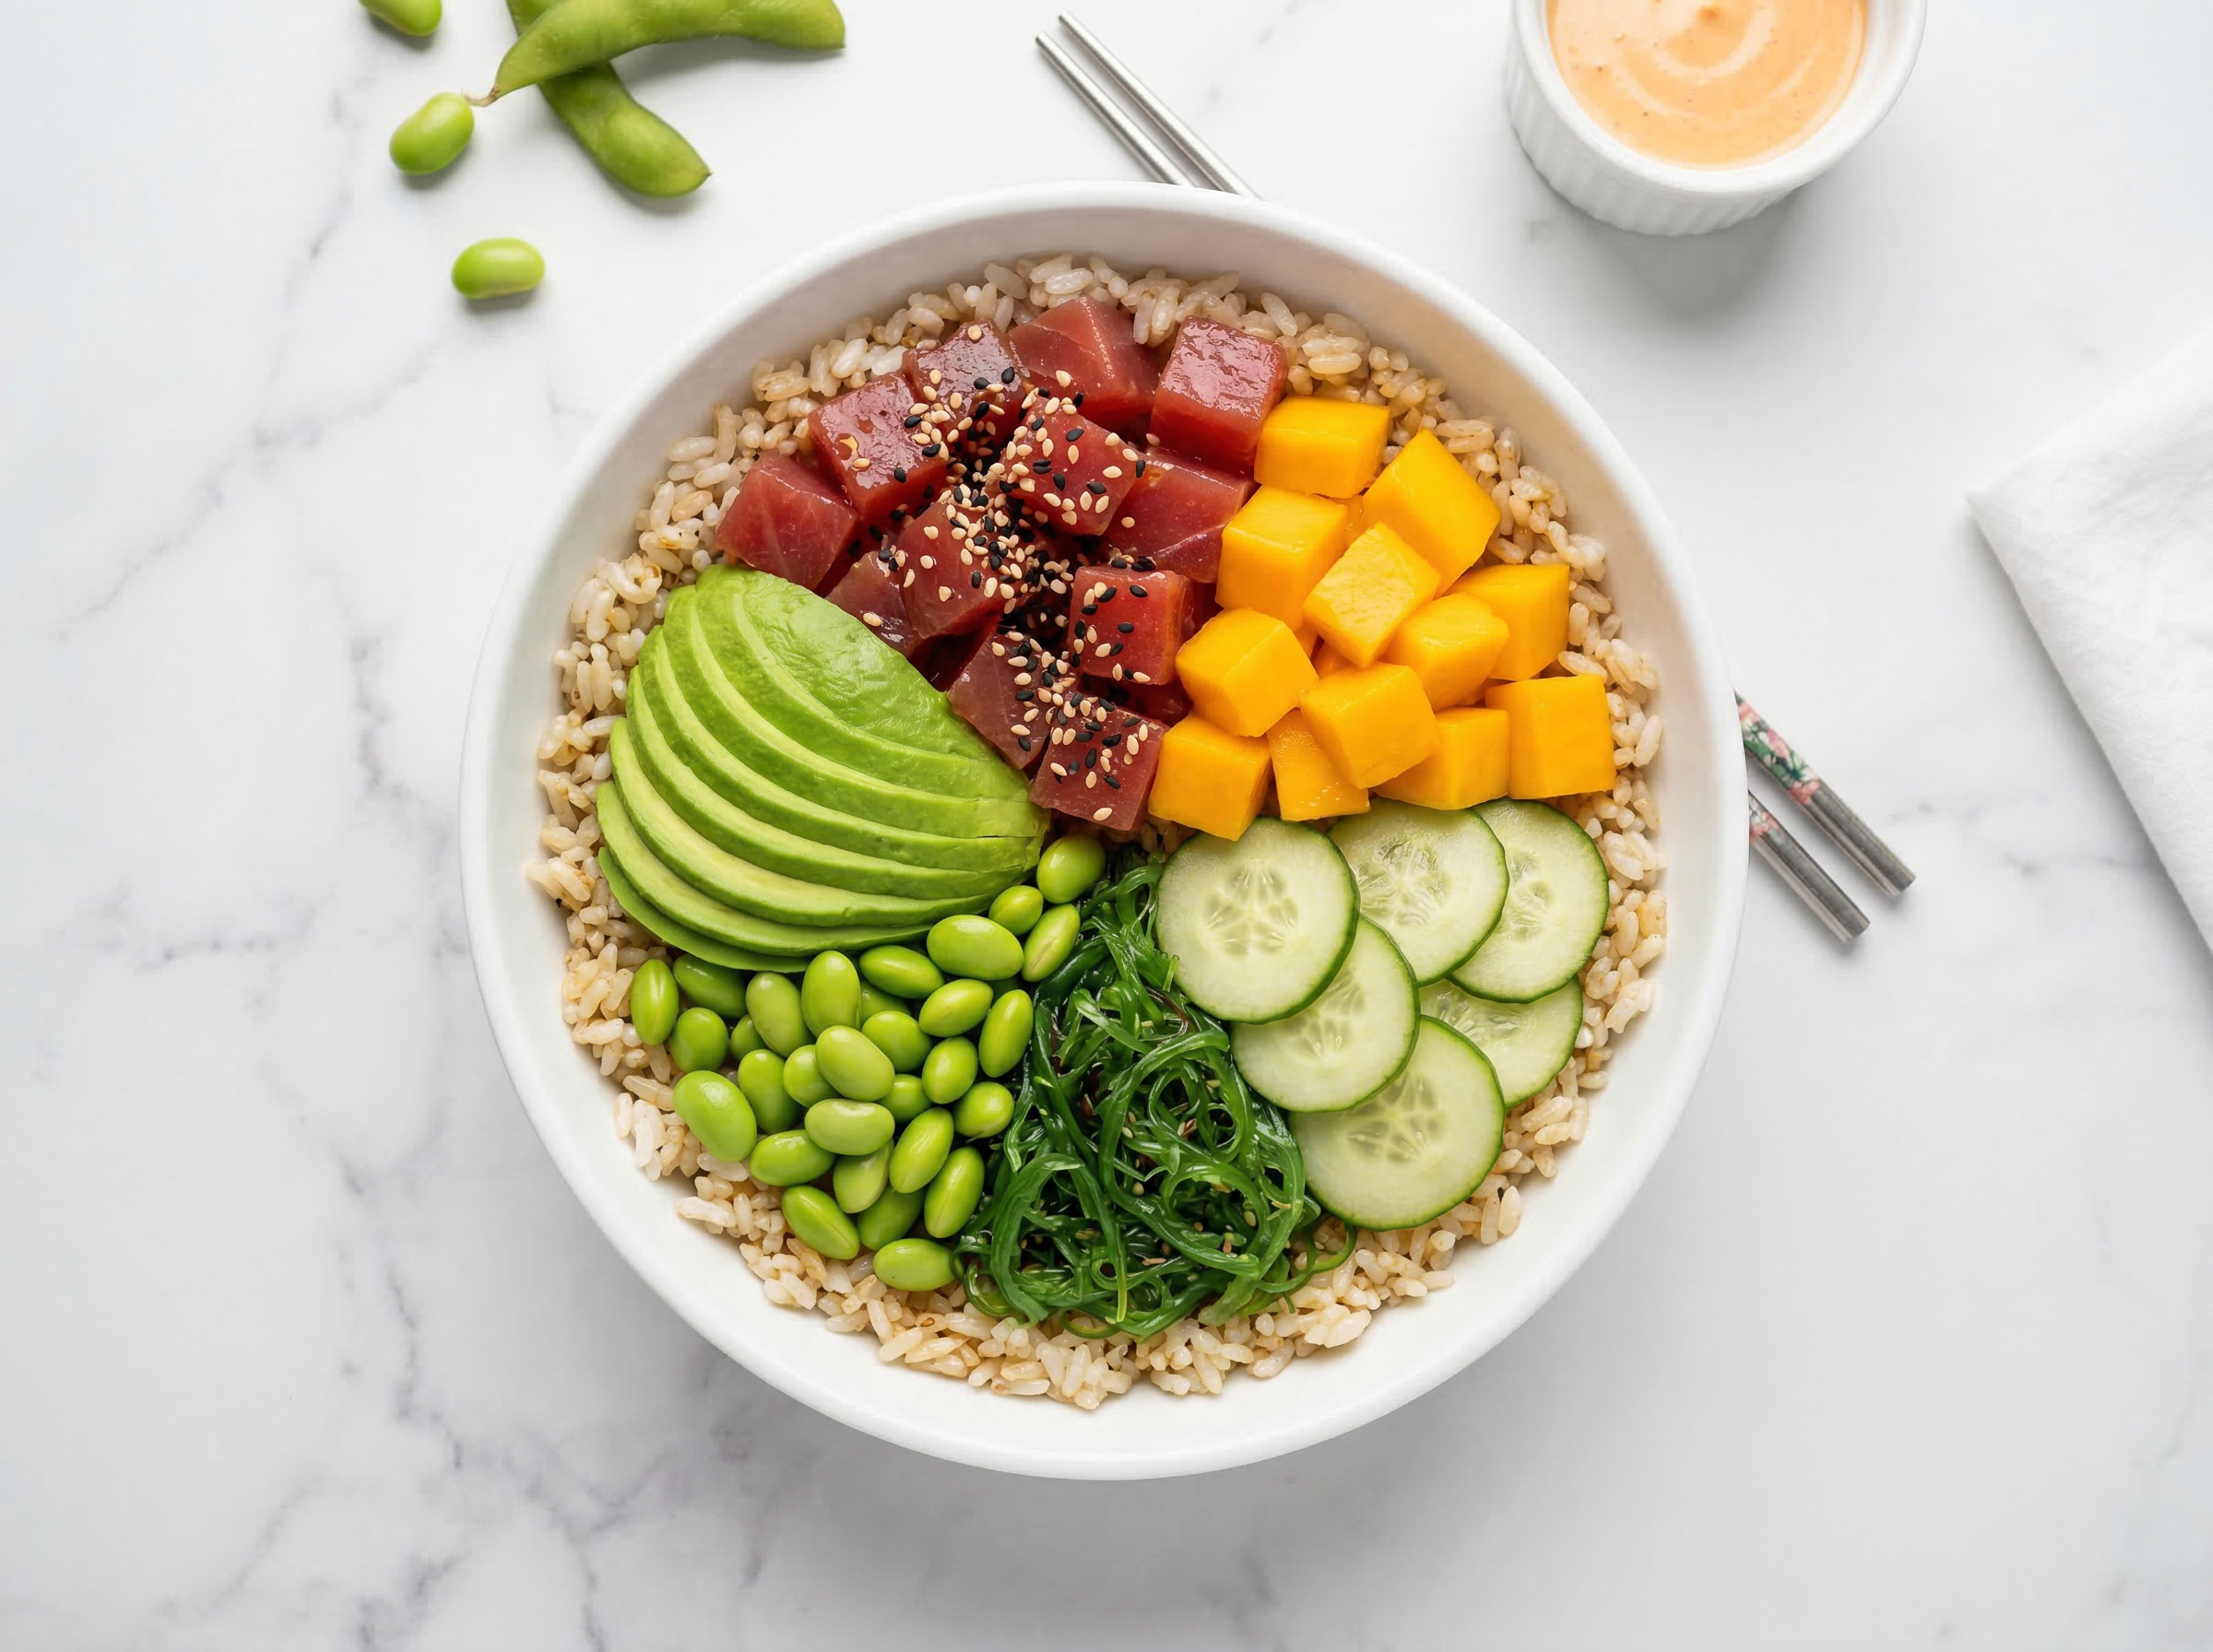
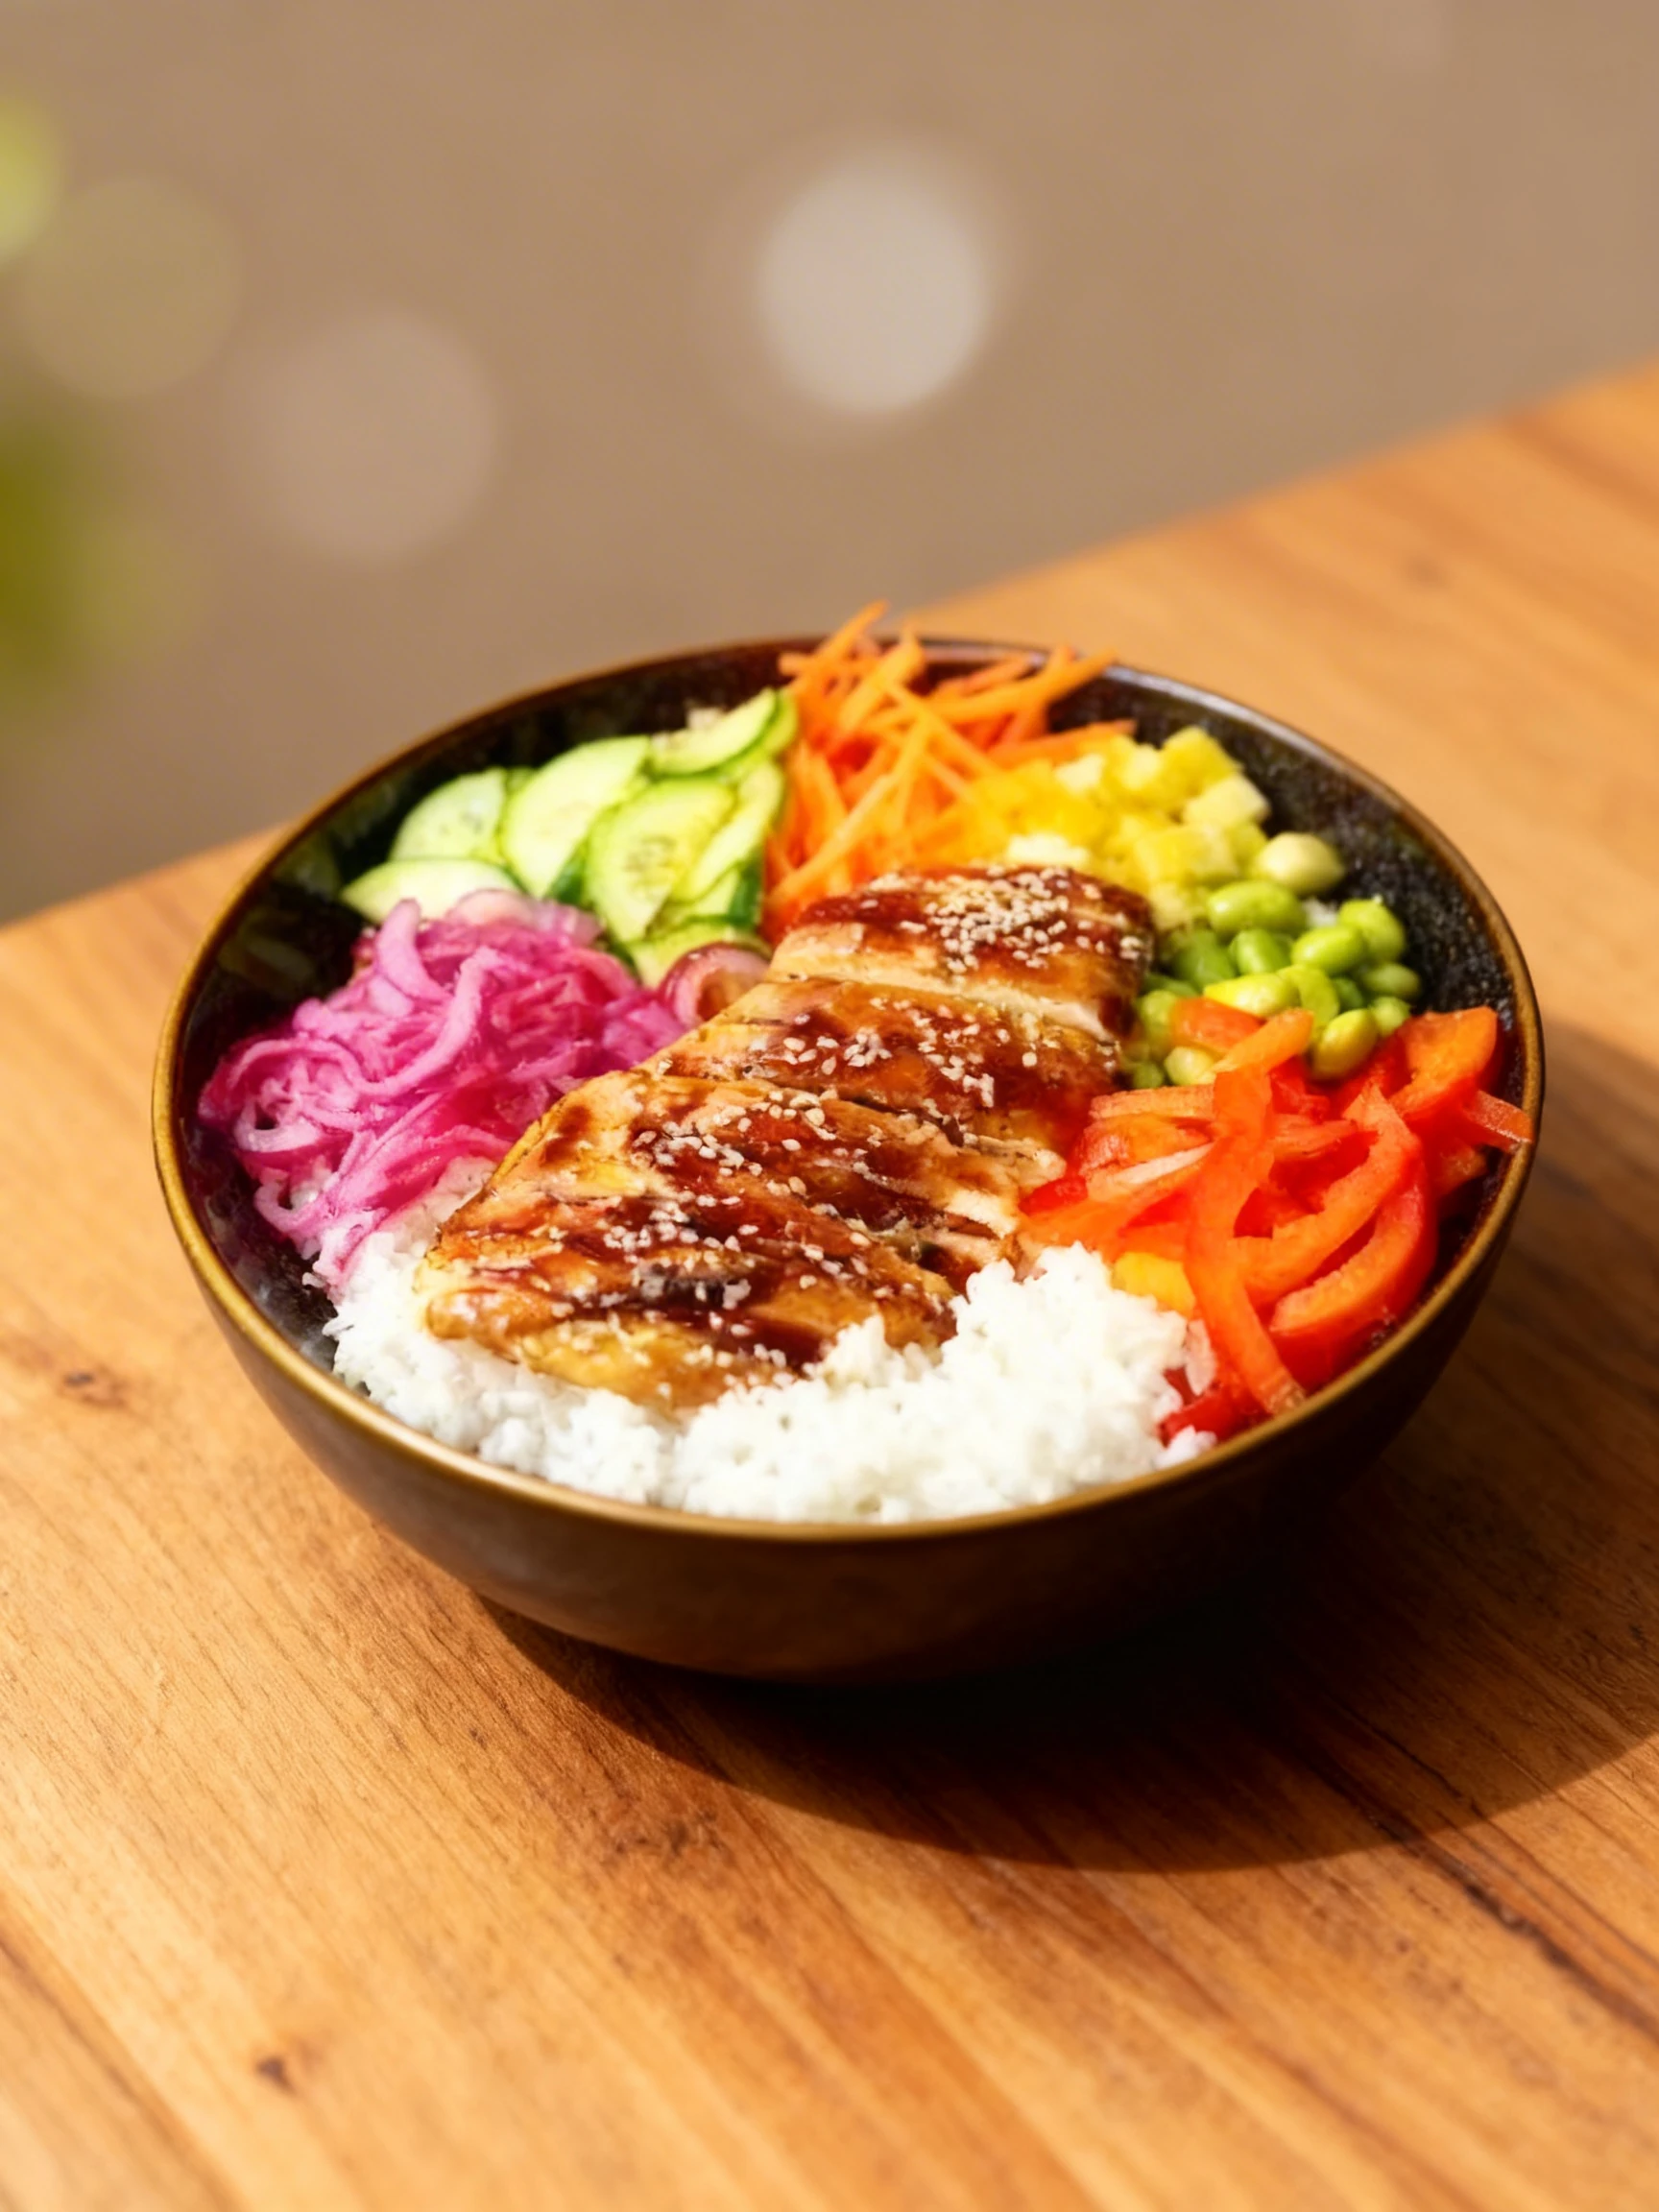
Poke bowl photography is simultaneously one of the most rewarding and most technically demanding genres in food photography. The dish is visually extraordinary - a round bowl sectioned into distinct color zones of ruby ahi tuna, pale cucumber, bright orange mango, dark nori, and creamy avocado - but it is also unforgiving of poor composition, rushed styling, or incorrect lighting. The overhead angle is essentially mandatory for poke, because the entire visual logic of the dish requires a bird's-eye view to communicate the precision of the sectioned topping arrangement. Shoot from any other angle and the bowl loses its defining visual identity. The ingredients themselves are fast-degrading: avocado browns within five minutes of cutting, the glossy soy-sesame marinade on ahi tuna begins to dull as it oxidizes, and the crisp texture of cucumber and edamame wilts under heat. This guide covers the specific composition logic, timing strategies, lighting setups, and platform-specific approaches for photographing poke bowls at their absolute visual peak.
What Makes Poke Bowls Challenging to Photograph
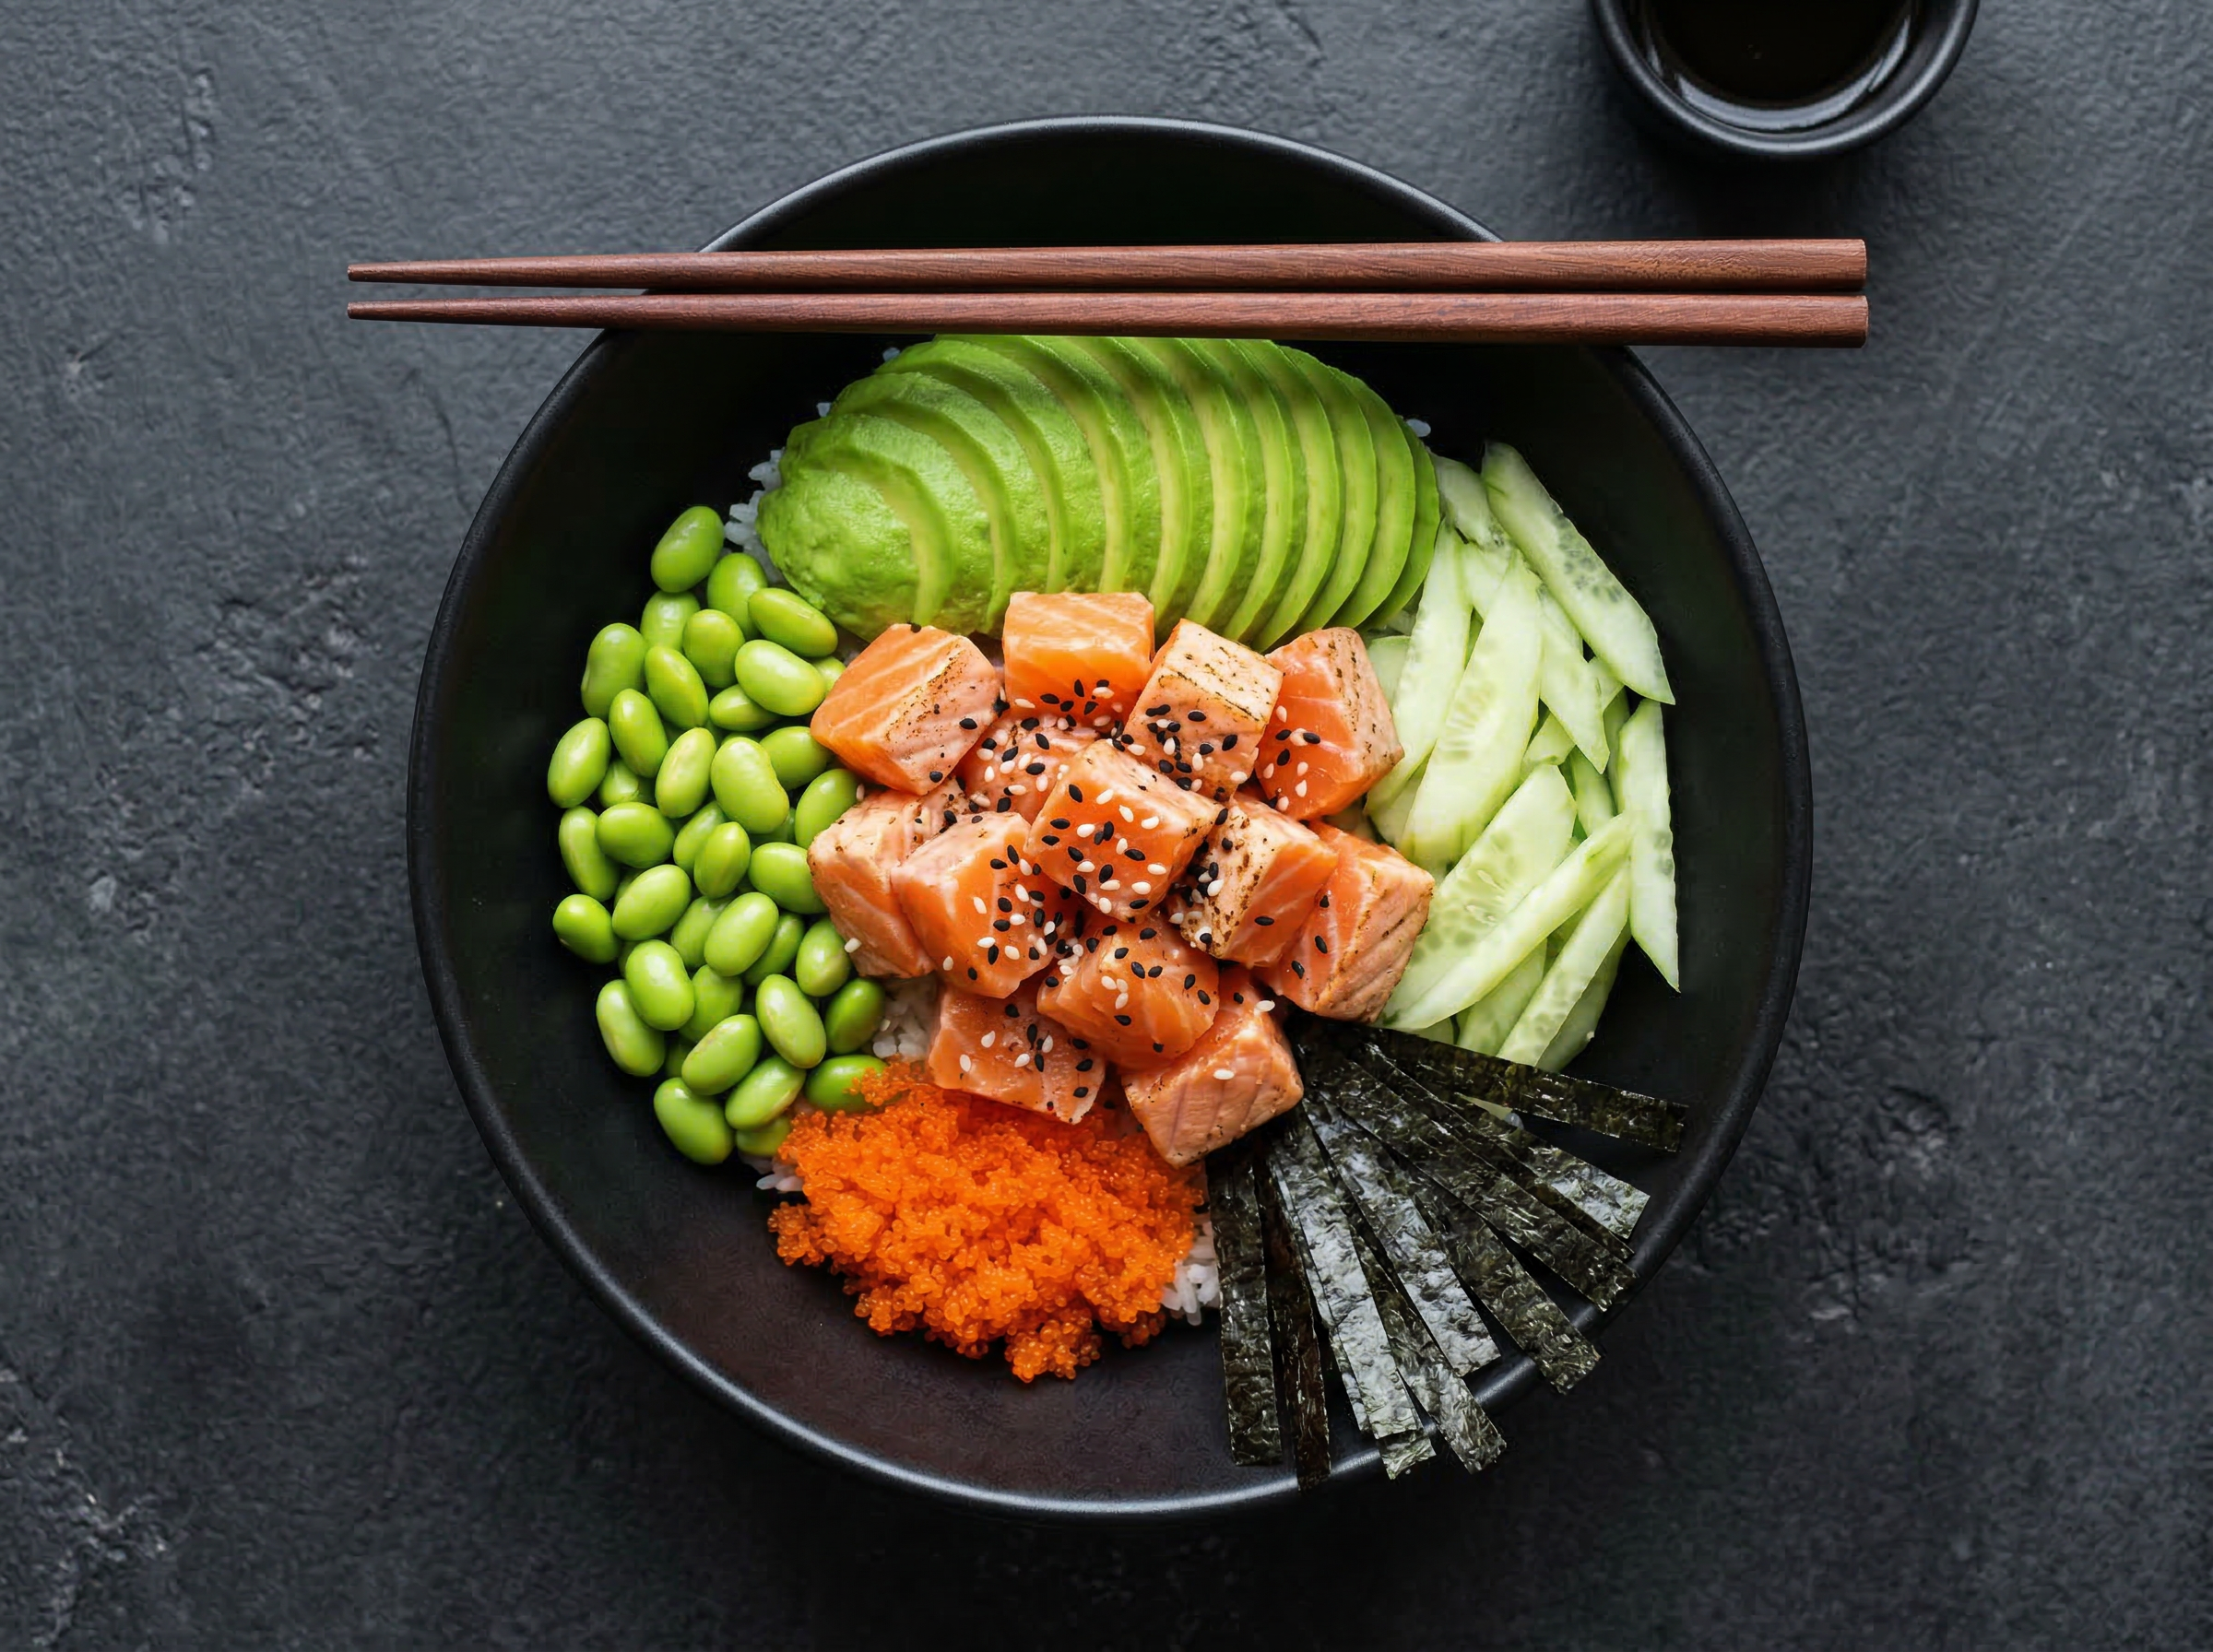
The central compositional challenge in poke bowl photography is achieving the sectioned topping look that has become the signature visual identity of modern poke. Each topping - ahi tuna, salmon, cucumber, edamame, avocado, mango, seaweed salad, masago - must occupy its own clearly defined zone in the bowl, with no mixing or overlapping between sections. This requires deliberate plating: begin with the rice base fully visible at the edges of the bowl, then place the largest protein section first as the anchor, and work clockwise with each topping using a small offset spatula or the back of a spoon to create clean boundaries. The rice base must be visible at the edges of the bowl even after toppings are placed - if it disappears entirely under protein and garnish, the overhead shot reads as a confused pile rather than a composed bowl. Avocado is the critical timing element: halved and sliced avocado begins to brown within five minutes of cutting, even with a squeeze of lime. Cut and fan the avocado slices as the final topping step, immediately before shooting. A small squeeze of lime juice on the cut face slows browning by two to three minutes. Stage and light the bowl using a stand-in setup before the real bowl is plated.
Best Lighting for Poke Bowls Photography
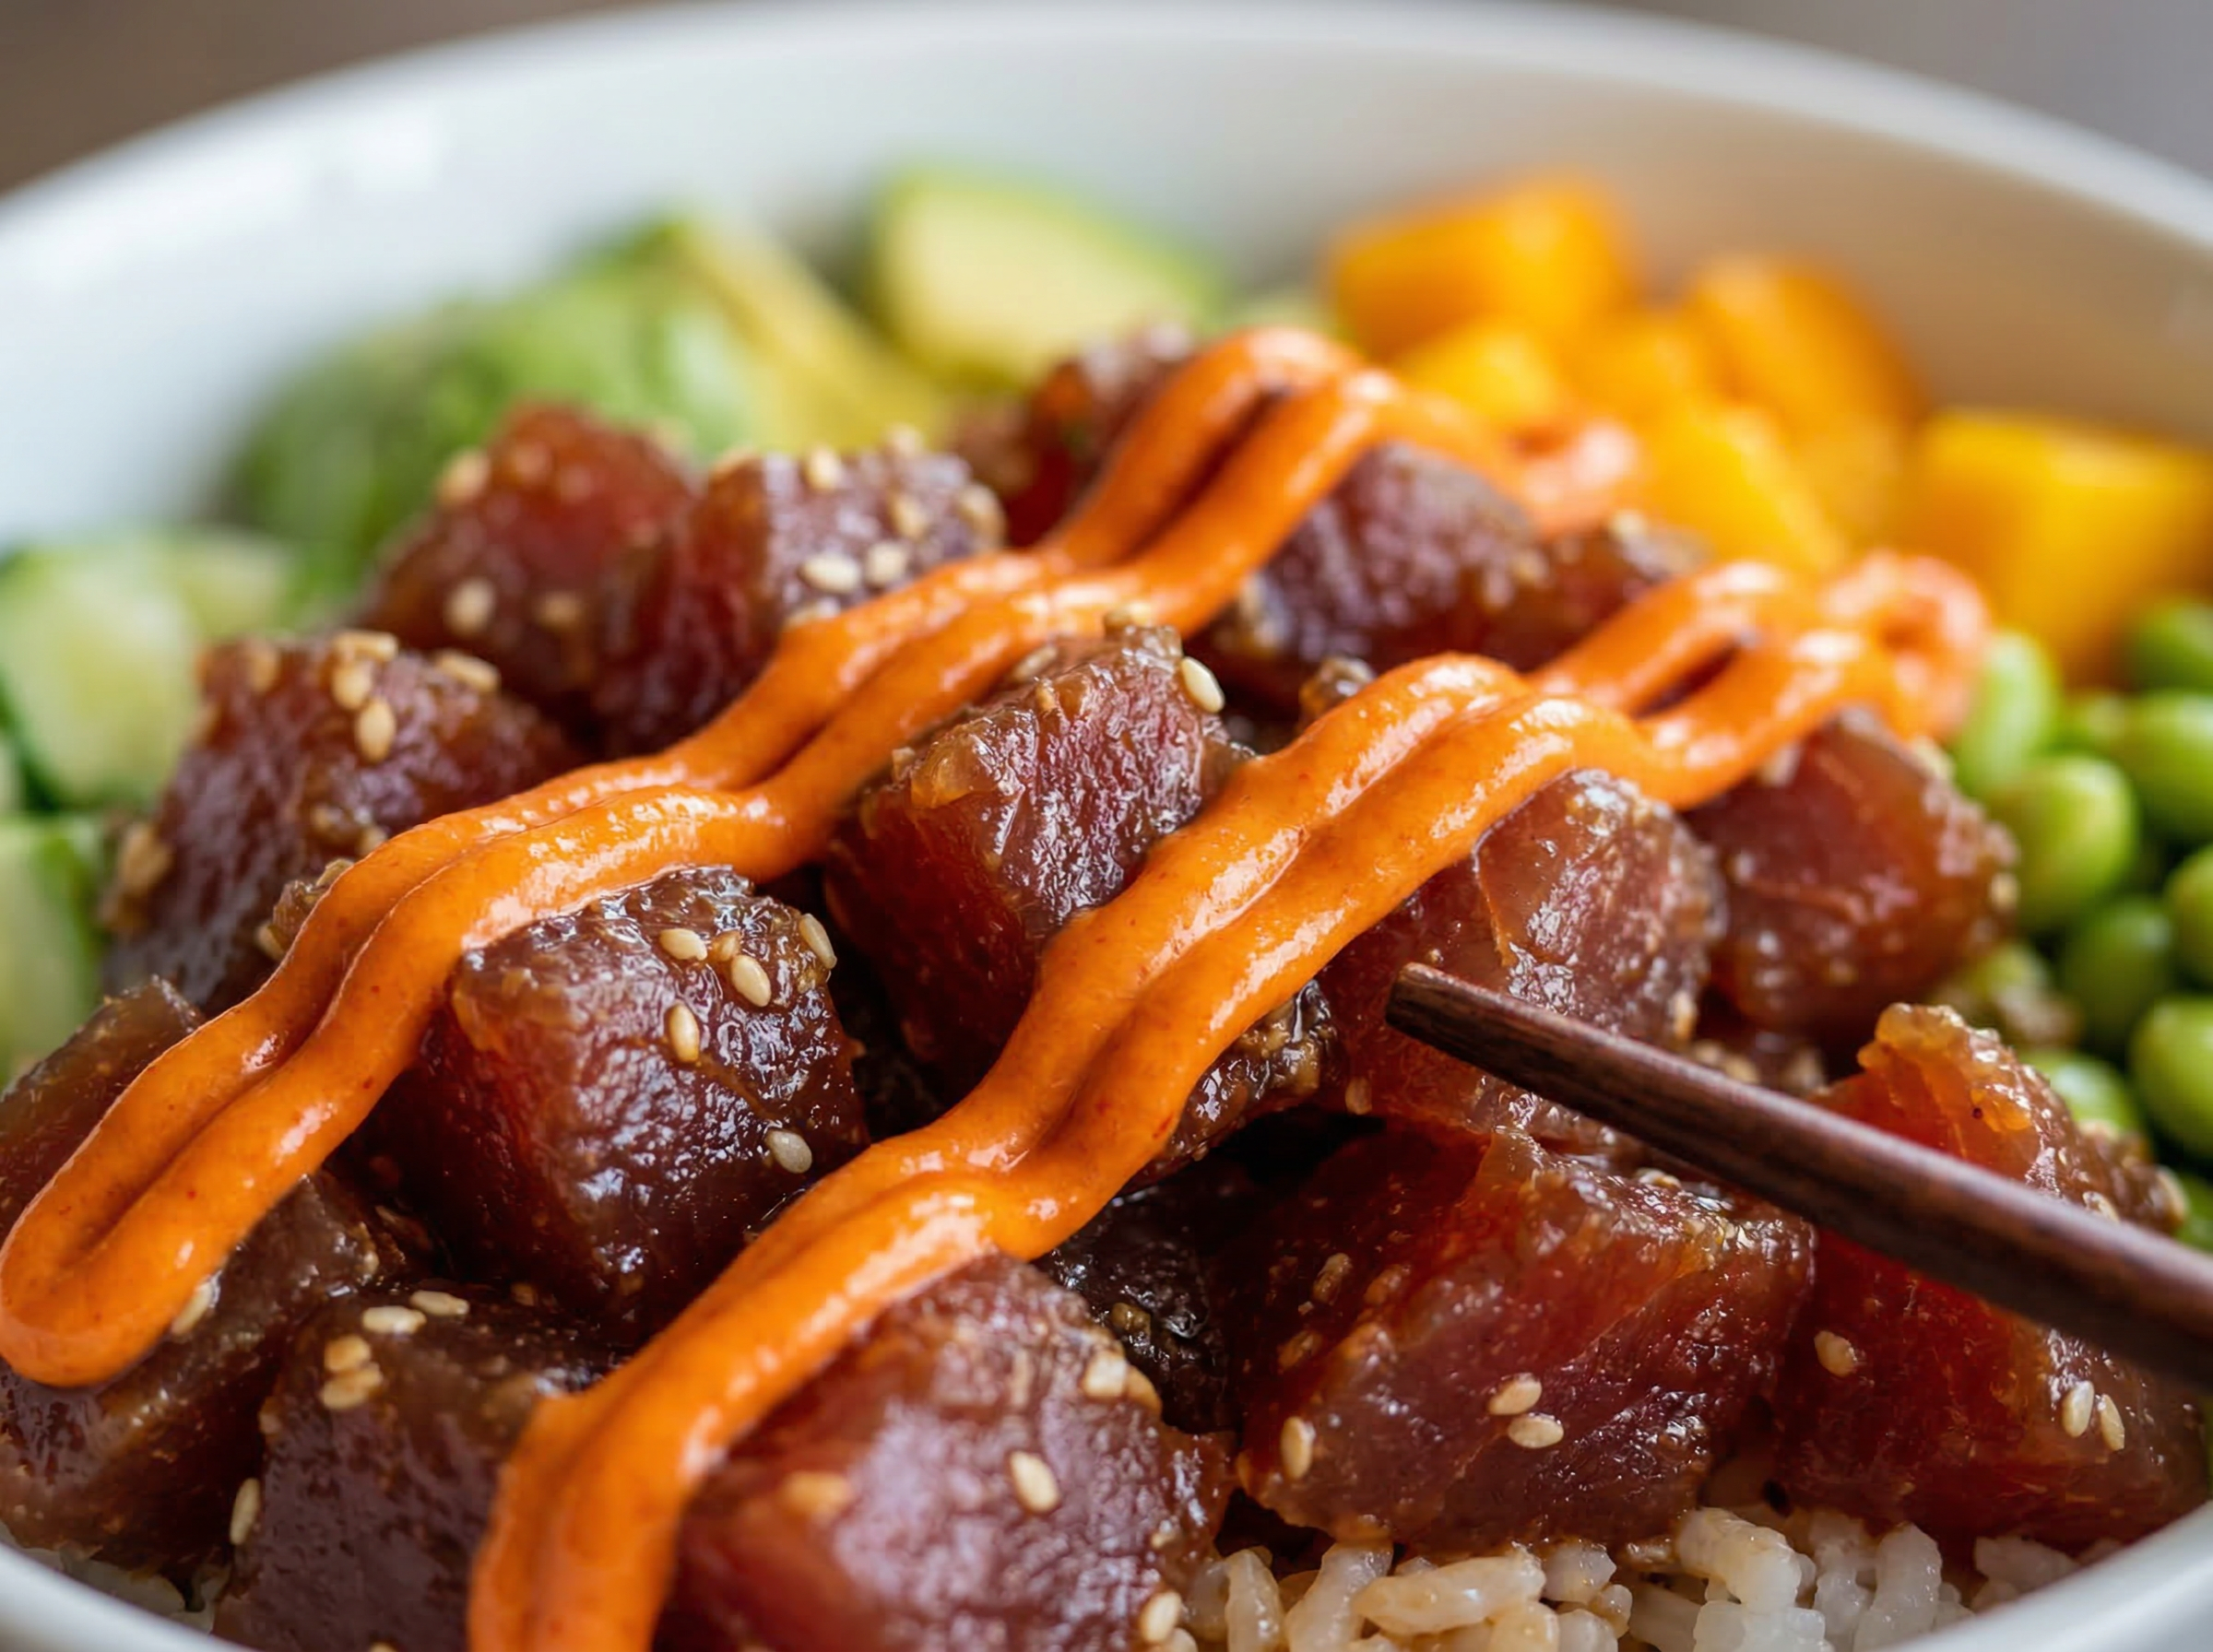
Poke bowl photography requires overhead bright natural light that illuminates the entire bowl evenly without creating hotspots or directional shadows that would make one section of the bowl look brighter or more saturated than another. A large window positioned directly above or slightly in front of the shooting surface is ideal - position the bowl so the window light falls evenly across the full diameter of the bowl. North-facing windows during midday provide the most consistent, shadow-free diffuse light for overhead poke shots. The color temperature must remain neutral to cool (5500–6200K). Warm light is actively harmful for poke photography: it shifts the magenta-red of ahi tuna toward brown-orange, which reads as old or improperly marinated, and it turns the bright green of edamame and avocado toward a yellow-green that signals degraded freshness. In a studio setup, position a large octabox or softbox directly overhead and slightly in front at roughly 80 degrees from the surface. Place a white bounce card at the back edge of the bowl to fill any shadow created by the overhead key and ensure the rim of the bowl is as bright as the center of the composition.
Camera Angles for Poke Bowls
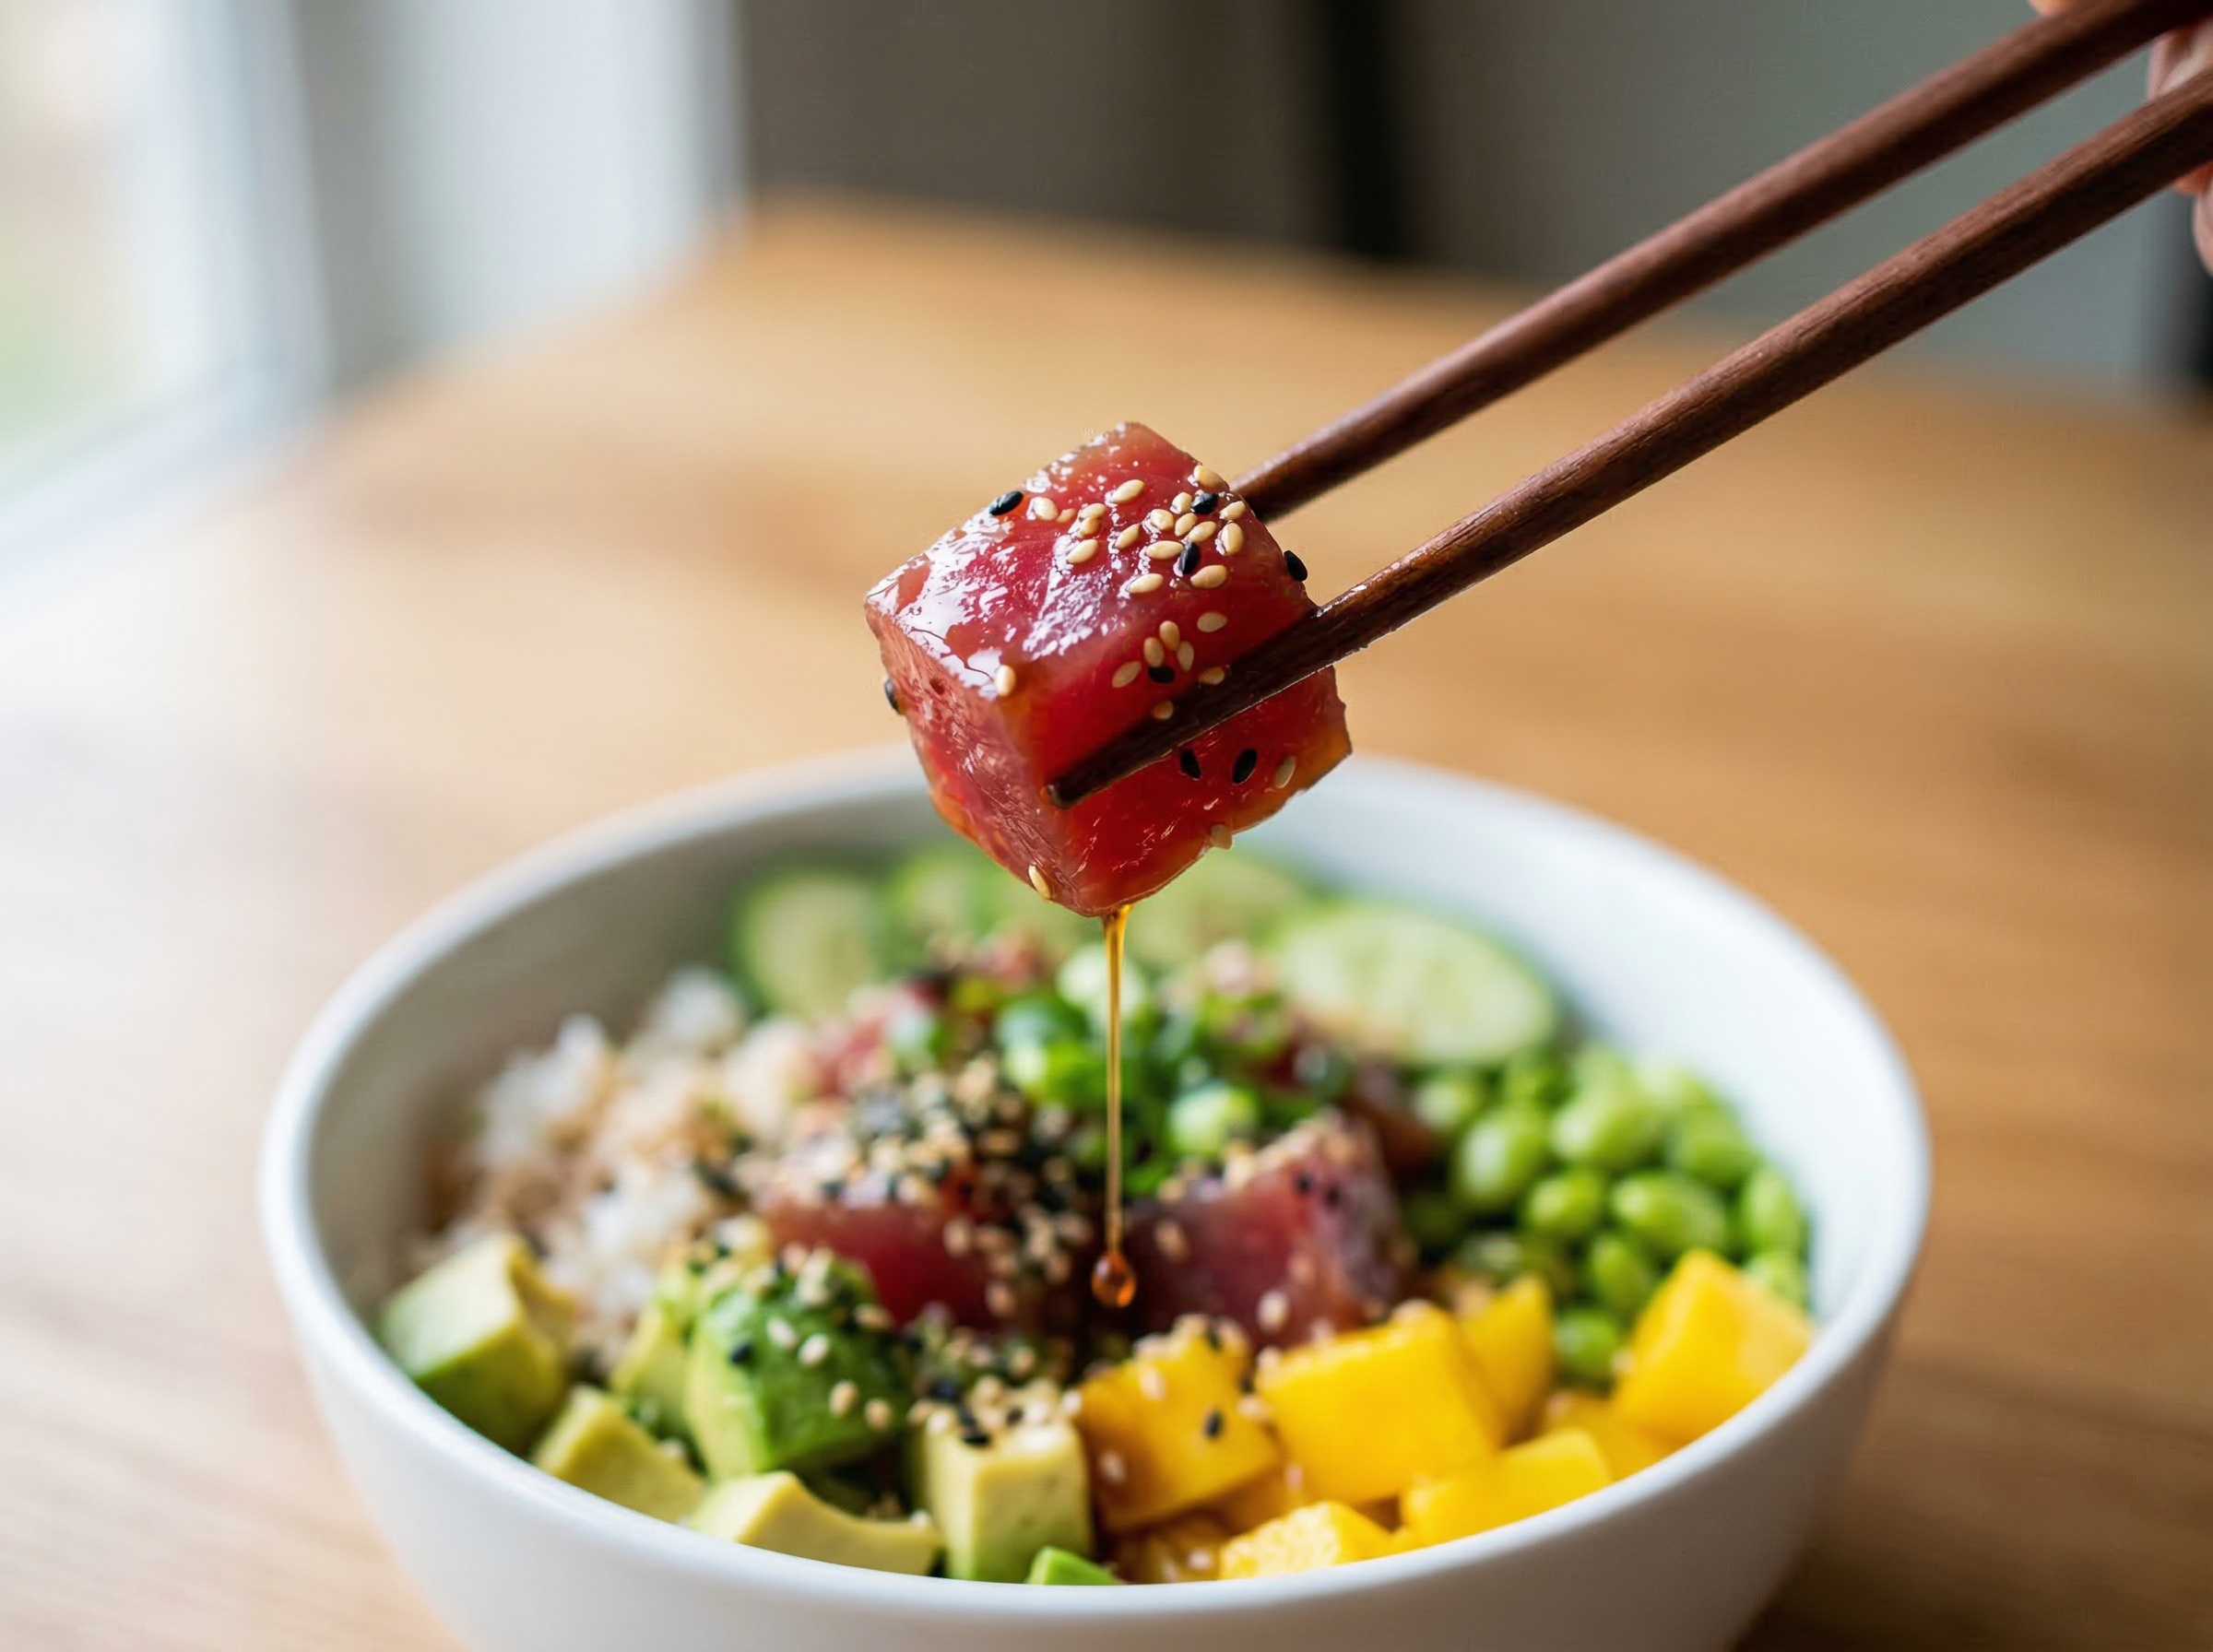
Overhead (90 degrees, straight down) is the essential angle for poke bowl photography, and departing from it requires specific justification. The bowl's sectioned composition is designed to be read from directly above - the color zones, the precise boundaries between toppings, and the circular geometry of the bowl are all optimized for a bird's-eye view. From 45 degrees or eye-level, the bowl reads as a crowded, indistinct mass of ingredients with the back sections obscured by the front. For delivery app menu item images, a slight 10-degree forward tilt from true overhead (so the camera is at approximately 80 degrees rather than 90) can reveal a small amount of bowl depth and help the rim read as a three-dimensional object rather than a flat ring - this subtle adjustment improves depth perception without compromising the composition logic. For a secondary detail shot within a carousel or menu spread, a 45-degree angle of a chopstick lifting a piece of ahi tuna from the bowl - showing the marinade gloss and the texture of the fish - is highly effective as an accompaniment to the hero overhead. Avoid eye-level poke shots as primary images in any platform context.
Food Styling and Props
Poke bowl styling is architectural in nature - it requires a methodical, section-by-section construction process rather than the free-form plating of most other cuisines. Begin by choosing the bowl: a round white ceramic bowl (10–11 inch diameter) provides maximum color contrast against which every topping reads clearly; a matte black bowl creates a dramatic high-contrast composition that performs well in print menu contexts. Fill the bowl with sushi rice and compress it lightly with the back of a spoon so it sits level - a domed rice base will make the toppings slide and blur the section boundaries. Divide the bowl visually into a pie of five to seven sections before plating. Place the protein anchor (ahi tuna cube, salmon slices) first, taking approximately one-third of the bowl. Add contrasting-color sections in adjacent zones: bright mango or corn next to tuna, dark seaweed salad next to pale cucumber. Edamame can be scattered loosely along section boundaries - they are small enough to not disrupt zones while adding green color accents. Nori strips, cut to uniform 2-inch lengths, should be placed upright and slightly fanned at the bowl edge for vertical accent. Sesame seeds are the final garnish - a pinch scattered over the protein section only, not the entire bowl. Chopsticks resting across the far rim of the bowl at a slight diagonal add foreground context without obscuring any section of the composition.
Recommended props
Equipment Guide
For overhead poke bowl photography, a camera boom arm or copy stand is essential - handheld overhead shooting at 90 degrees produces camera shake and inconsistent framing, which is fatal to a composition that depends on precise symmetry and section visibility. Mount the camera on the boom with a remote shutter release. A 50mm prime is the correct focal length for a 10–11 inch bowl at overhead distances: wider lenses introduce barrel distortion that bows the circular rim of the bowl into an oval, which looks immediately wrong. If your shooting space does not accommodate a boom arm, a sturdy tripod with a center column that extends horizontally (called a lateral arm configuration) is the alternative. For lighting, a large 24×36-inch softbox or a 7-foot octabox positioned directly overhead provides the diffuse, even illumination the bowl requires. A second small LED panel at the back of the set at low power fills the far rim shadow. Keep a set of small offset spatulas and a pair of tweezers on the set for final styling adjustments - moving a single edamame pod or adjusting a nori strip without disturbing the rest of the bowl requires tools, not fingers.
Skip the photoshoot — enhance the poke bowls photos you already have
The techniques on this page take time to master. MenuPhotoAI applies the same lighting, color, and texture corrections — automatically — to the smartphone photos you already shot. Studio-quality results in 30 seconds.
Try free — 5 credits, no cardCommon Poke Bowls Photography Mistakes
Mixing topping sections instead of maintaining distinct zones
Poke bowl photography depends entirely on the visual logic of separate color sections. If toppings overlap or blur at boundaries, the overhead shot reads as a disorganized salad rather than a composed bowl. Use an offset spatula to create clean edges between each topping zone. The section boundaries are the composition - blurring them eliminates the dish's entire visual identity.
Shooting avocado after it starts browning
Cut avocado begins to oxidize and brown within four to five minutes of cutting. Brown avocado in a poke bowl is one of the fastest trust-destroyers in food photography - it signals staleness on a dish whose entire brand promise is freshness. Cut and fan avocado as the absolute last styling step, with a light squeeze of lime juice, and shoot immediately. Keep a backup avocado ready if the first batch browns before the shot.
Using warm light that makes ahi tuna look brown
Warm amber light - whether from tungsten restaurant lighting, a warm softbox, or an unbalanced white balance - shifts the magenta-red of fresh ahi tuna into brown-orange tones that read as old or improperly refrigerated fish. This is a trust-critical error for any seafood application. Always use cool-to-neutral daylight (5500–6200K) as the key light for poke bowls.
Shooting at a 45-degree angle instead of overhead
A poke bowl photographed at 45 degrees looks like a cluttered bowl of random ingredients - the back sections are obscured, the section geometry is invisible, and the bowl loses the graphic, composed quality that makes it a high-performing food image. Overhead is not optional for poke; it is the angle the dish's composition was designed to be seen from. Use a boom arm or lateral tripod arm.
Over-filling the bowl so rice base disappears
When toppings completely cover the rice base, the overhead shot loses its sense of structure and depth. A thin band of visible rice at the bowl's edges - even just 0.5 inches - anchors the toppings visually and tells the viewer what the base layer is. Use the rice as a framing device and resist the temptation to pile toppings to the rim of the bowl.
Editing Tips
Poke bowl editing prioritizes color accuracy and saturation over contrast or mood. Begin by confirming the white balance is neutral - ahi tuna should appear magenta-red, not brown-orange. Pull up shadows slightly to open the dark zones (seaweed salad and nori tend to go very dark under overhead light). Increase vibrance by 15–20 points rather than full saturation to lift all colors simultaneously without oversaturating the reds. Add targeted cyan and green saturation in the HSL panel for edamame and avocado, and targeted red saturation for ahi tuna. Increase texture and clarity at 10–15 points to reveal the sear marks on tuna, the sesame seed detail, and the surface of each grain of rice around the edges of the bowl. Avoid heavy contrast curves - the bowl should look fresh and abundant, not dark and moody.
Platform-Specific Tips
On DoorDash and Uber Eats, poke bowl menu item photos perform best as a square overhead crop (1:1) that fills the frame with the bowl from rim to rim, leaving only a small amount of the surface visible at the edges. The sectioned composition reads instantly at thumbnail scale and communicates premium, customized bowl-building that drives clicks. For category banner images on delivery platforms, a wider overhead shot that shows the bowl plus two to three garnish props (sesame seed bowl, sauce ramekin, chopsticks) works well in a horizontal landscape crop. For Instagram, poke bowls remain one of the highest-save content categories in the food vertical. An overhead hero shot performs strongly in feed, but carousel content that sequences the hero overhead, a chopstick-lift detail shot, and a lifestyle shot of the bowl on the table with a hand reaching in generates the highest engagement. For Stories, a time-lapse or Reel of the bowl being sectioned and built topping-by-topping is a proven high-retention format. For print menus, poke bowls should be printed in their overhead orientation - this is one of the few dishes where portrait orientation (bowl filling the frame vertically) works better than landscape.
Poke Bowls Photo Examples
Real poke bowls photos from restaurants using MenuPhotoAI. Tap any category to see the full gallery and the before-and-after view.
Take your Poke Bowls photos further with AI
Once you have a solid shot using the techniques above, MenuPhotoAI can handle the finishing work. Our AI removes distracting backgrounds, corrects exposure and white balance, and applies cuisine-appropriate color grading — turning a good smartphone photo into something you'd be proud to put on your menu or delivery app listing. Start with 5 free photos, no credit card required.
Frequently Asked Questions
Skip the photoshoot — enhance the poke bowls photos you already have
The techniques on this page take time to master. MenuPhotoAI applies the same lighting, color, and texture corrections — automatically — to the smartphone photos you already shot. Studio-quality results in 30 seconds.
Try free — 5 credits, no cardMore Cuisine Photography Guides
This guide reflects best practices for Poke Bowls food photography as of 2026. Techniques may vary based on specific dishes, equipment, and shooting conditions. MenuPhotoAI is an AI food photo enhancement platform.