Photography Guide
Italian Food Photography Guide
Wet pasta loses its sheen within five minutes - you have one narrow window to shoot before it goes flat and dull.
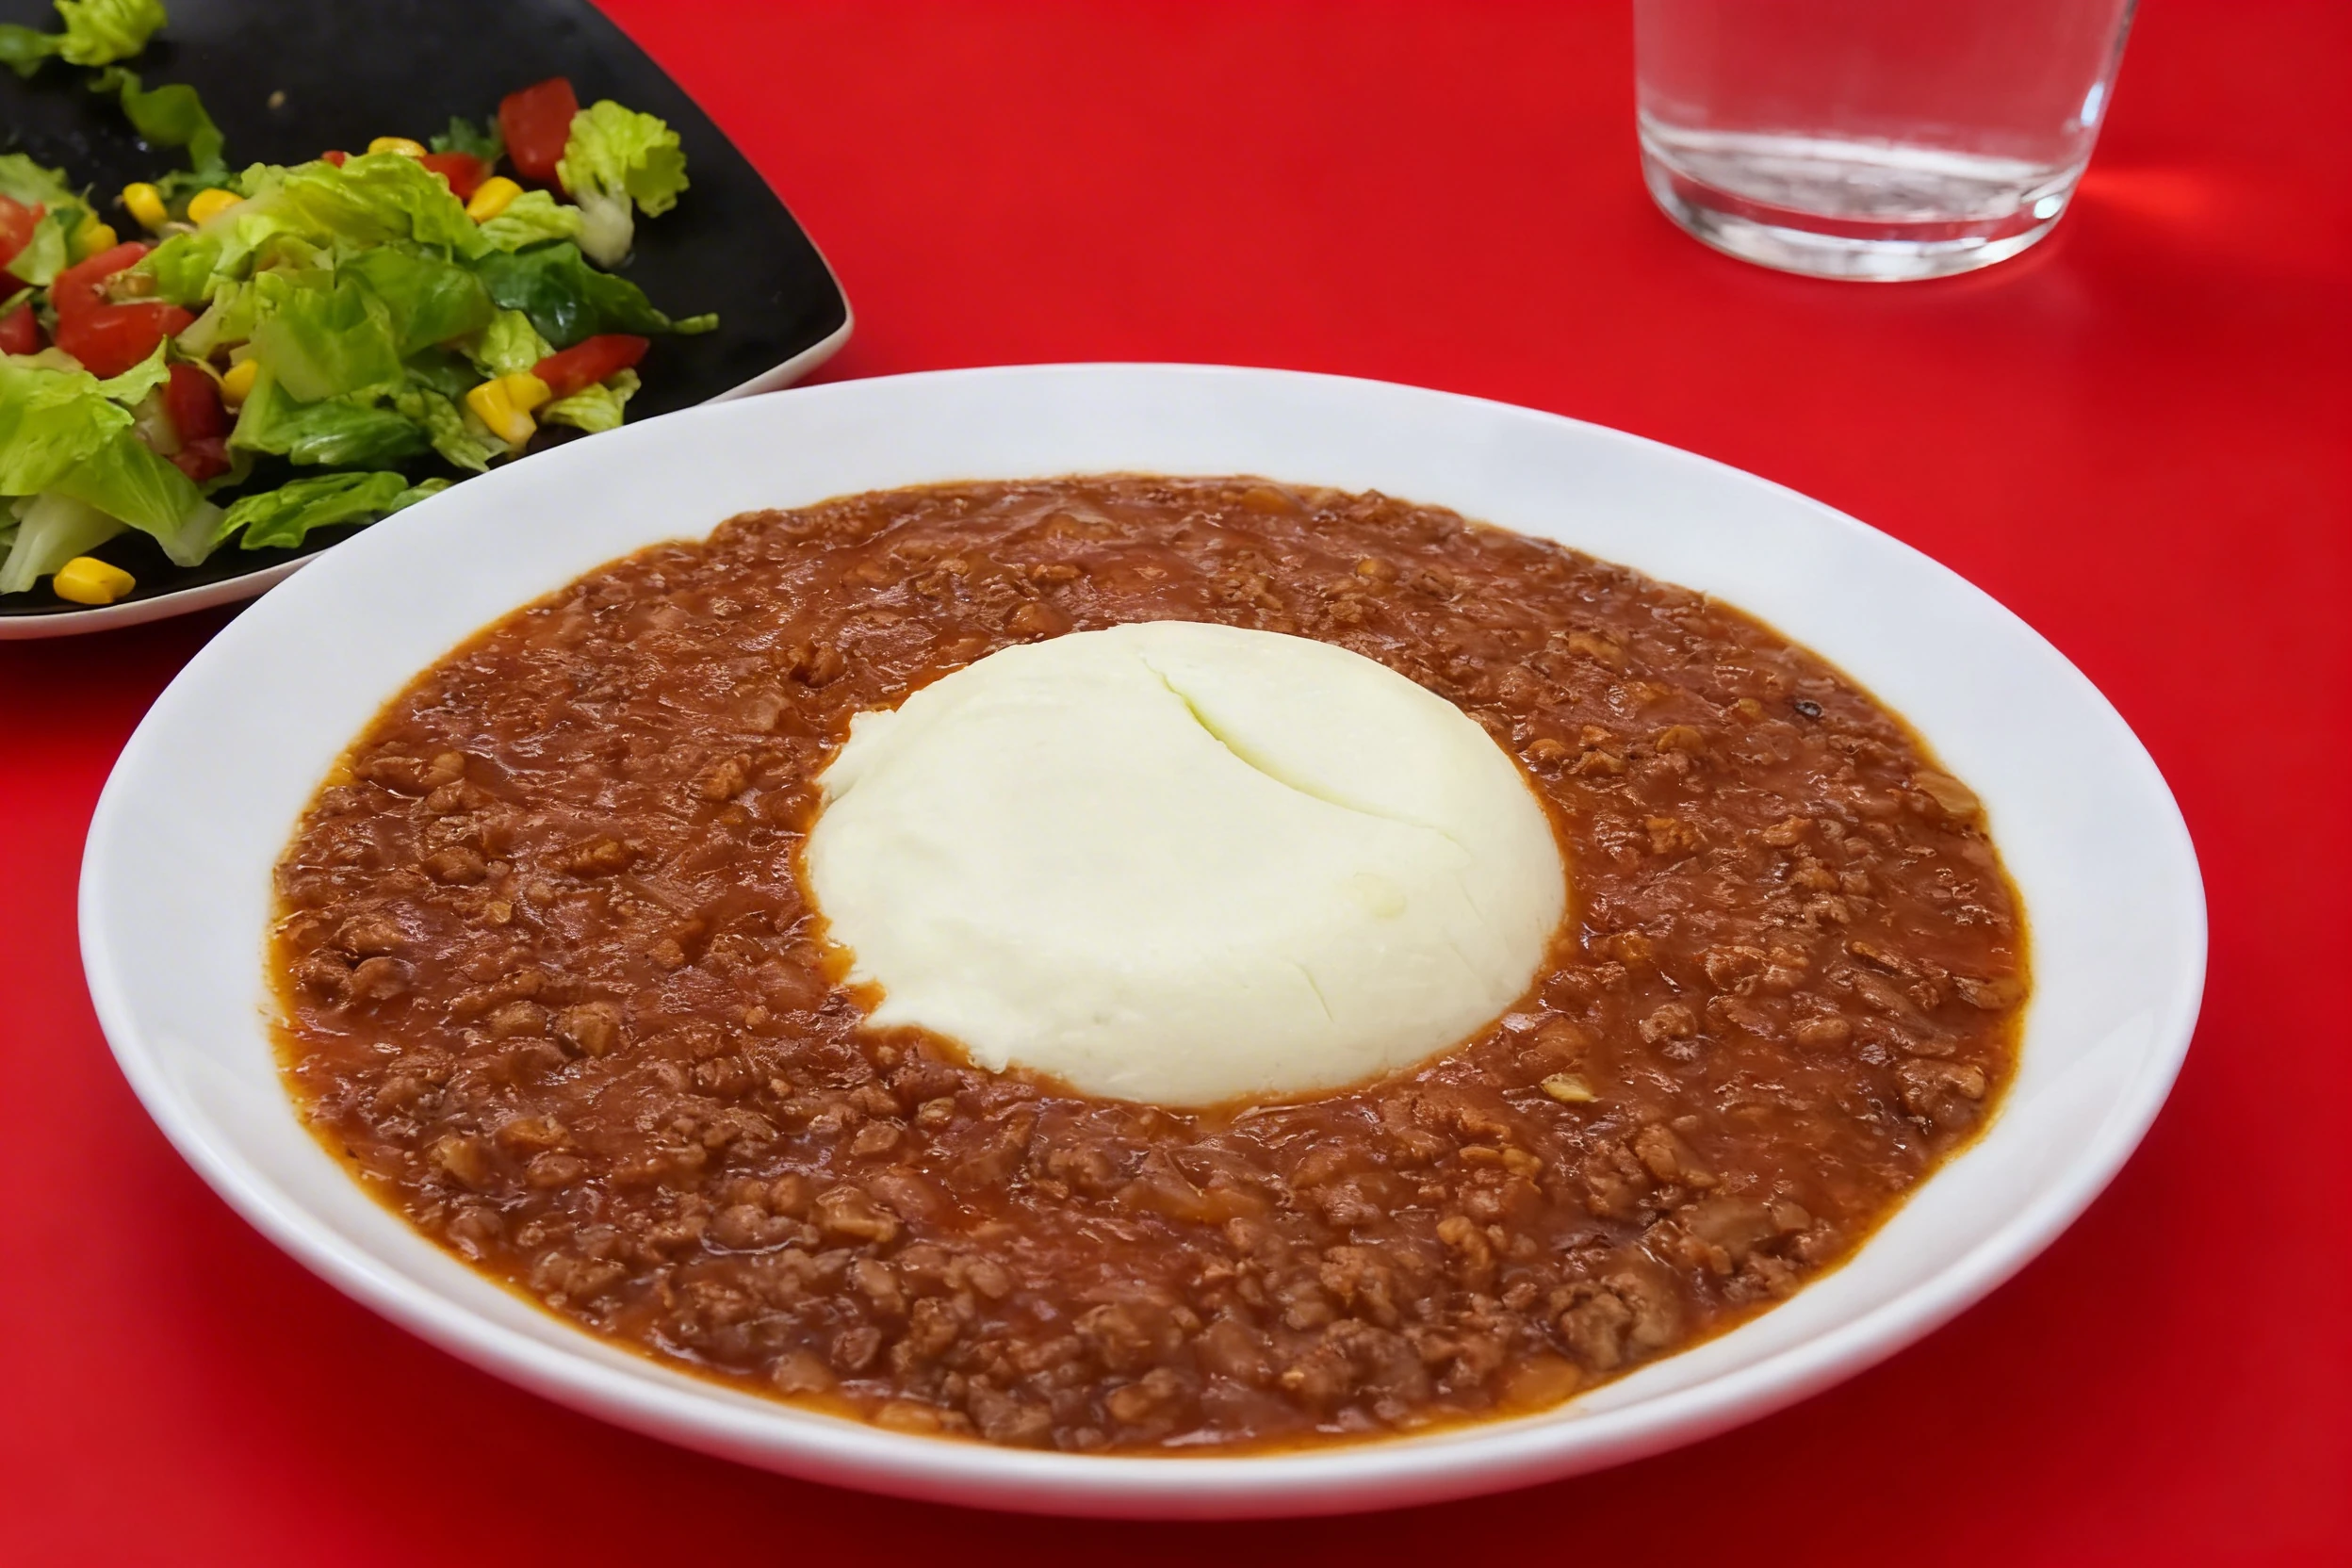
Primary Angle
45-degree
Lighting
Soft window light from the left, no flash
Read time
~8 min
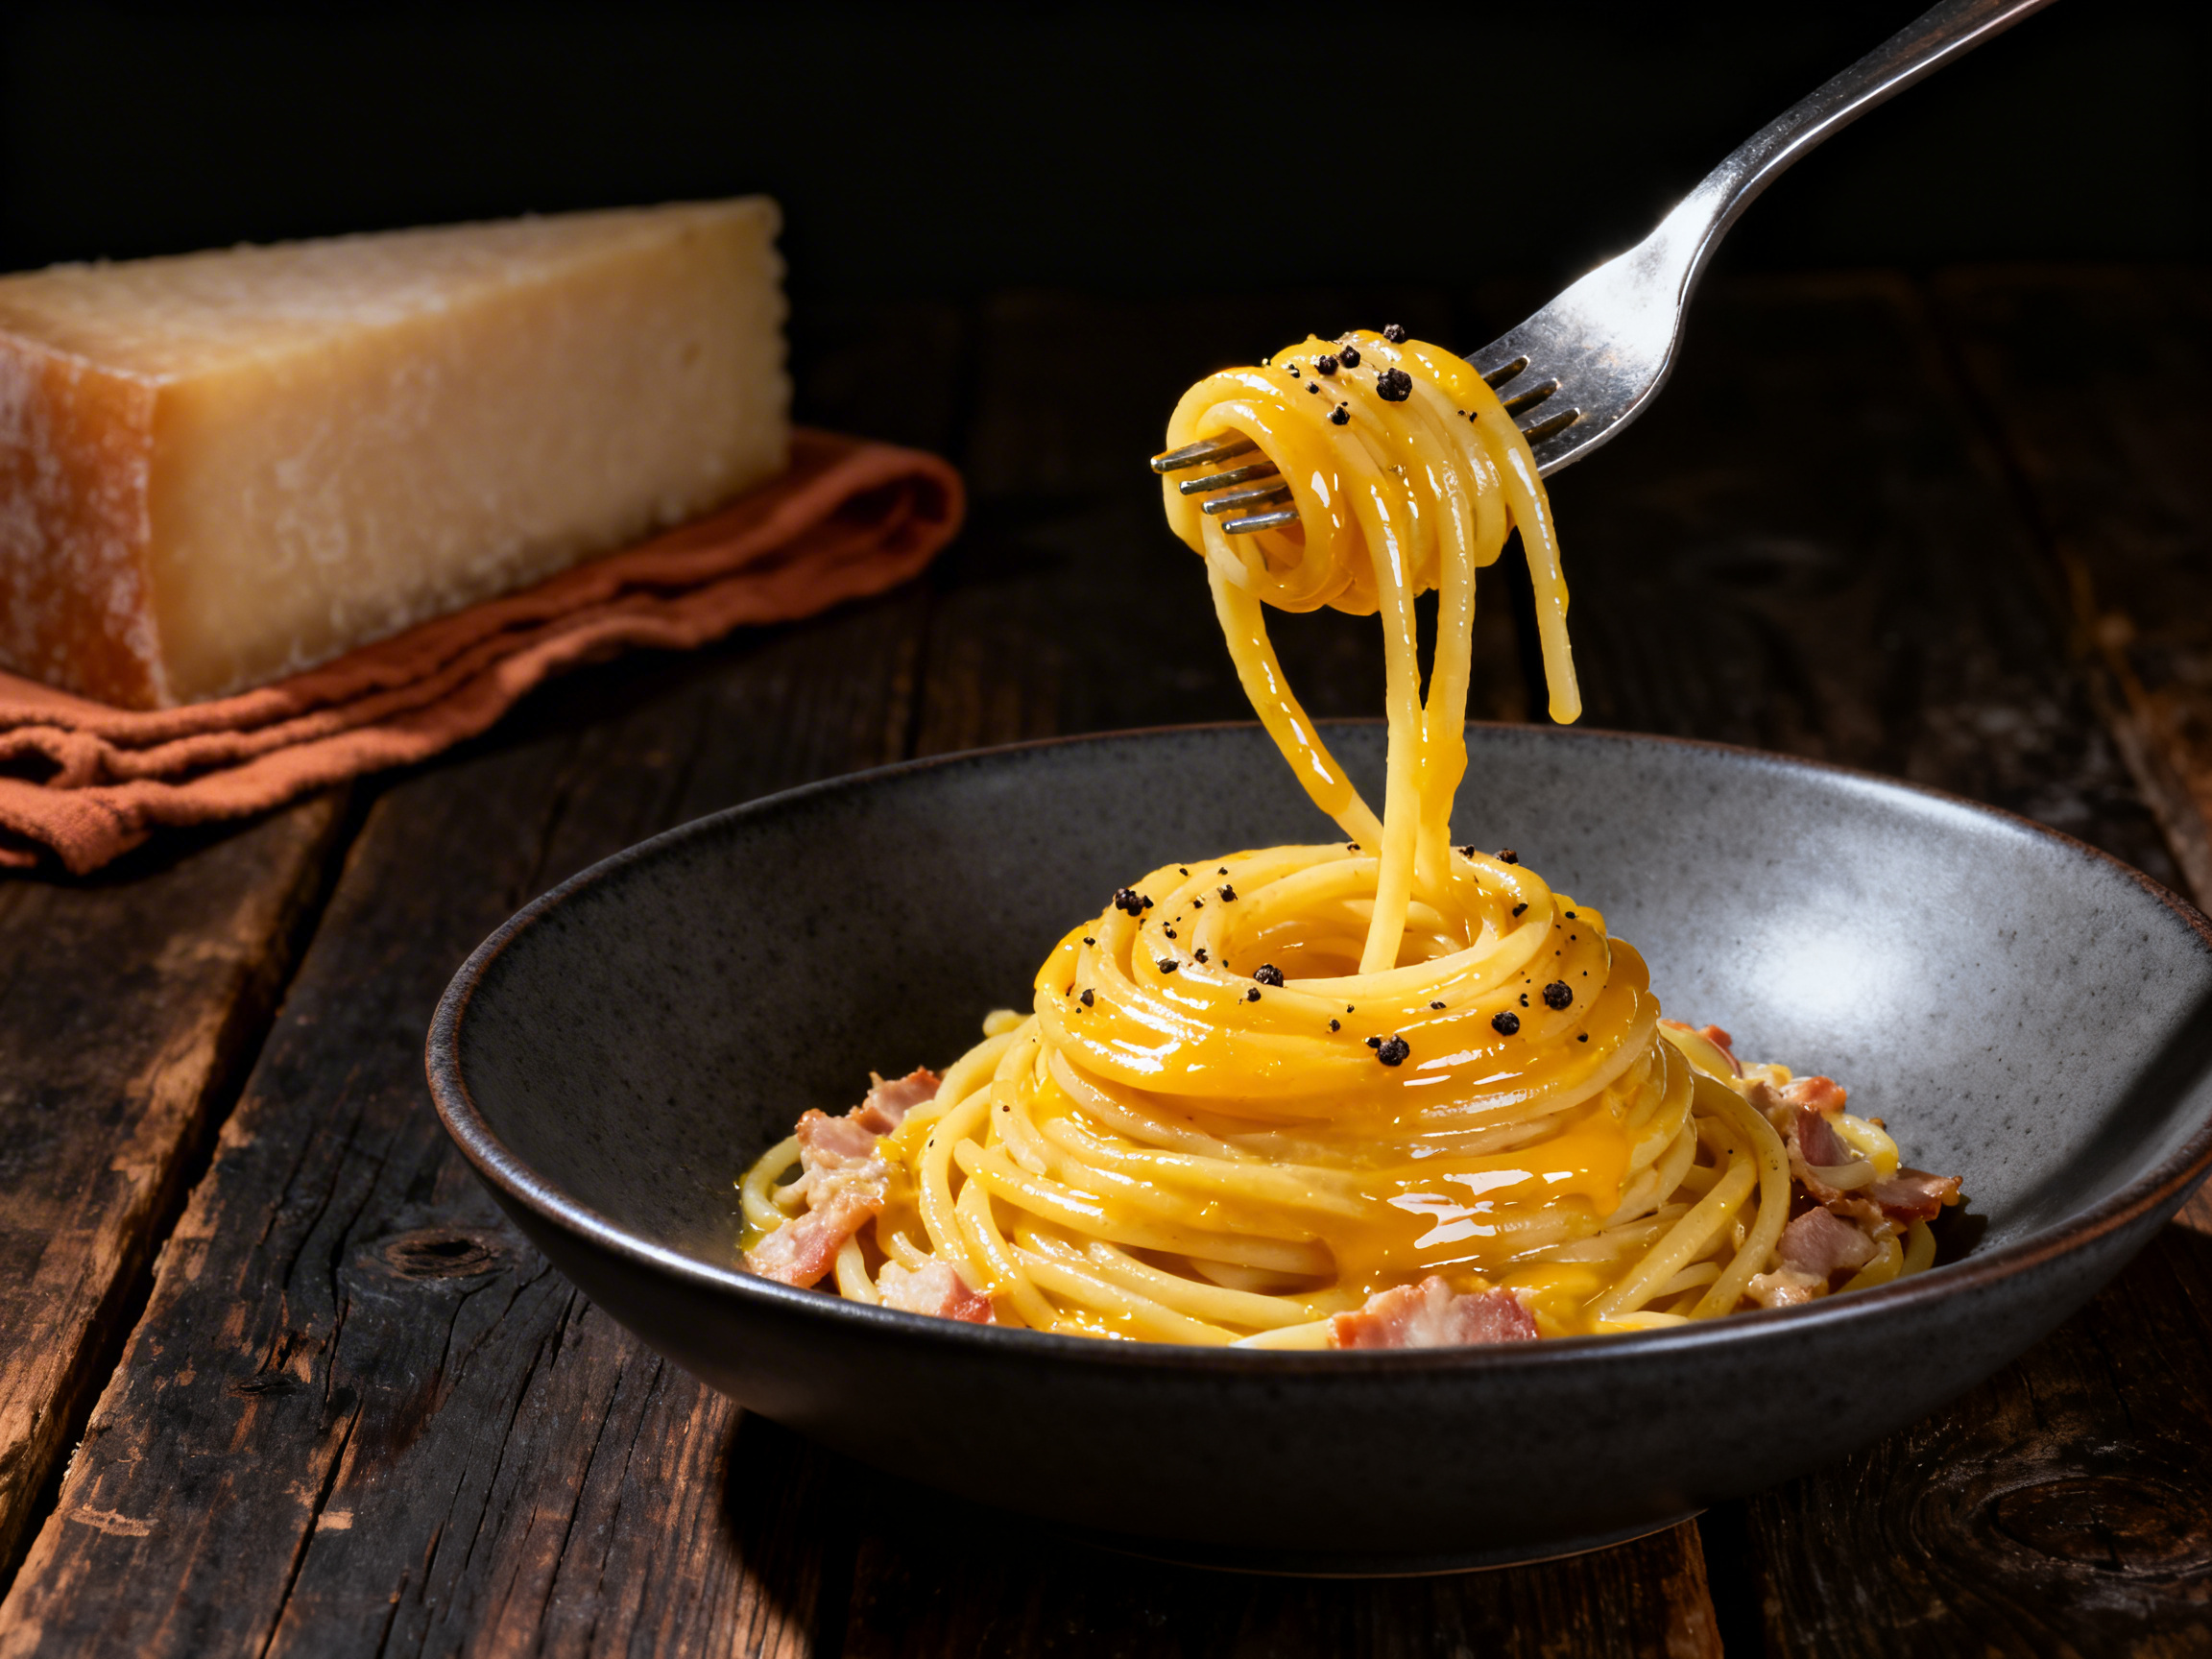
Italian food photography rewards patience and precision in equal measure. From the glossy lacquer of a perfectly sauced cacio e pepe to the ivory cream folds of tiramisu, every dish presents its own visual story - but also its own technical trap. The biggest truth about shooting Italian food is that time is your enemy. Pasta carbonara loses the egg-yolk sheen in under five minutes. Risotto stiffens and loses its flowing quality almost the moment it leaves the pan. Bruschetta starts to wilt at the edges. To shoot Italian food well, you need to have your frame locked, your lighting dialed, and your props placed before the dish even arrives at the table. This guide covers the exact techniques professional food photographers use when shooting Italian menus - from the angle choices that make a bowl of spaghetti look three-dimensional to the light setups that keep sauced pasta gleaming. Follow these steps and your Italian food photos will stop looking flat.
What Makes Italian Challenging to Photograph
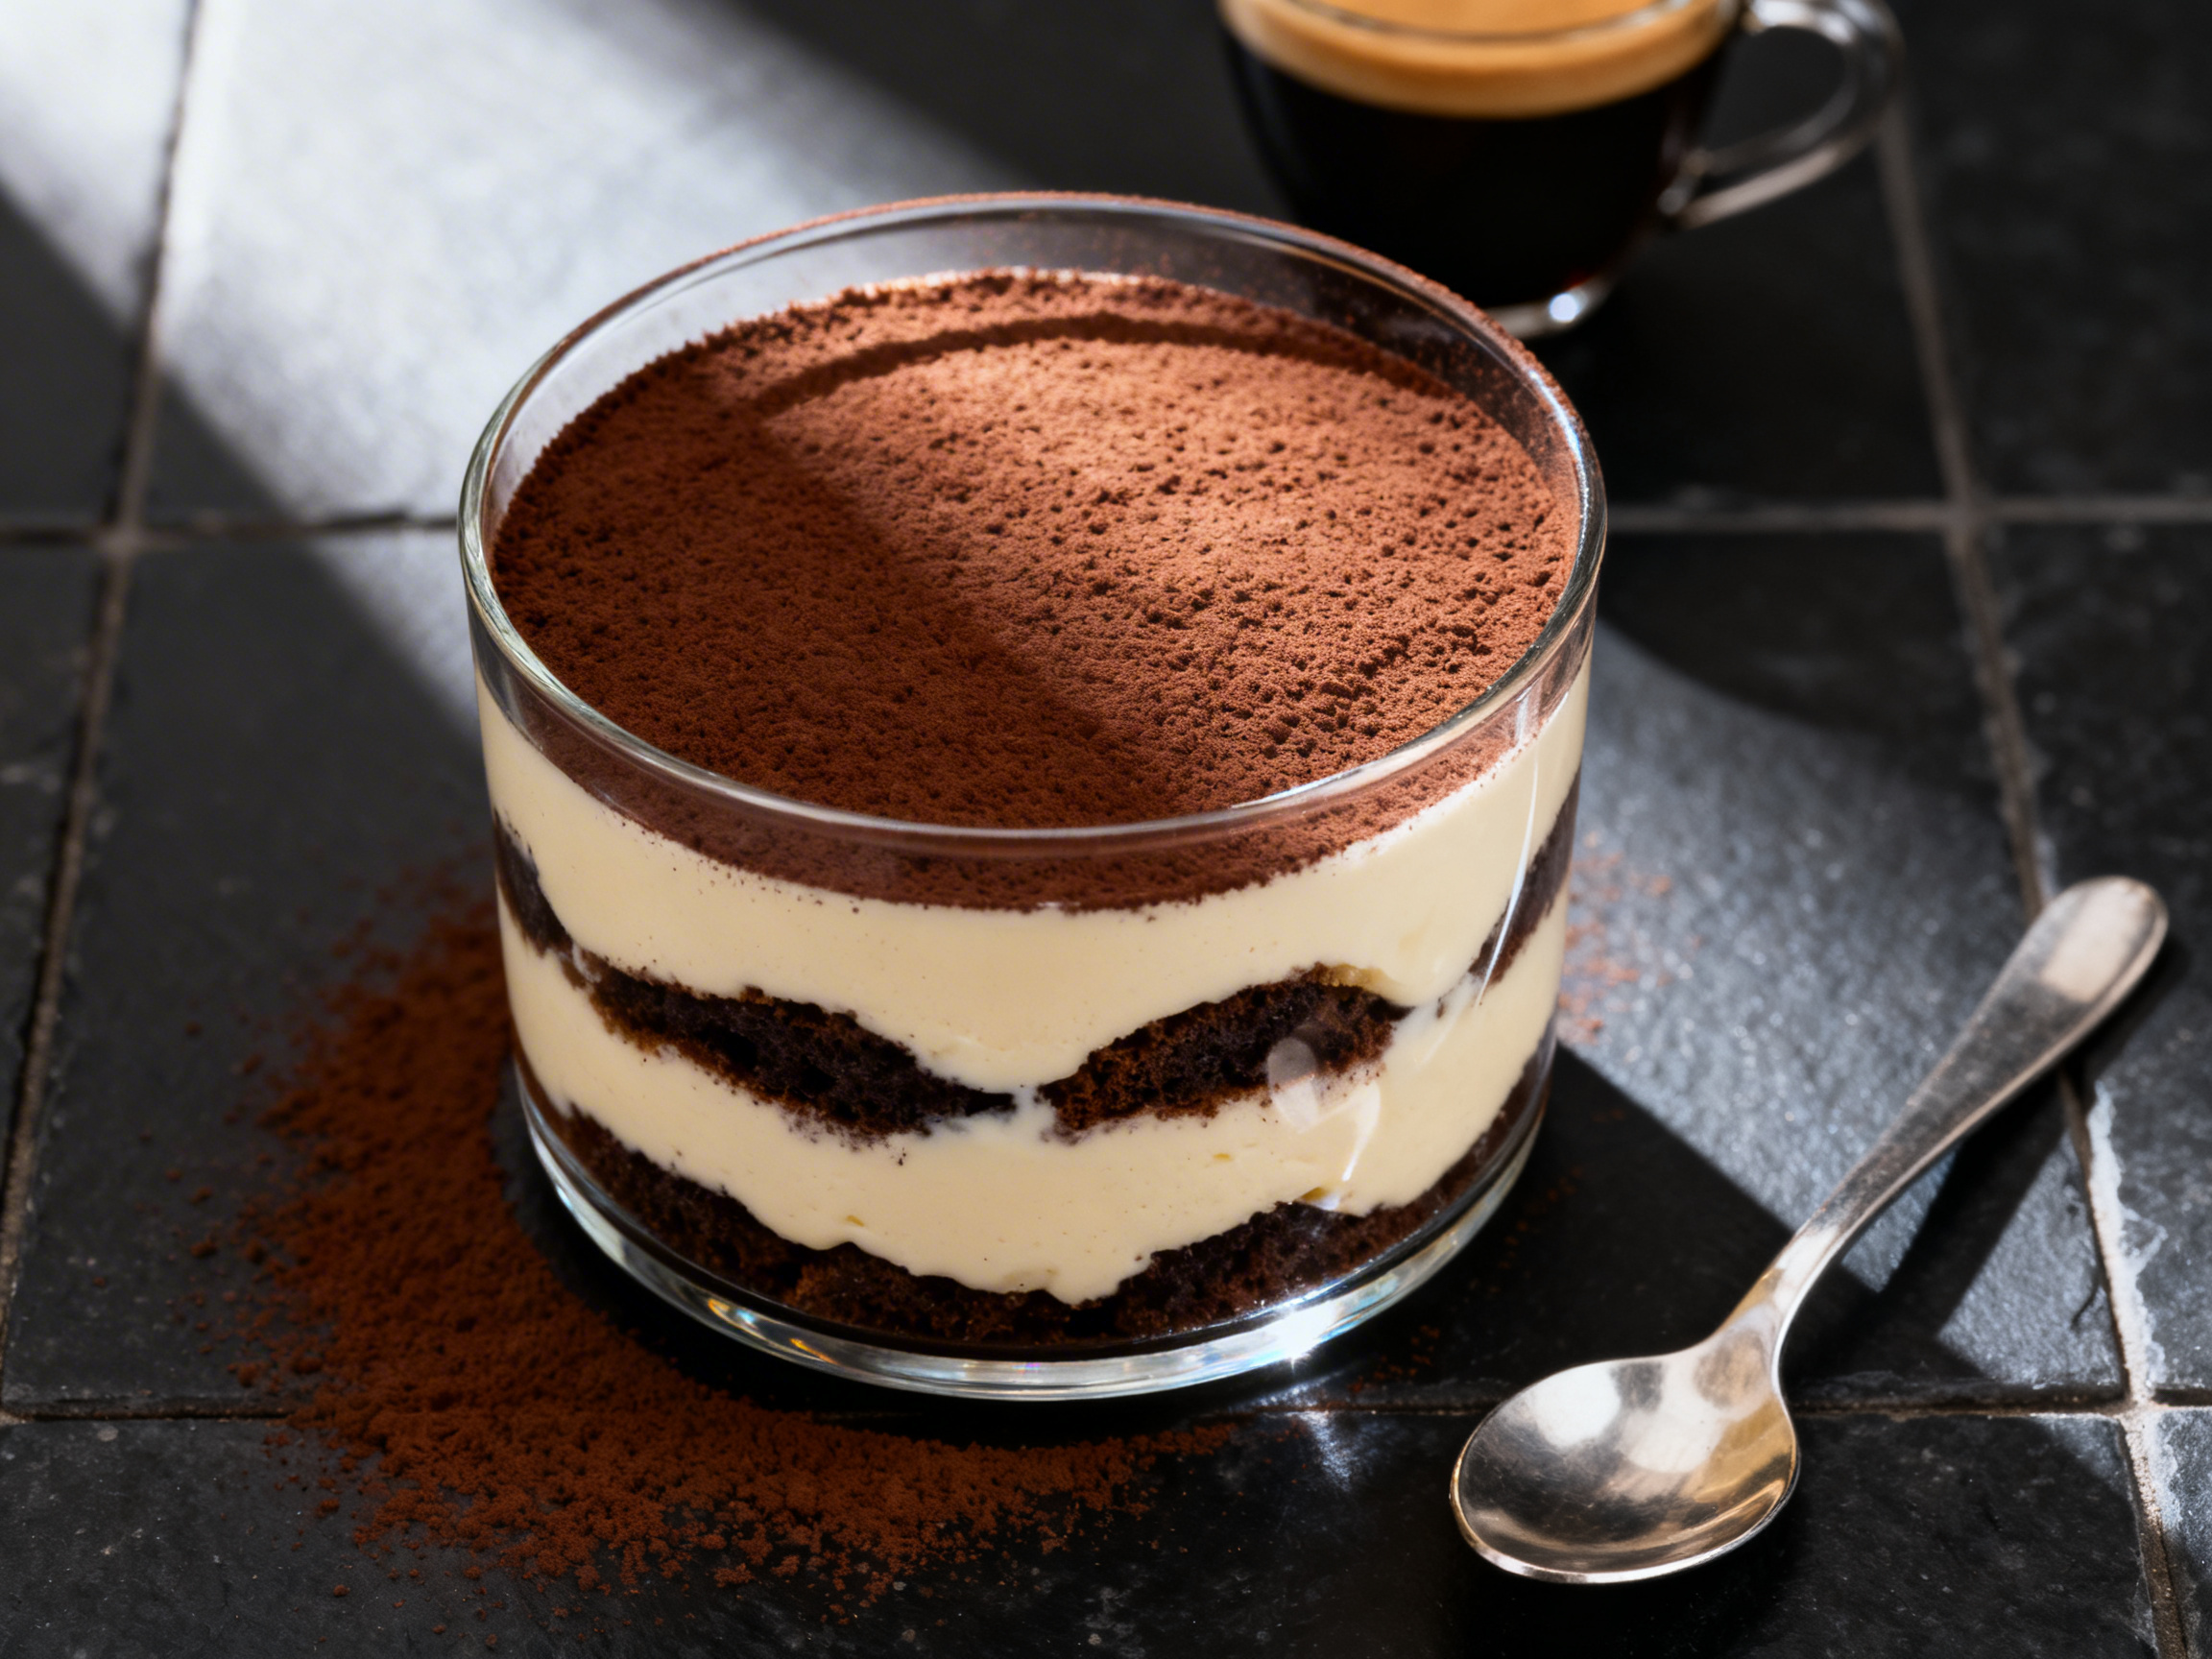
The defining challenge of Italian food photography is the five-minute sheen window on sauced pasta. When pasta carbonara or cacio e pepe comes off the heat, the emulsified egg and cheese coat every strand in a high-gloss lacquer that reads beautifully on camera. But within five minutes at room temperature - sometimes faster under studio lights - that sheen disappears. The sauce cools, tightens, and the pasta turns matte and clumped. This means your camera must already be on a tripod, your composition set, and your lighting fixed before the plate is placed. A second challenge is steam management. Hot osso buco and risotto release visible steam, which can look stunning backlit but will fog your lens if you are too close. Position a diffusion panel behind the dish and shoot through a gap to capture wisps without fogging. For tiramisu and cold desserts, condensation is the inverse problem - cocoa-dusted tops can attract moisture and spot. Shoot cold desserts at room temperature only after a five-minute rest, and apply cocoa powder immediately before the shutter fires.
Best Lighting for Italian Photography
The non-negotiable rule for Italian food photography is: no direct flash. Flash kills the sheen on sauced pasta faster than anything else, flattening the glossy surface into a chalky matte. Instead, position a large window to the left of the dish at roughly the ten-o'clock position and use a white foam-core reflector on the right side to open up shadows. This single-source, soft setup wraps light around the curves of pasta strands and creates the specular highlights that make carbonara look wet and rich. For osso buco and braises, you can allow slightly more contrast - a smaller reflector or a black card on the fill side creates shadows that define the braised meat's texture. For tiramisu, soft diffused light from the side at 45° reveals the contrast between the dark cocoa dusting and the pale mascarpone cream beneath. Avoid overhead lighting on any sauced pasta dish; it creates hot spots on the sauce surface and pools shadows inside deep pasta bowls. If shooting in a restaurant with warm ambient tungsten, set a custom white balance to 3,200K and add a CTO gel over any supplemental LED panel to match.
Camera Angles for Italian
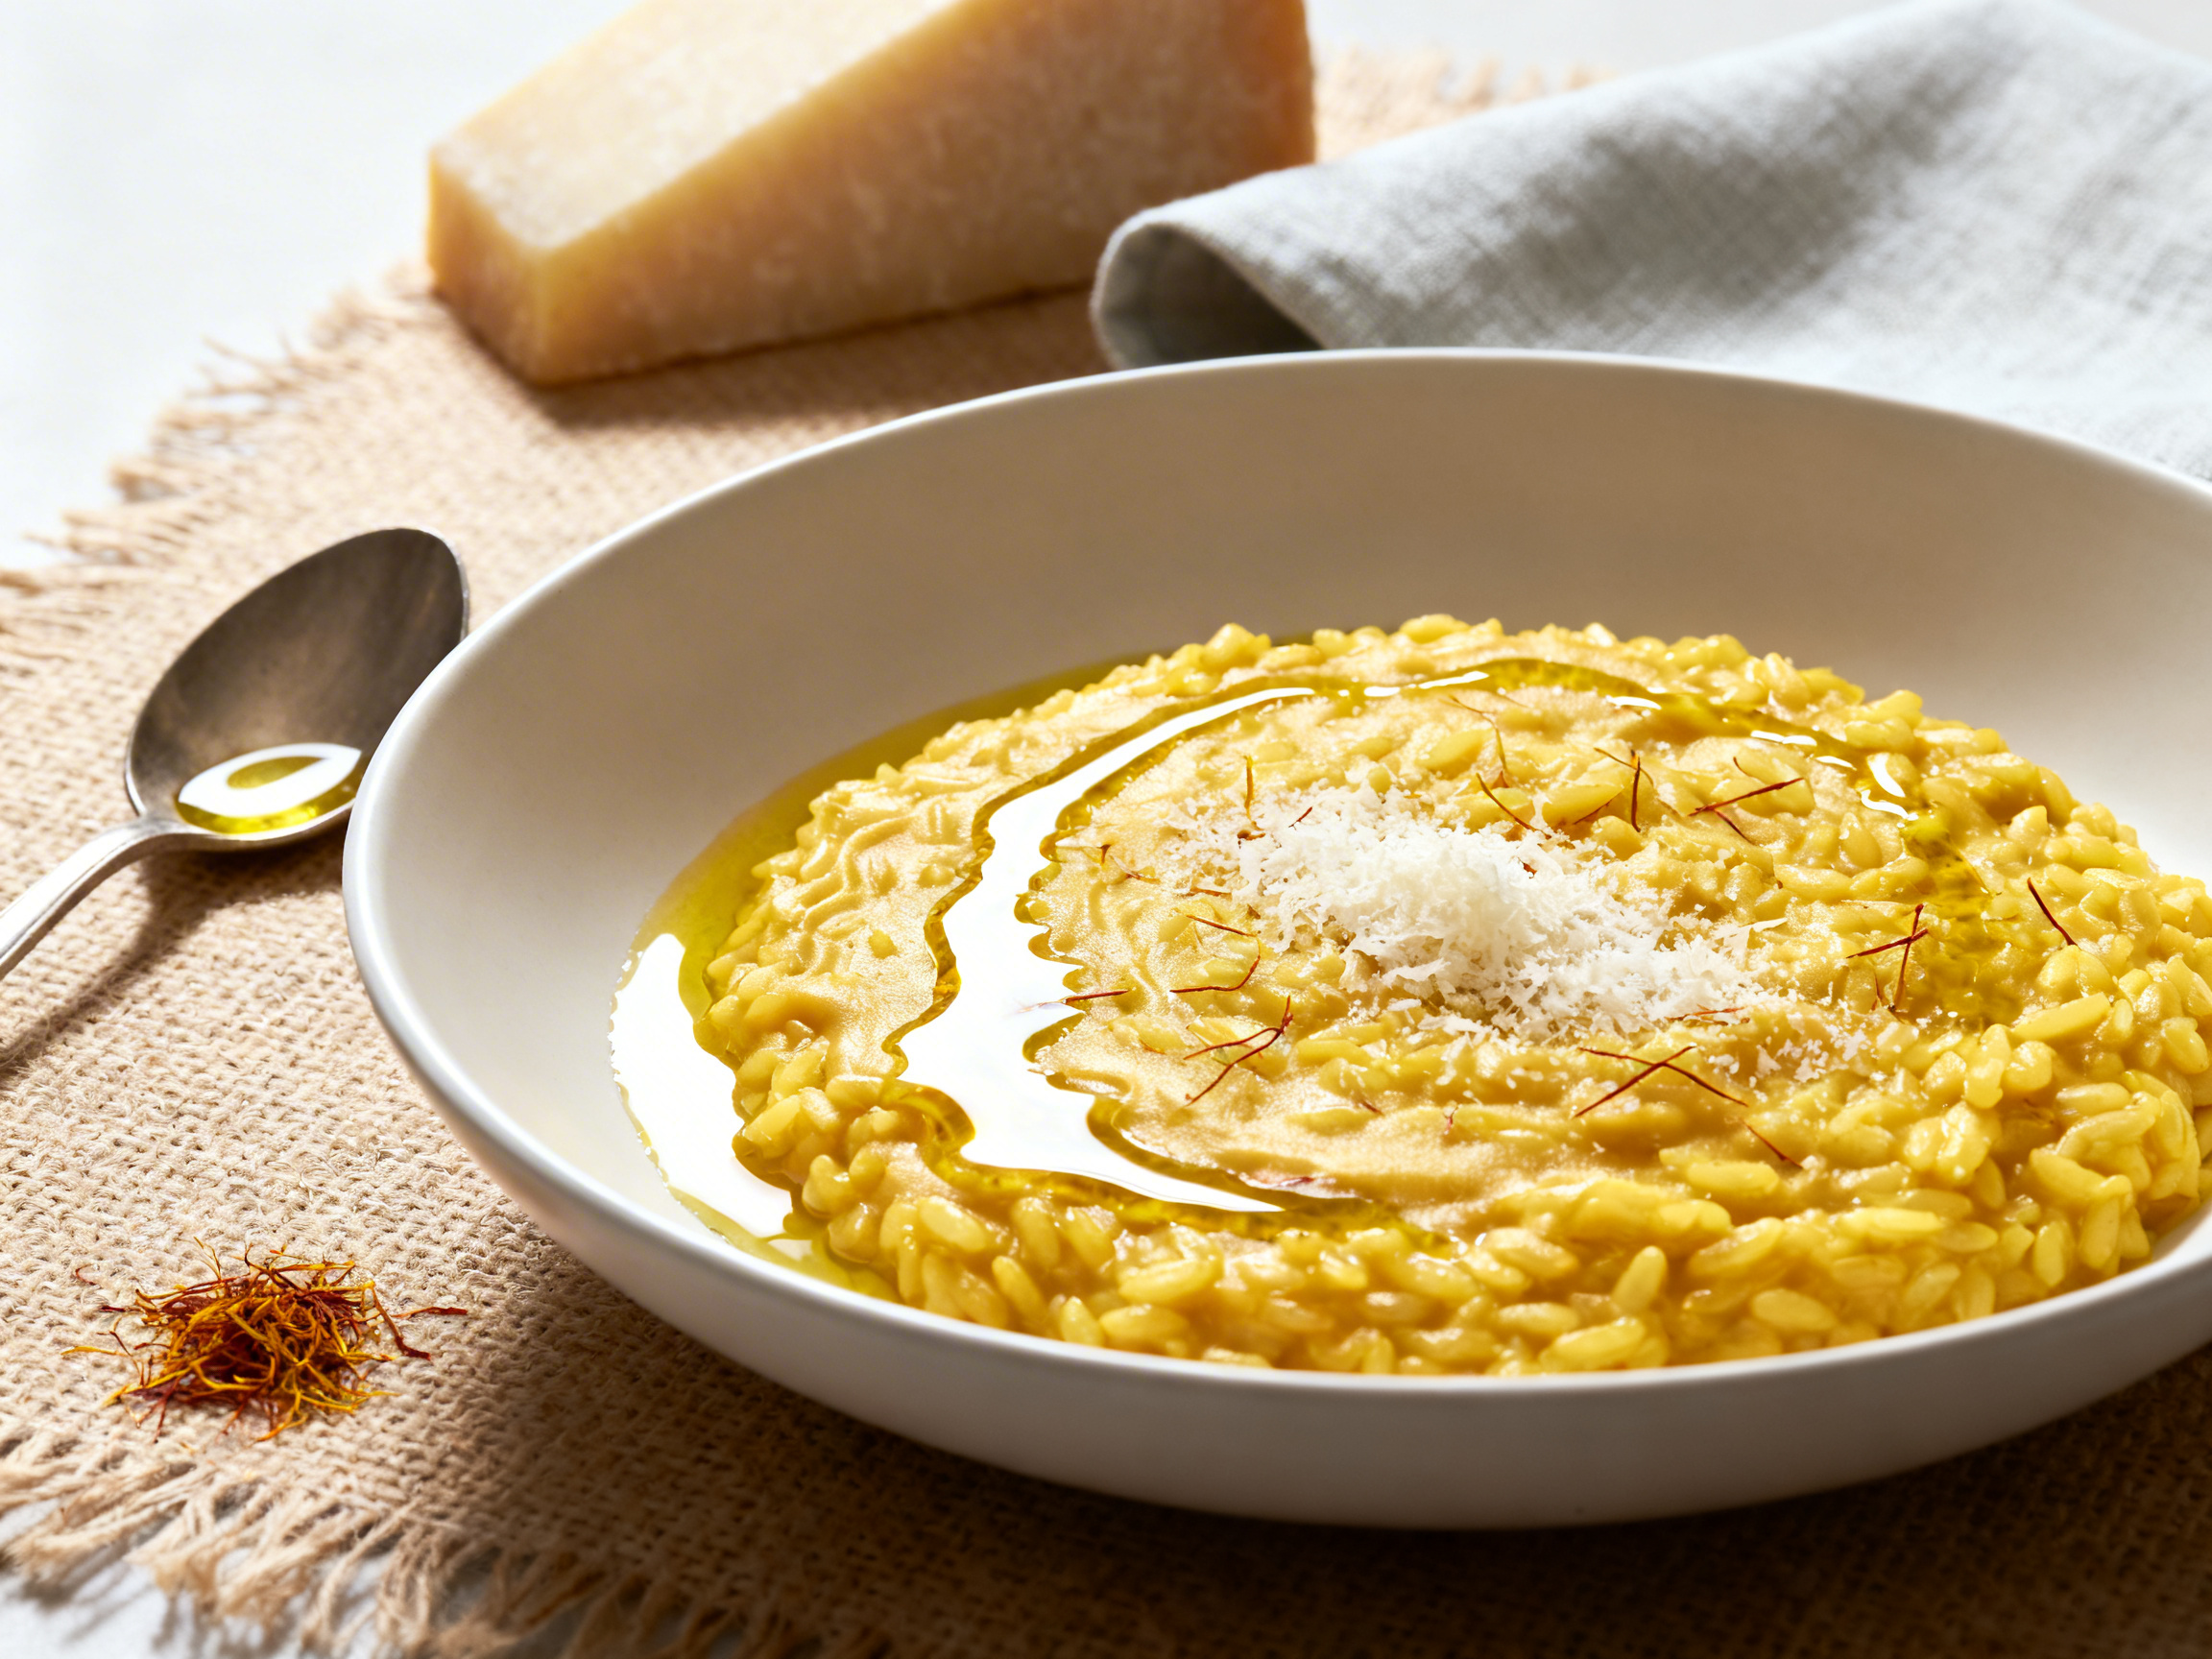
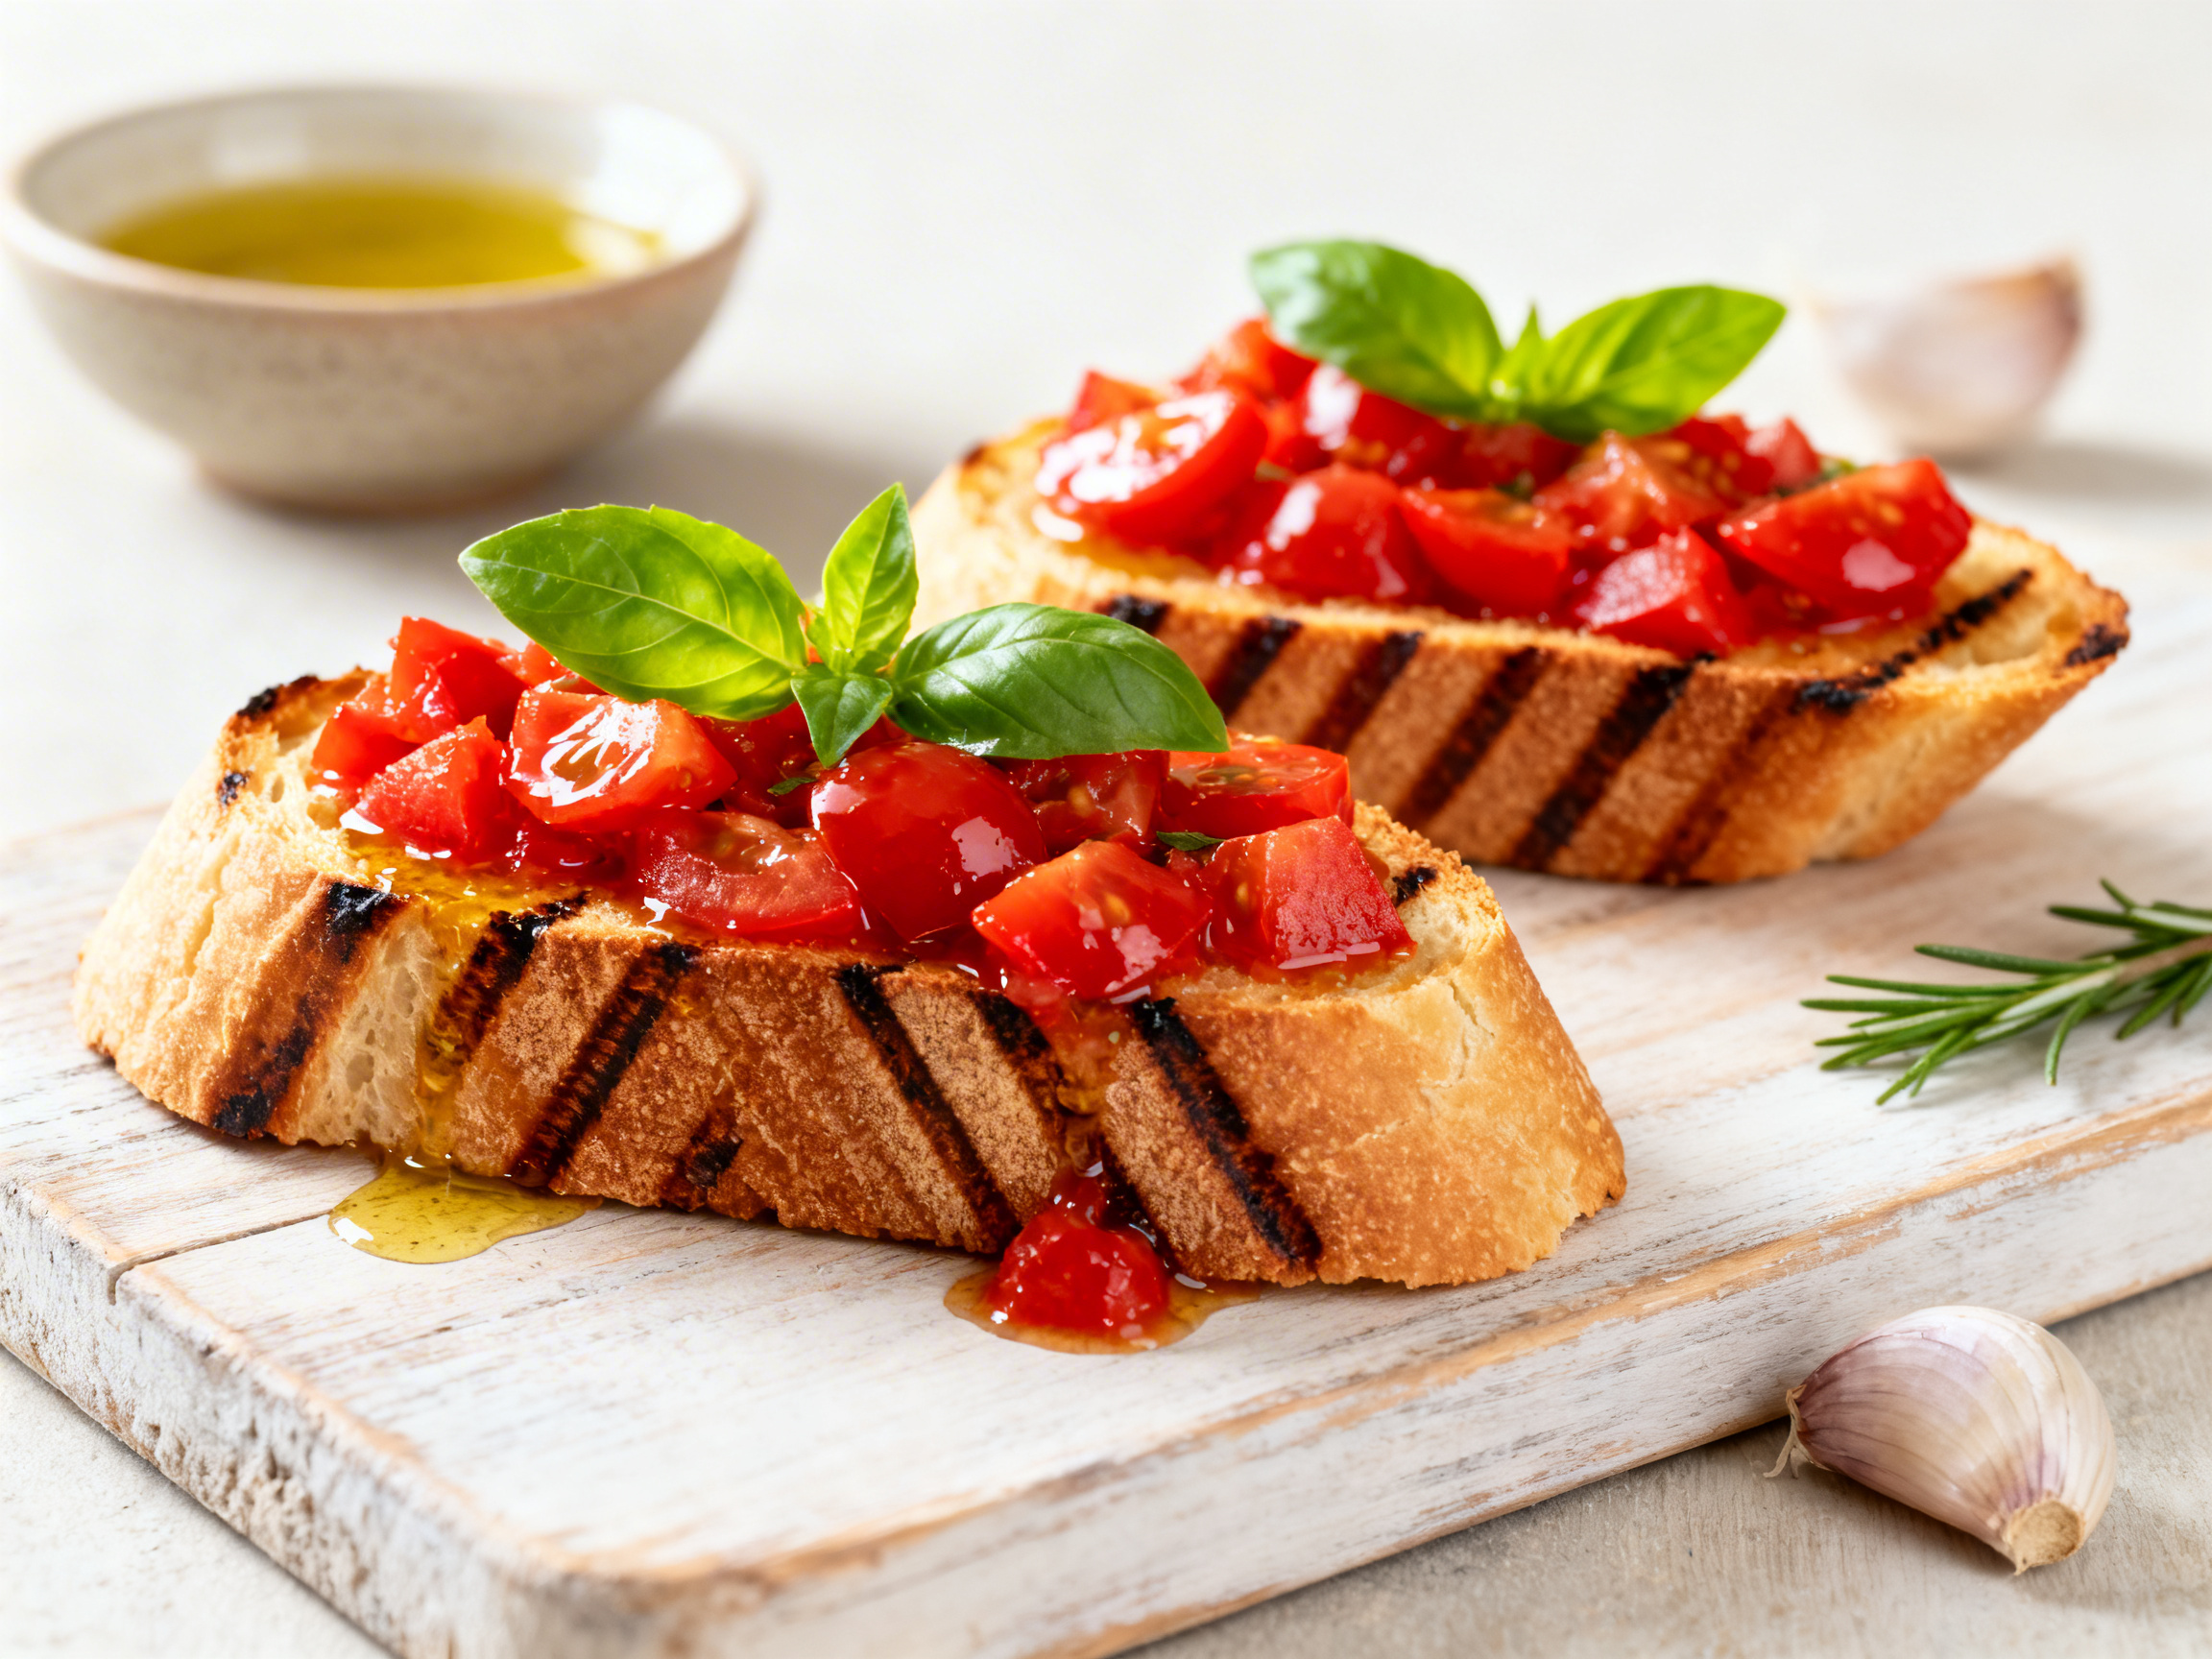
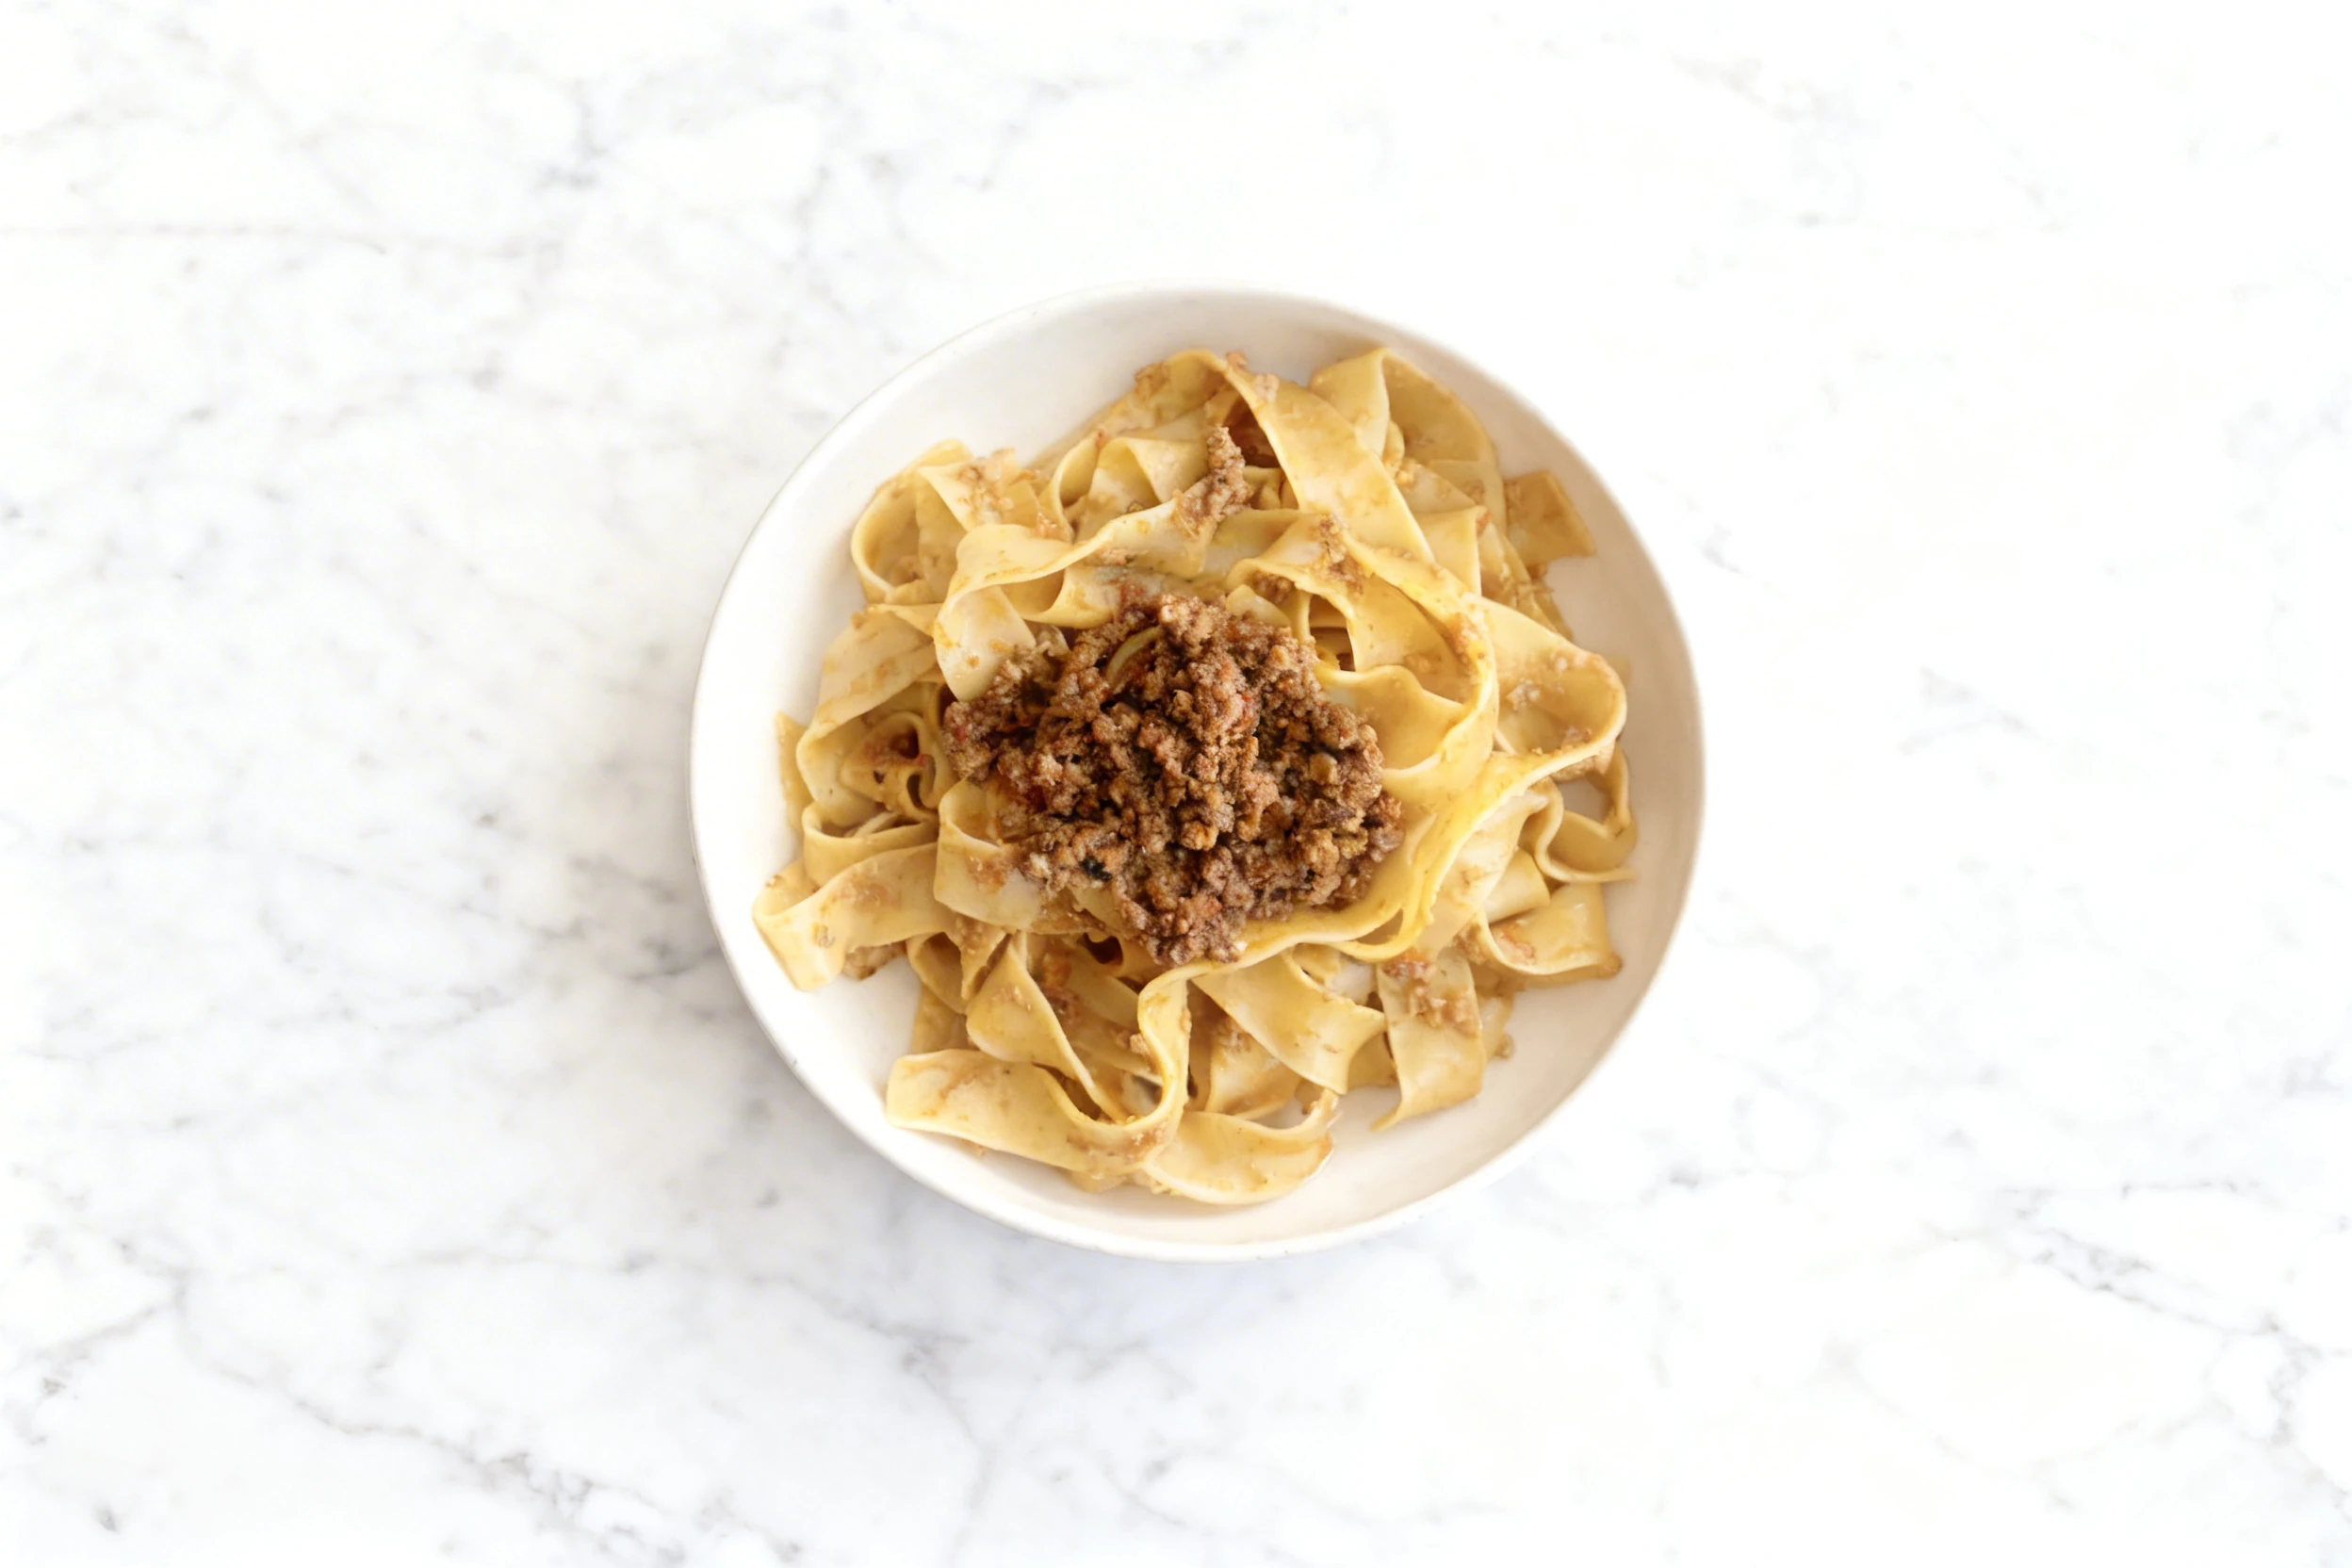
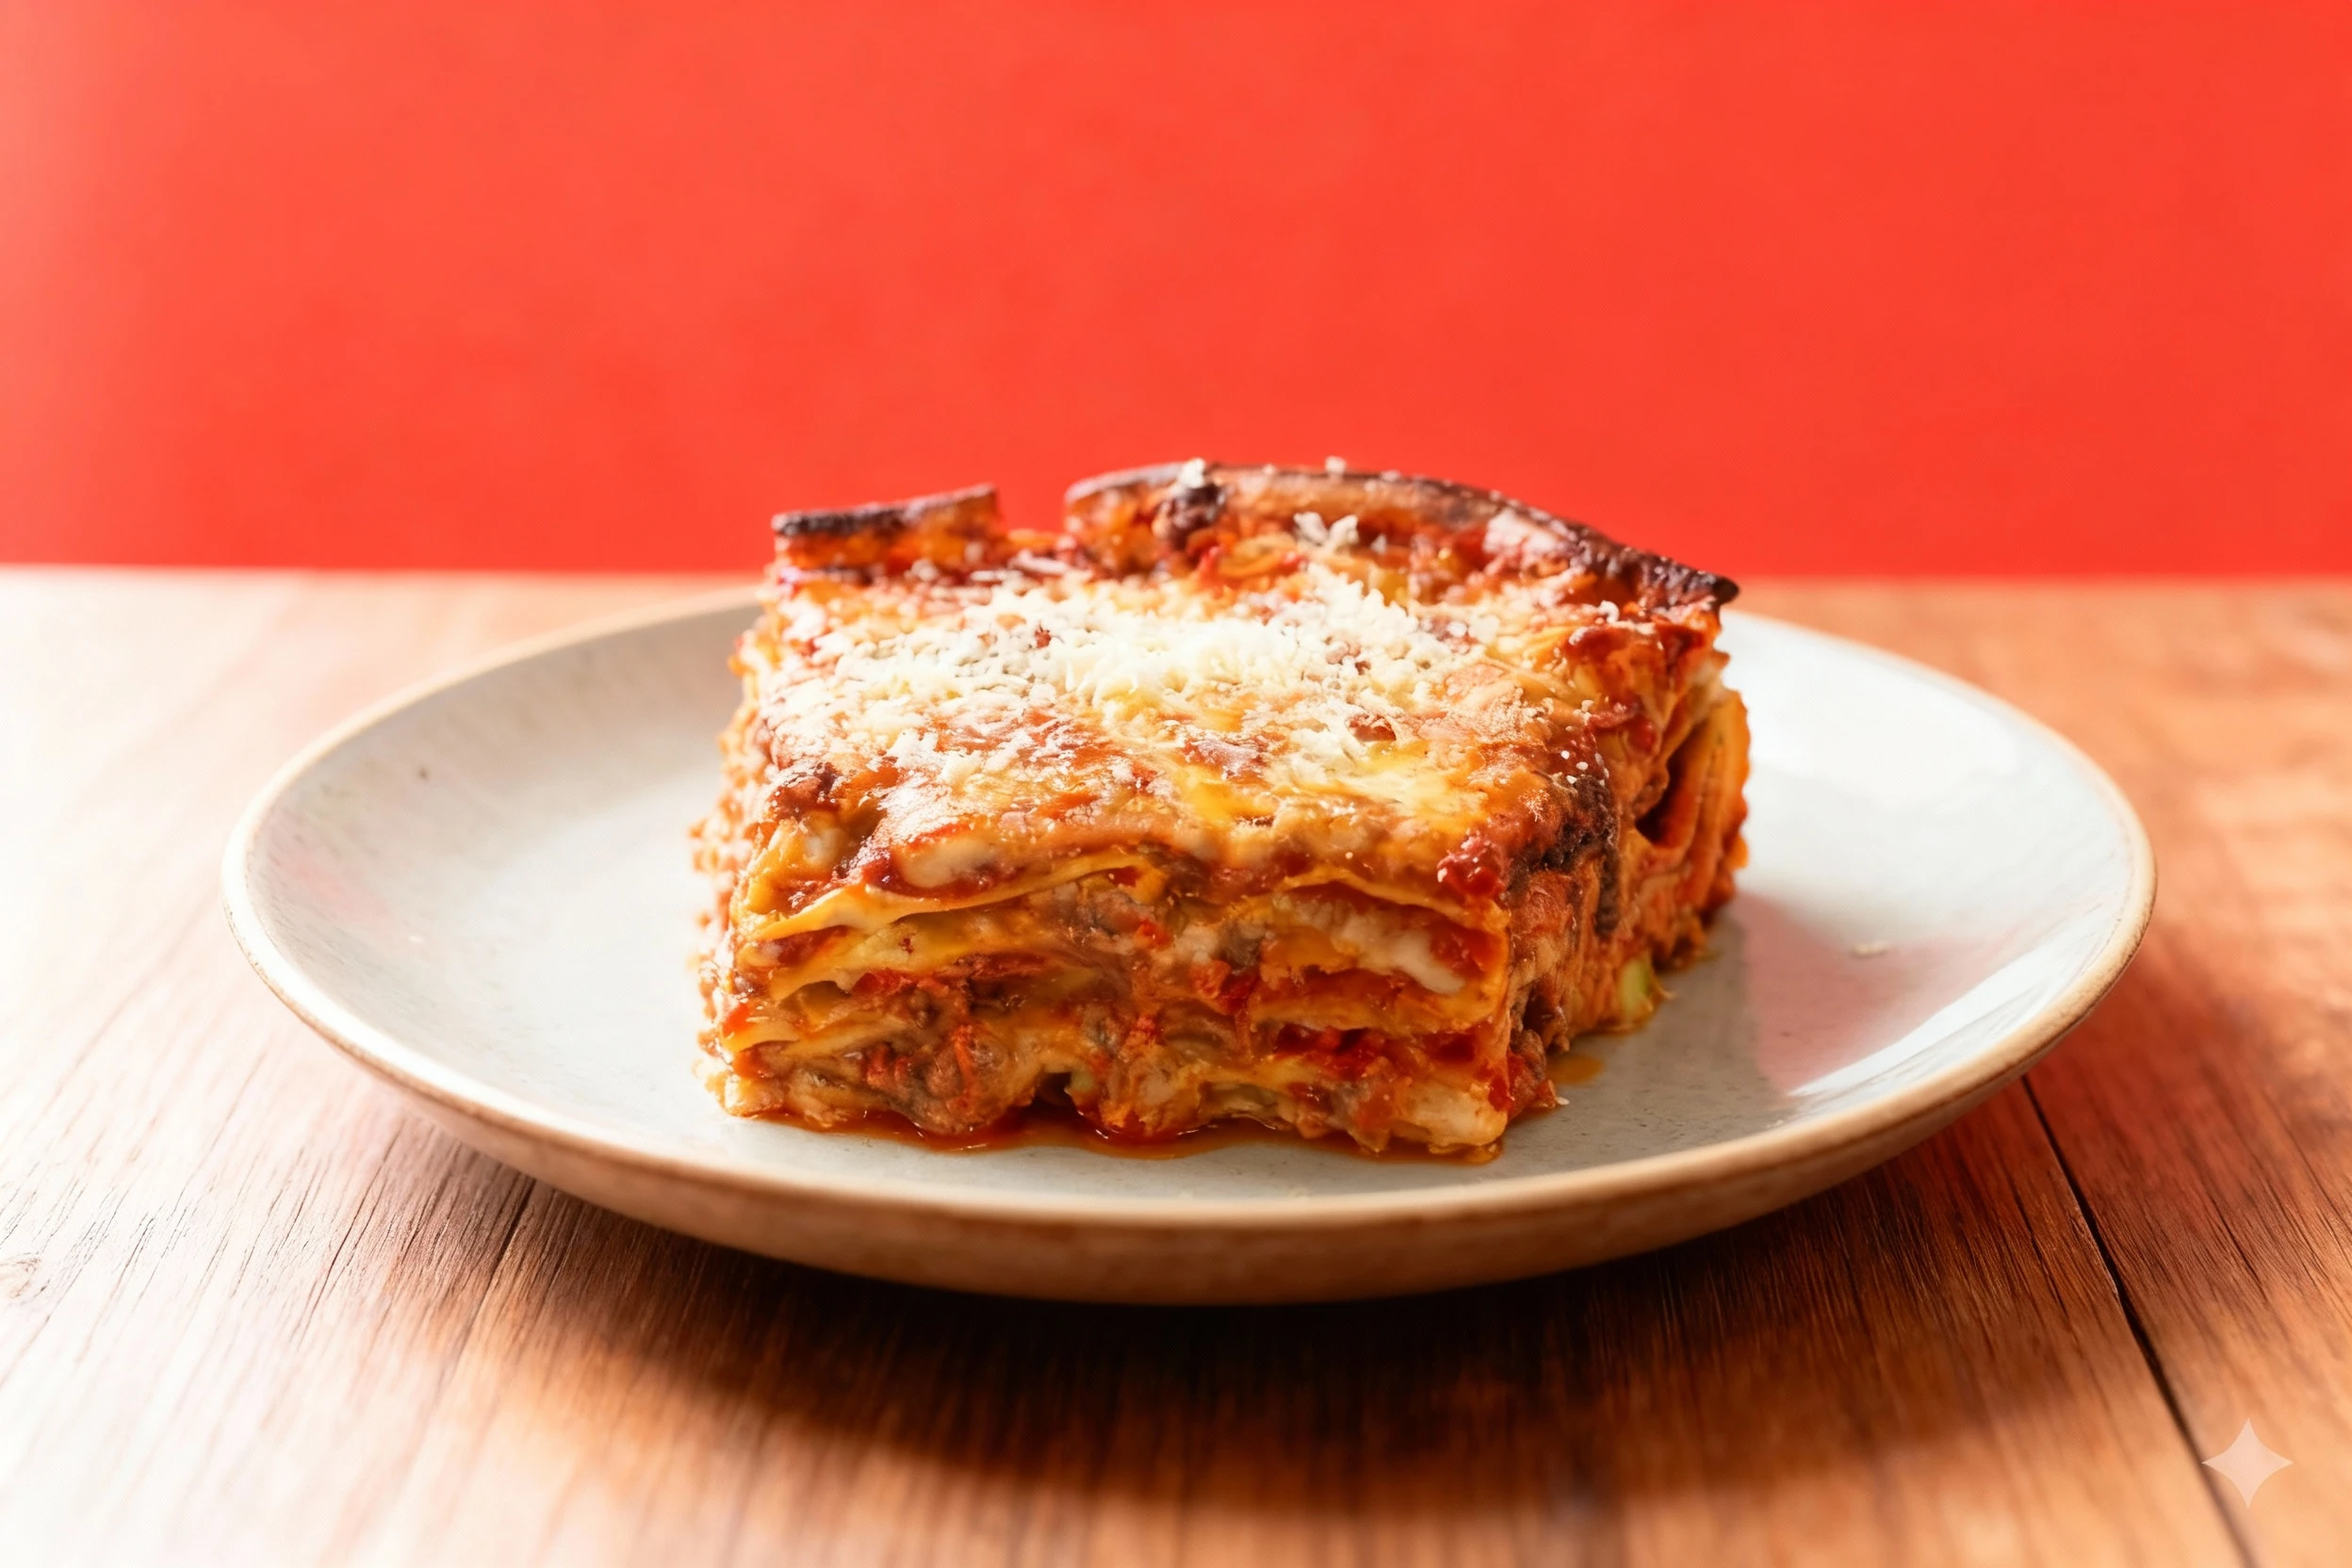
Different Italian dishes demand different camera positions. Pasta dishes - carbonara, cacio e pepe, spaghetti alle vongole - are almost always strongest at the 45-degree angle. This angle reveals the depth of the twirl, shows the sauce coating on individual strands, and allows you to prop a fork mid-twist for that iconic lifted-strand shot. Pizza is the exception: shoot a full pie overhead to show the full topping distribution, and switch to a 35-to-45-degree angle only for a single slice, where you want to see the cheese stretch and crust layers. Antipasti boards and bruschetta land best at 30 to 35 degrees above the table - high enough to show the full spread without compressing it flat. Tiramisu and molten-chocolate desserts photograph strongest overhead or at very slight tilt, where the cocoa-dusted surface becomes the hero. Risotto sits between: a 35-degree angle from the front-left shows the flowing consistency while letting you see toppings like saffron strands or grated Parmigiano-Reggiano. For osso buco, a side-angled 30-degree shot that captures the marrow inside the bone cross-section tells the most compelling story.
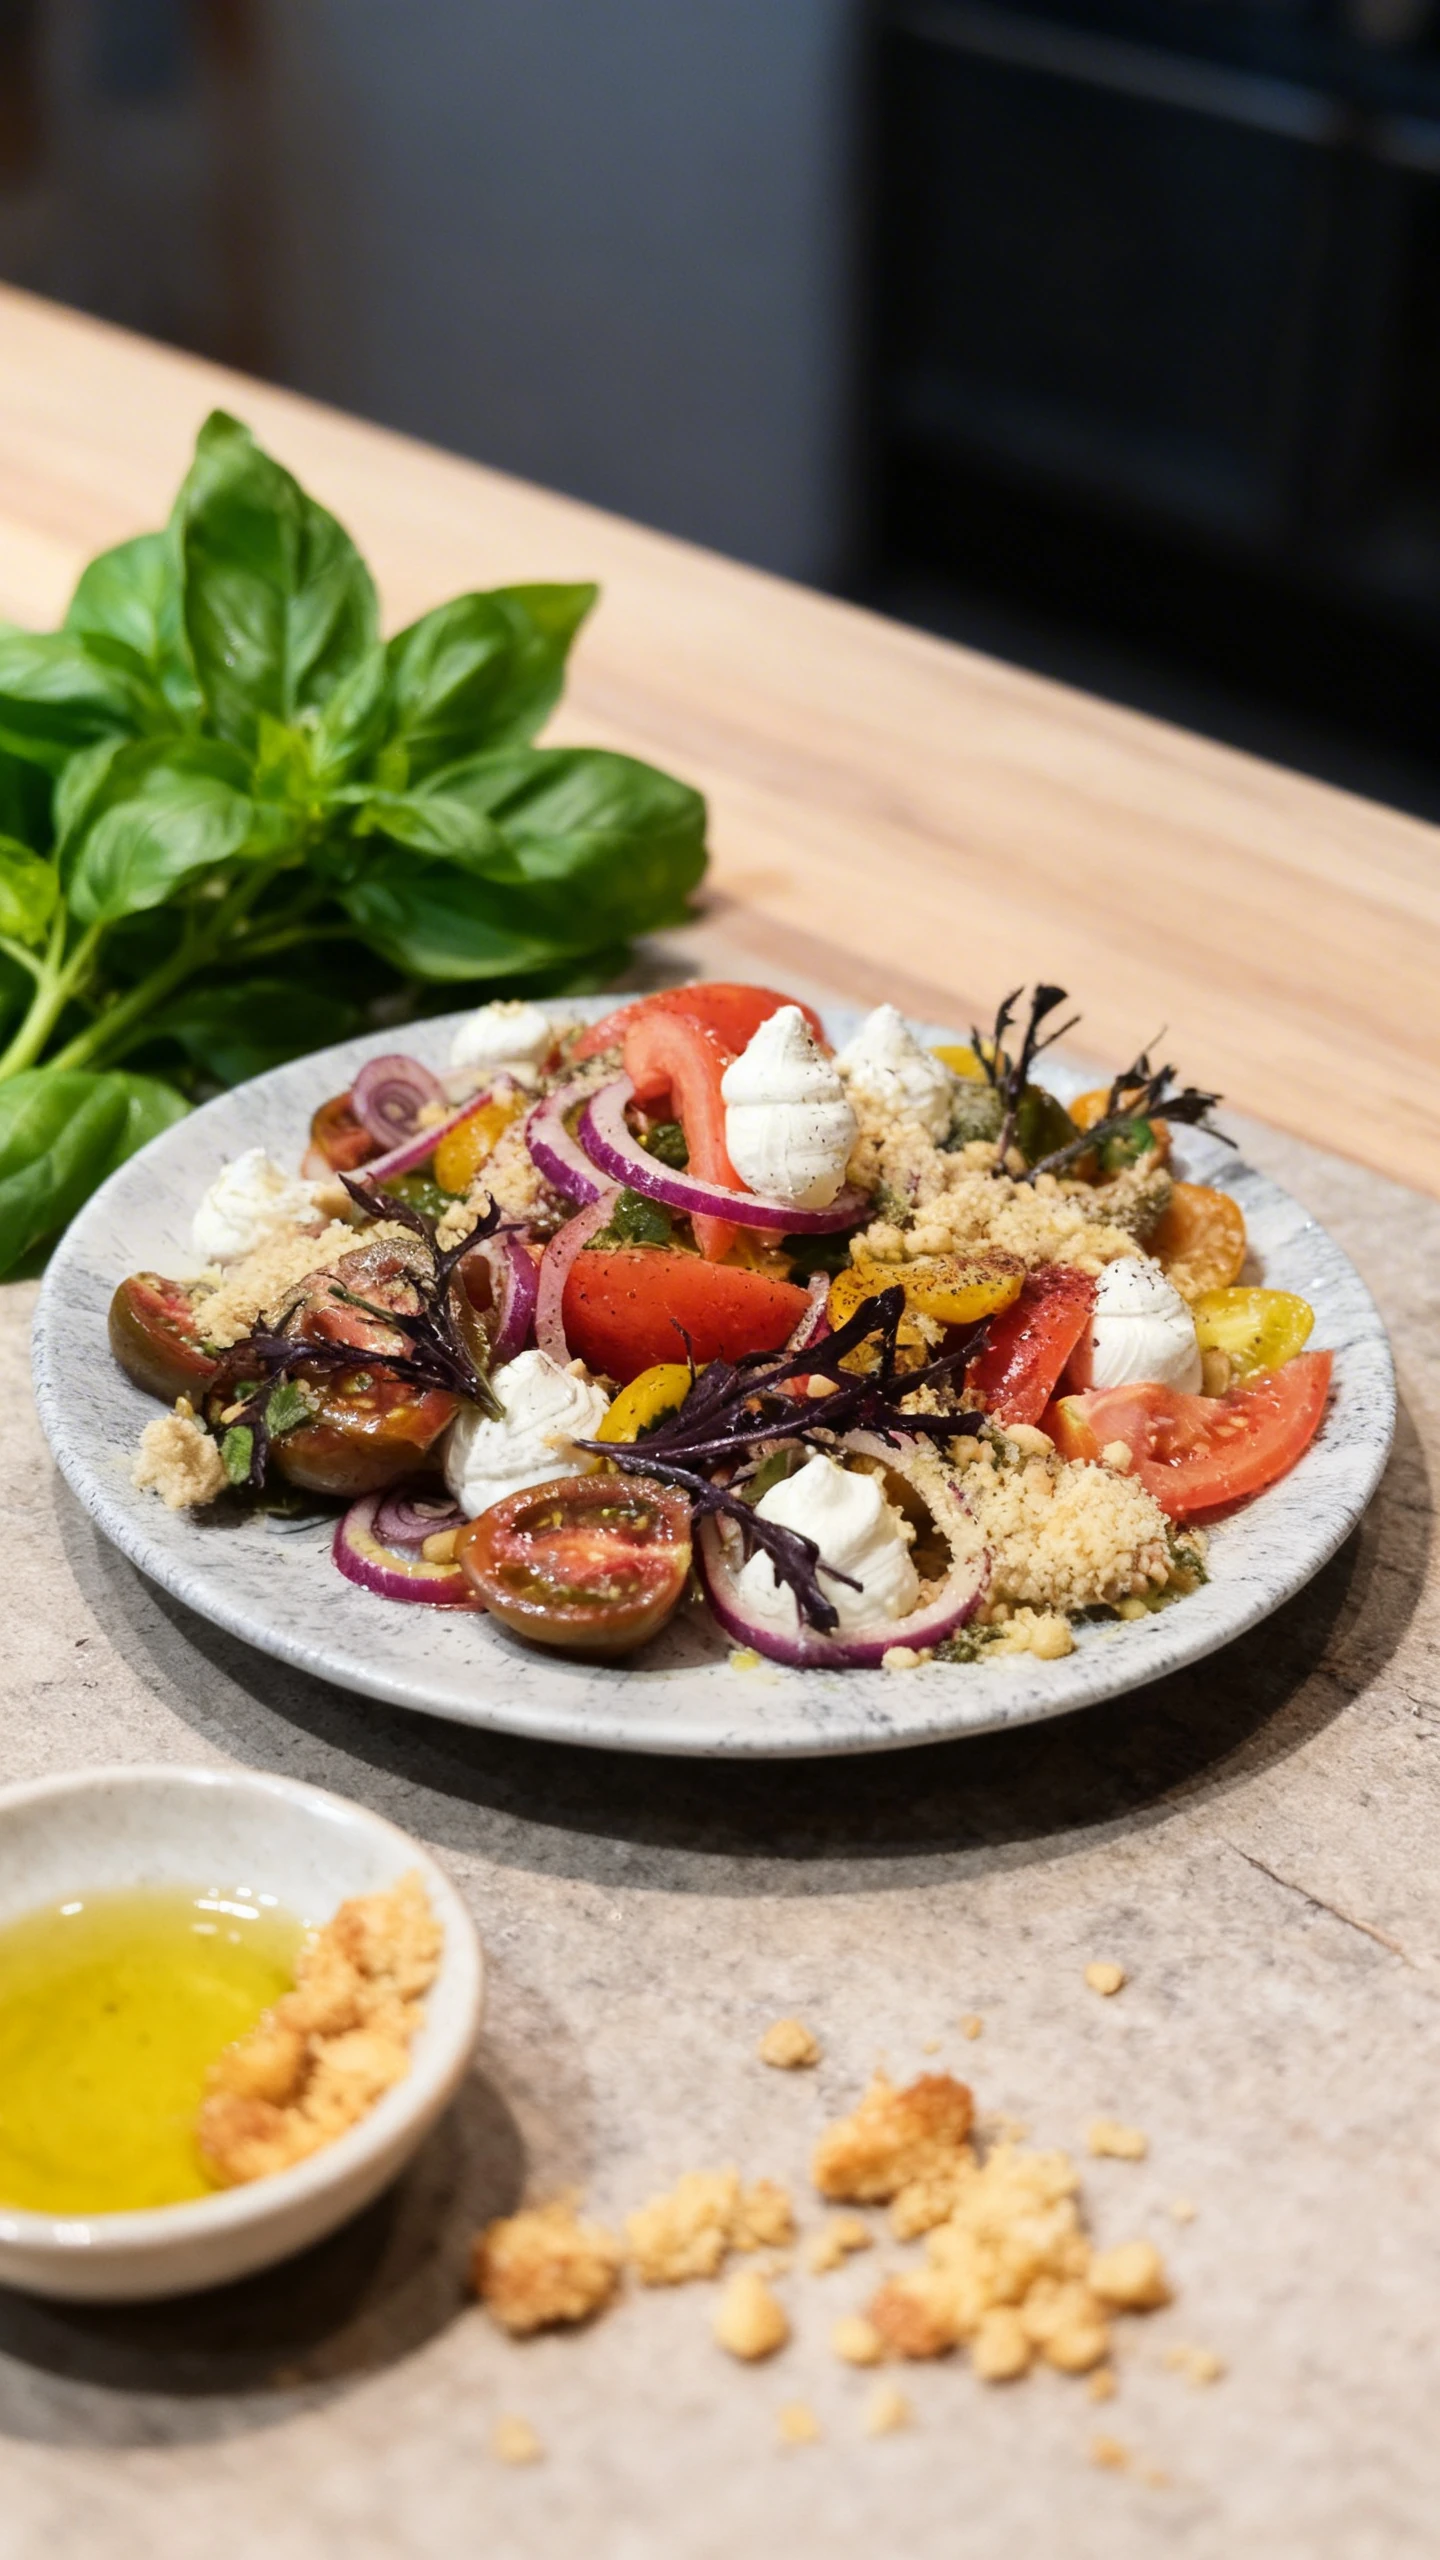
Food Styling and Props
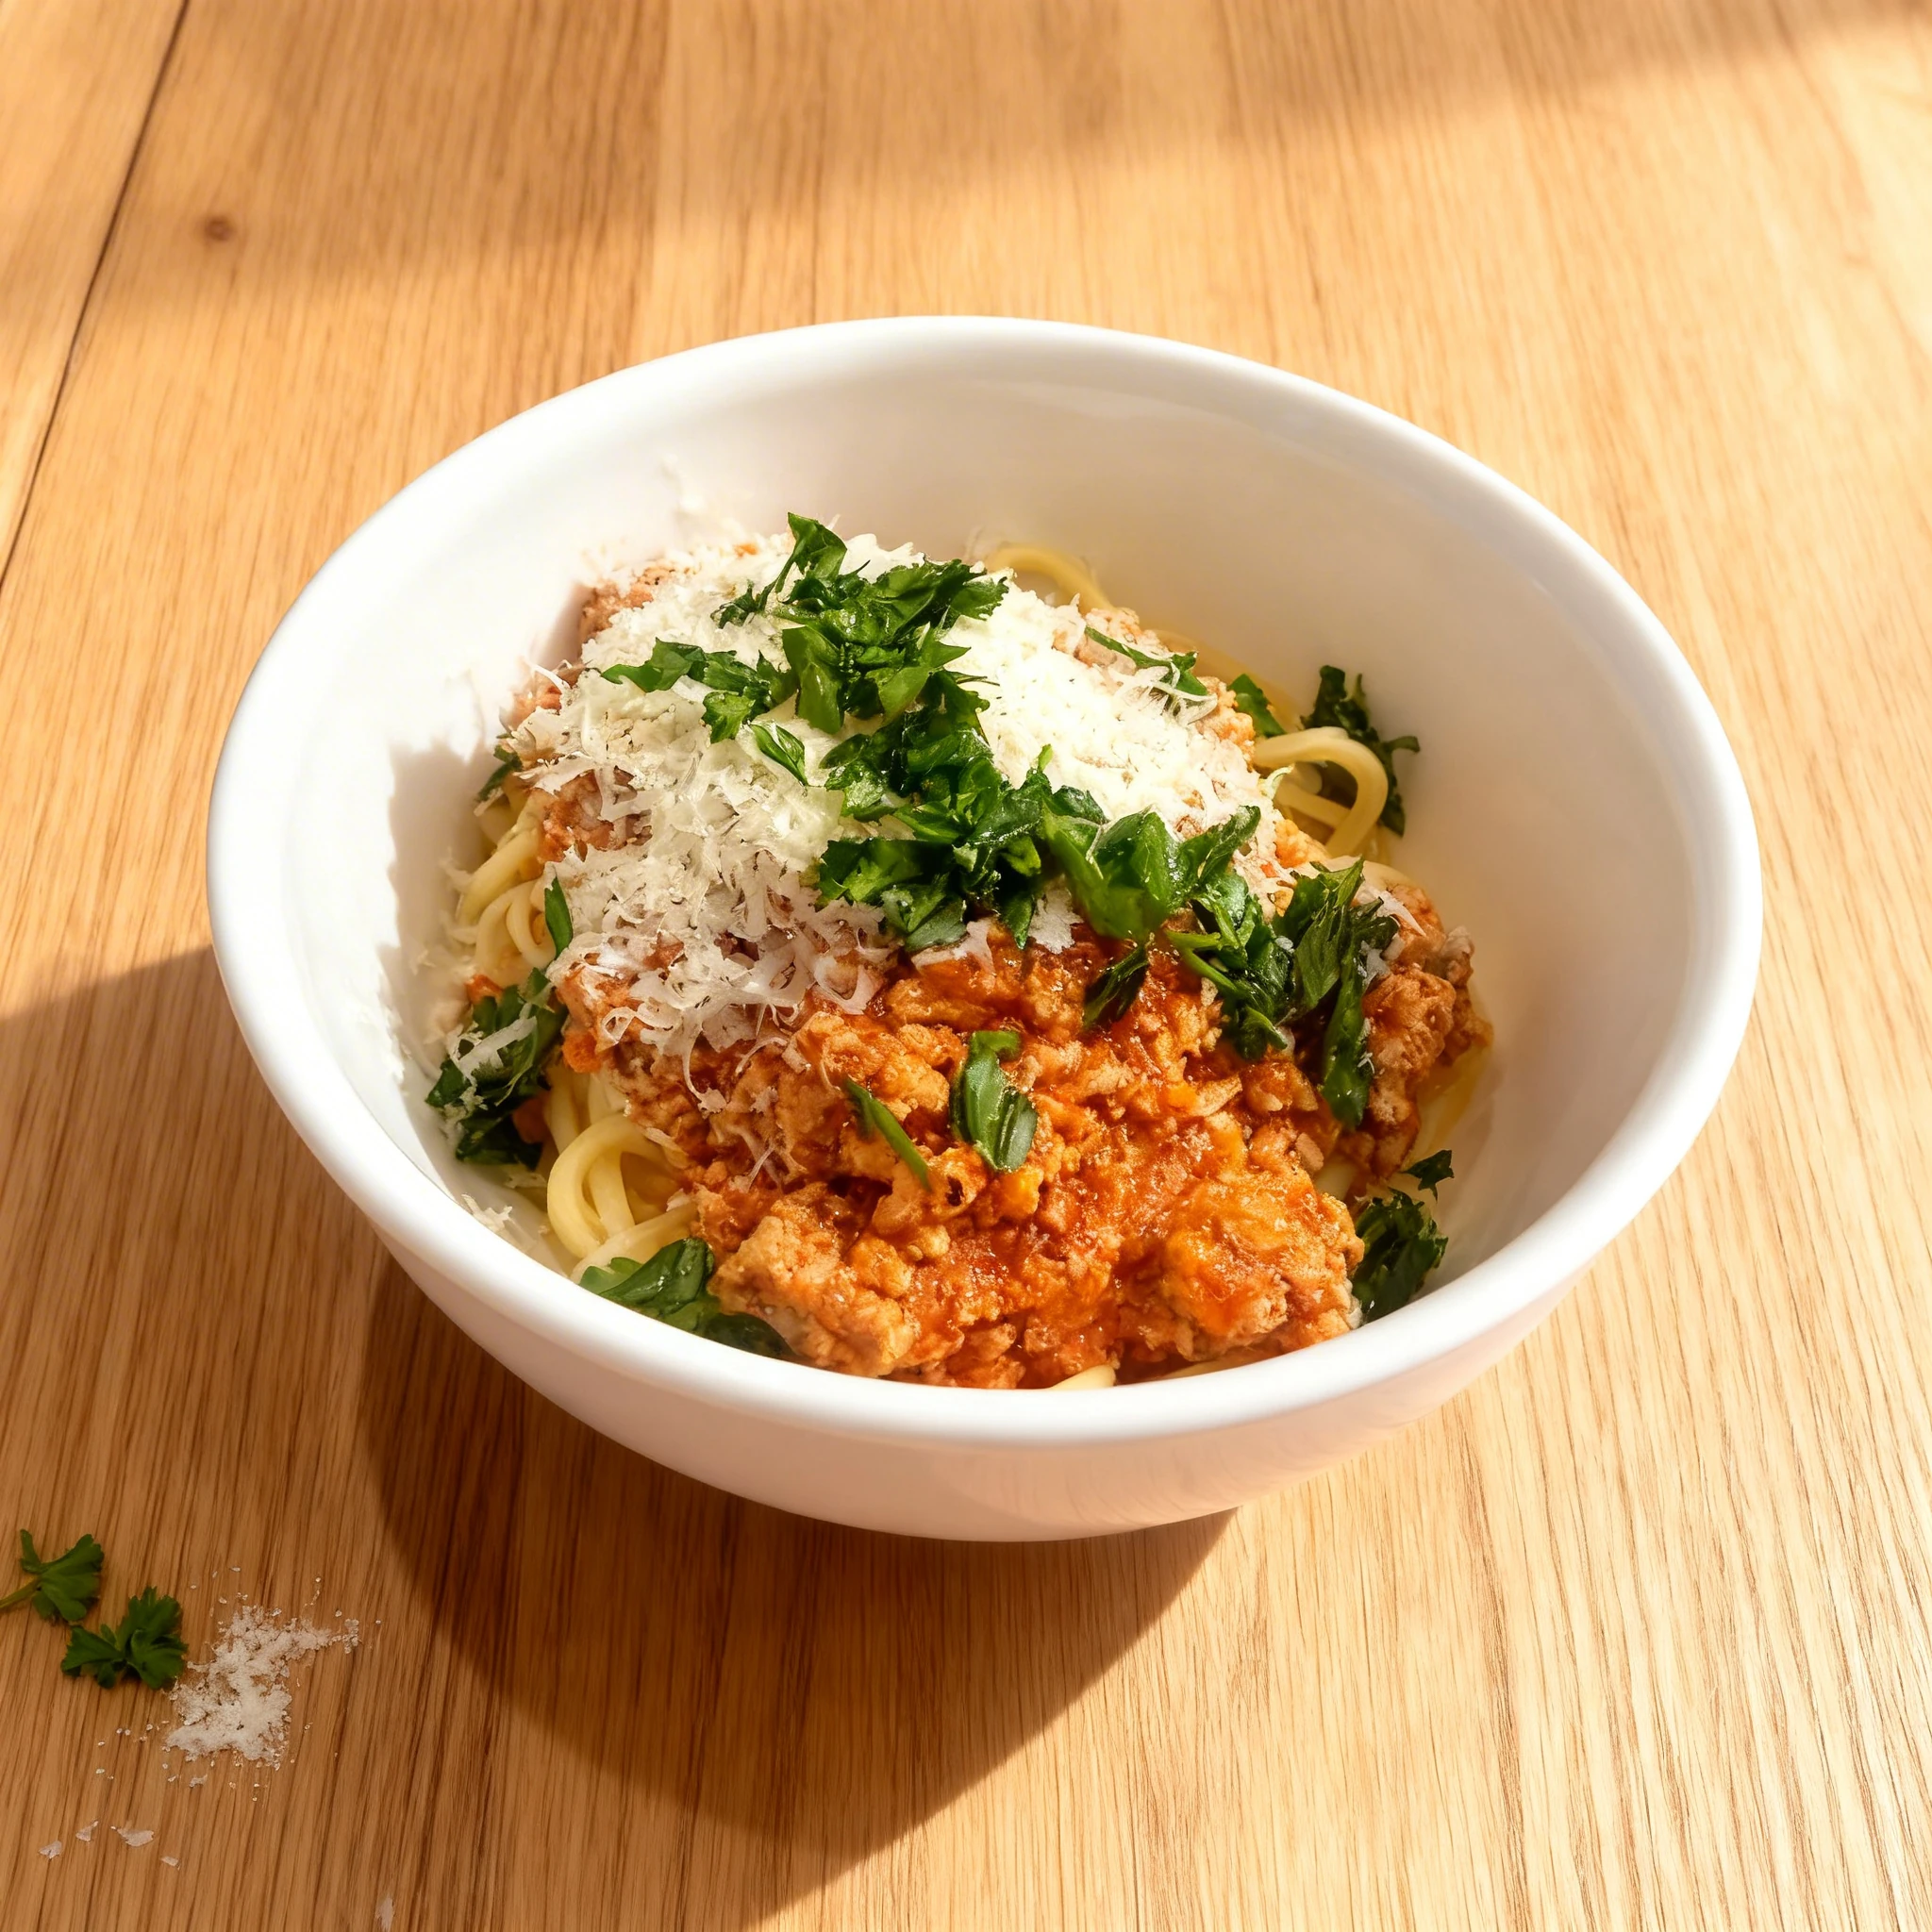
Italian food styling hinges on controlled abundance - the look of a dish that was prepared with generosity but not carelessness. For pasta, use a large carving fork to create a twirl: insert the fork, rotate slowly while lifting, and set the nest on the plate slightly off-center. Leaving a small pool of sauce visible around the base of the twirl tells the viewer the pasta is properly sauced. Scatter three to five fresh basil leaves or a pinch of flat-leaf parsley nearby; never fan them in a perfect arc - drop them from a few inches above so they land naturally. For carbonara, a few cracks of coarse black pepper over the top immediately before the shot adds texture and signals the dish's identity. For risotto, use a wide shallow bowl; spoon the risotto in a loose mound, not packed, and let it spread naturally to the edges. A drizzle of finishing olive oil applied with a teaspoon creates a gloss trail. For tiramisu in a glass or ramekin, a small offset spatula dragged across the cocoa top creates a perfect dusted finish. Bruschetta should be placed with one piece leaning against another at a slight angle; this creates the height dimension that flat food lacks. Tuck a whole garlic clove and a branch of fresh rosemary into the frame's negative space. For osso buco, place the gremolata - the parsley, lemon zest, and garlic garnish - directly on the cross-cut bone face so it reads clearly in the shot.
Recommended props
Equipment Guide
For Italian food photography, a full-frame mirrorless or DSLR body gives you the sensor depth to capture fine pasta strand detail in the shadow areas of a bowl. Pair it with an 85mm or 100mm prime lens at f/2.8 to f/4 - this focal length lets you fill the frame from a comfortable distance without the distortion that a 35mm would introduce into pasta bowls. A macro lens is worth having specifically for the close-up detail shots: the curl of a pasta edge, a sesame seed on focaccia, the cocoa-powder crust on tiramisu. For lighting hardware, a 60-by-90-centimeter softbox or a large diffusion scrim positioned between the window and the dish is the workhorse of the setup. A white foam-core reflector (50 by 70 centimeters) on the opposite side completes the two-card bounce system. Use a cable release or two-second timer to eliminate camera shake when shooting at f/4 with low-ISO natural light. A small spray bottle with water adds condensation to wine glasses; a fine-tipped brush applies olive oil highlights to individual pasta strands for hero shots.
Skip the photoshoot — enhance the italian photos you already have
The techniques on this page take time to master. MenuPhotoAI applies the same lighting, color, and texture corrections — automatically — to the smartphone photos you already shot. Studio-quality results in 30 seconds.
Try free — 5 credits, no cardCommon Italian Photography Mistakes
Waiting too long to shoot sauced pasta
The single most common mistake is plating the pasta, arranging props, then fussing with the camera angle. By the time the shutter fires, the sauce has cooled and the sheen is gone. Lock your frame and lighting before the dish leaves the kitchen. Have everything ready so you can shoot within 90 seconds of plating.
Using flash on glossy sauces
Direct flash creates a flat, blown-out hot spot on carbonara, cacio e pepe, and any cream-sauced pasta. The specular highlight it produces is too harsh and too small to look appetizing. Switch to a large softbox or natural window light instead; the larger the light source relative to the dish, the more flattering the sheen.
Over-styling the pasta twirl
Photographers sometimes spend five minutes perfecting a pasta nest until it looks architectural and unnatural - which the viewer instantly reads as fake. A single confident twirl with a fork, set down with light imperfection, reads as authentic and fresh. One or two stray strands are fine; they signal movement and life.
Shooting tiramisu from the side
Tiramisu is a layered dessert whose beauty lies in the contrast of cocoa-dusted top and the cream-and-biscuit layers beneath. A side-on angle collapses all of that into a single beige block. Shoot from overhead or at a very slight forward tilt to make the dusted surface the hero, with just enough angle to hint at the layers inside.
Ignoring color temperature in warm restaurant lighting
Warm tungsten restaurant lighting turns white pasta an unappetizing yellow and makes cream sauces look greenish in the shadows. Always set a custom white balance on a white card or a piece of white linen in the actual shooting light before you begin. Auto white balance drifts inconsistently between frames in mixed lighting situations.
Editing Tips
Italian food edits should enhance warmth without crossing into orange. In Lightroom or Capture One, pull highlights down slightly to recover sauce detail, and lift shadows just enough to see texture in the darkest pasta strands. Add warmth in the white balance by nudging the temperature slider 200 to 300K toward yellow. In the HSL panel, boost orange saturation slightly for tomato sauces and reduce yellow saturation if skin tones on the sauce look too ochre. Clarity at plus 10 to 15 adds micro-contrast that makes pasta strand texture pop. Avoid over-sharpening - it creates a gritty halo effect on smooth cream sauces. MenuPhotoAI's AI enhancement can apply food-specific tone curves and texture recovery in seconds, finishing what your in-camera capture started.
Platform-Specific Tips
On Instagram and TikTok, Italian food performs best as a close-crop 45-degree shot that fills the square or vertical frame with a pasta twirl or a cheese pull - the tactile, sensory shots that generate saves. Use warm, slightly high-contrast processing for maximum thumb-stop impact. For DoorDash and Uber Eats product listings, switch to a clean overhead or straight 45-degree format with a neutral background - delivery platform algorithms and A/B tests consistently show that clean compositions with identifiable hero elements drive higher click-through than busy lifestyle shots. Keep the background plain or use a simple linen texture. For print menus, you have the most room: a full 45-degree lifestyle shot with wine glass, props, and atmospheric depth works beautifully in a full-bleed spread. Ensure the image is exported at 300 DPI minimum with CMYK conversion for accurate sauce color reproduction in print. For Google Business profile photos, a bright, unambiguous overhead of the pizza or a clean front-lit pasta bowl performs best for local search conversion.
Italian Photo Examples
Real italian photos from restaurants using MenuPhotoAI. Tap any category to see the full gallery and the before-and-after view.
Take your Italian photos further with AI
Once you have a solid shot using the techniques above, MenuPhotoAI can handle the finishing work. Our AI removes distracting backgrounds, corrects exposure and white balance, and applies cuisine-appropriate color grading — turning a good smartphone photo into something you'd be proud to put on your menu or delivery app listing. Start with 5 free photos, no credit card required.
Frequently Asked Questions
Skip the photoshoot — enhance the italian photos you already have
The techniques on this page take time to master. MenuPhotoAI applies the same lighting, color, and texture corrections — automatically — to the smartphone photos you already shot. Studio-quality results in 30 seconds.
Try free — 5 credits, no cardMore Cuisine Photography Guides
This guide reflects best practices for Italian food photography as of 2026. Techniques may vary based on specific dishes, equipment, and shooting conditions. MenuPhotoAI is an AI food photo enhancement platform.