Photography Guide
Coffee & Cafe Food Photography Guide
Photographing latte art within 2 minutes before a surface film forms and the pattern loses definition.
Primary Angle
Overhead
Lighting
Overhead soft diffused light for latte art; side window light for steam drama
Read time
~8 min
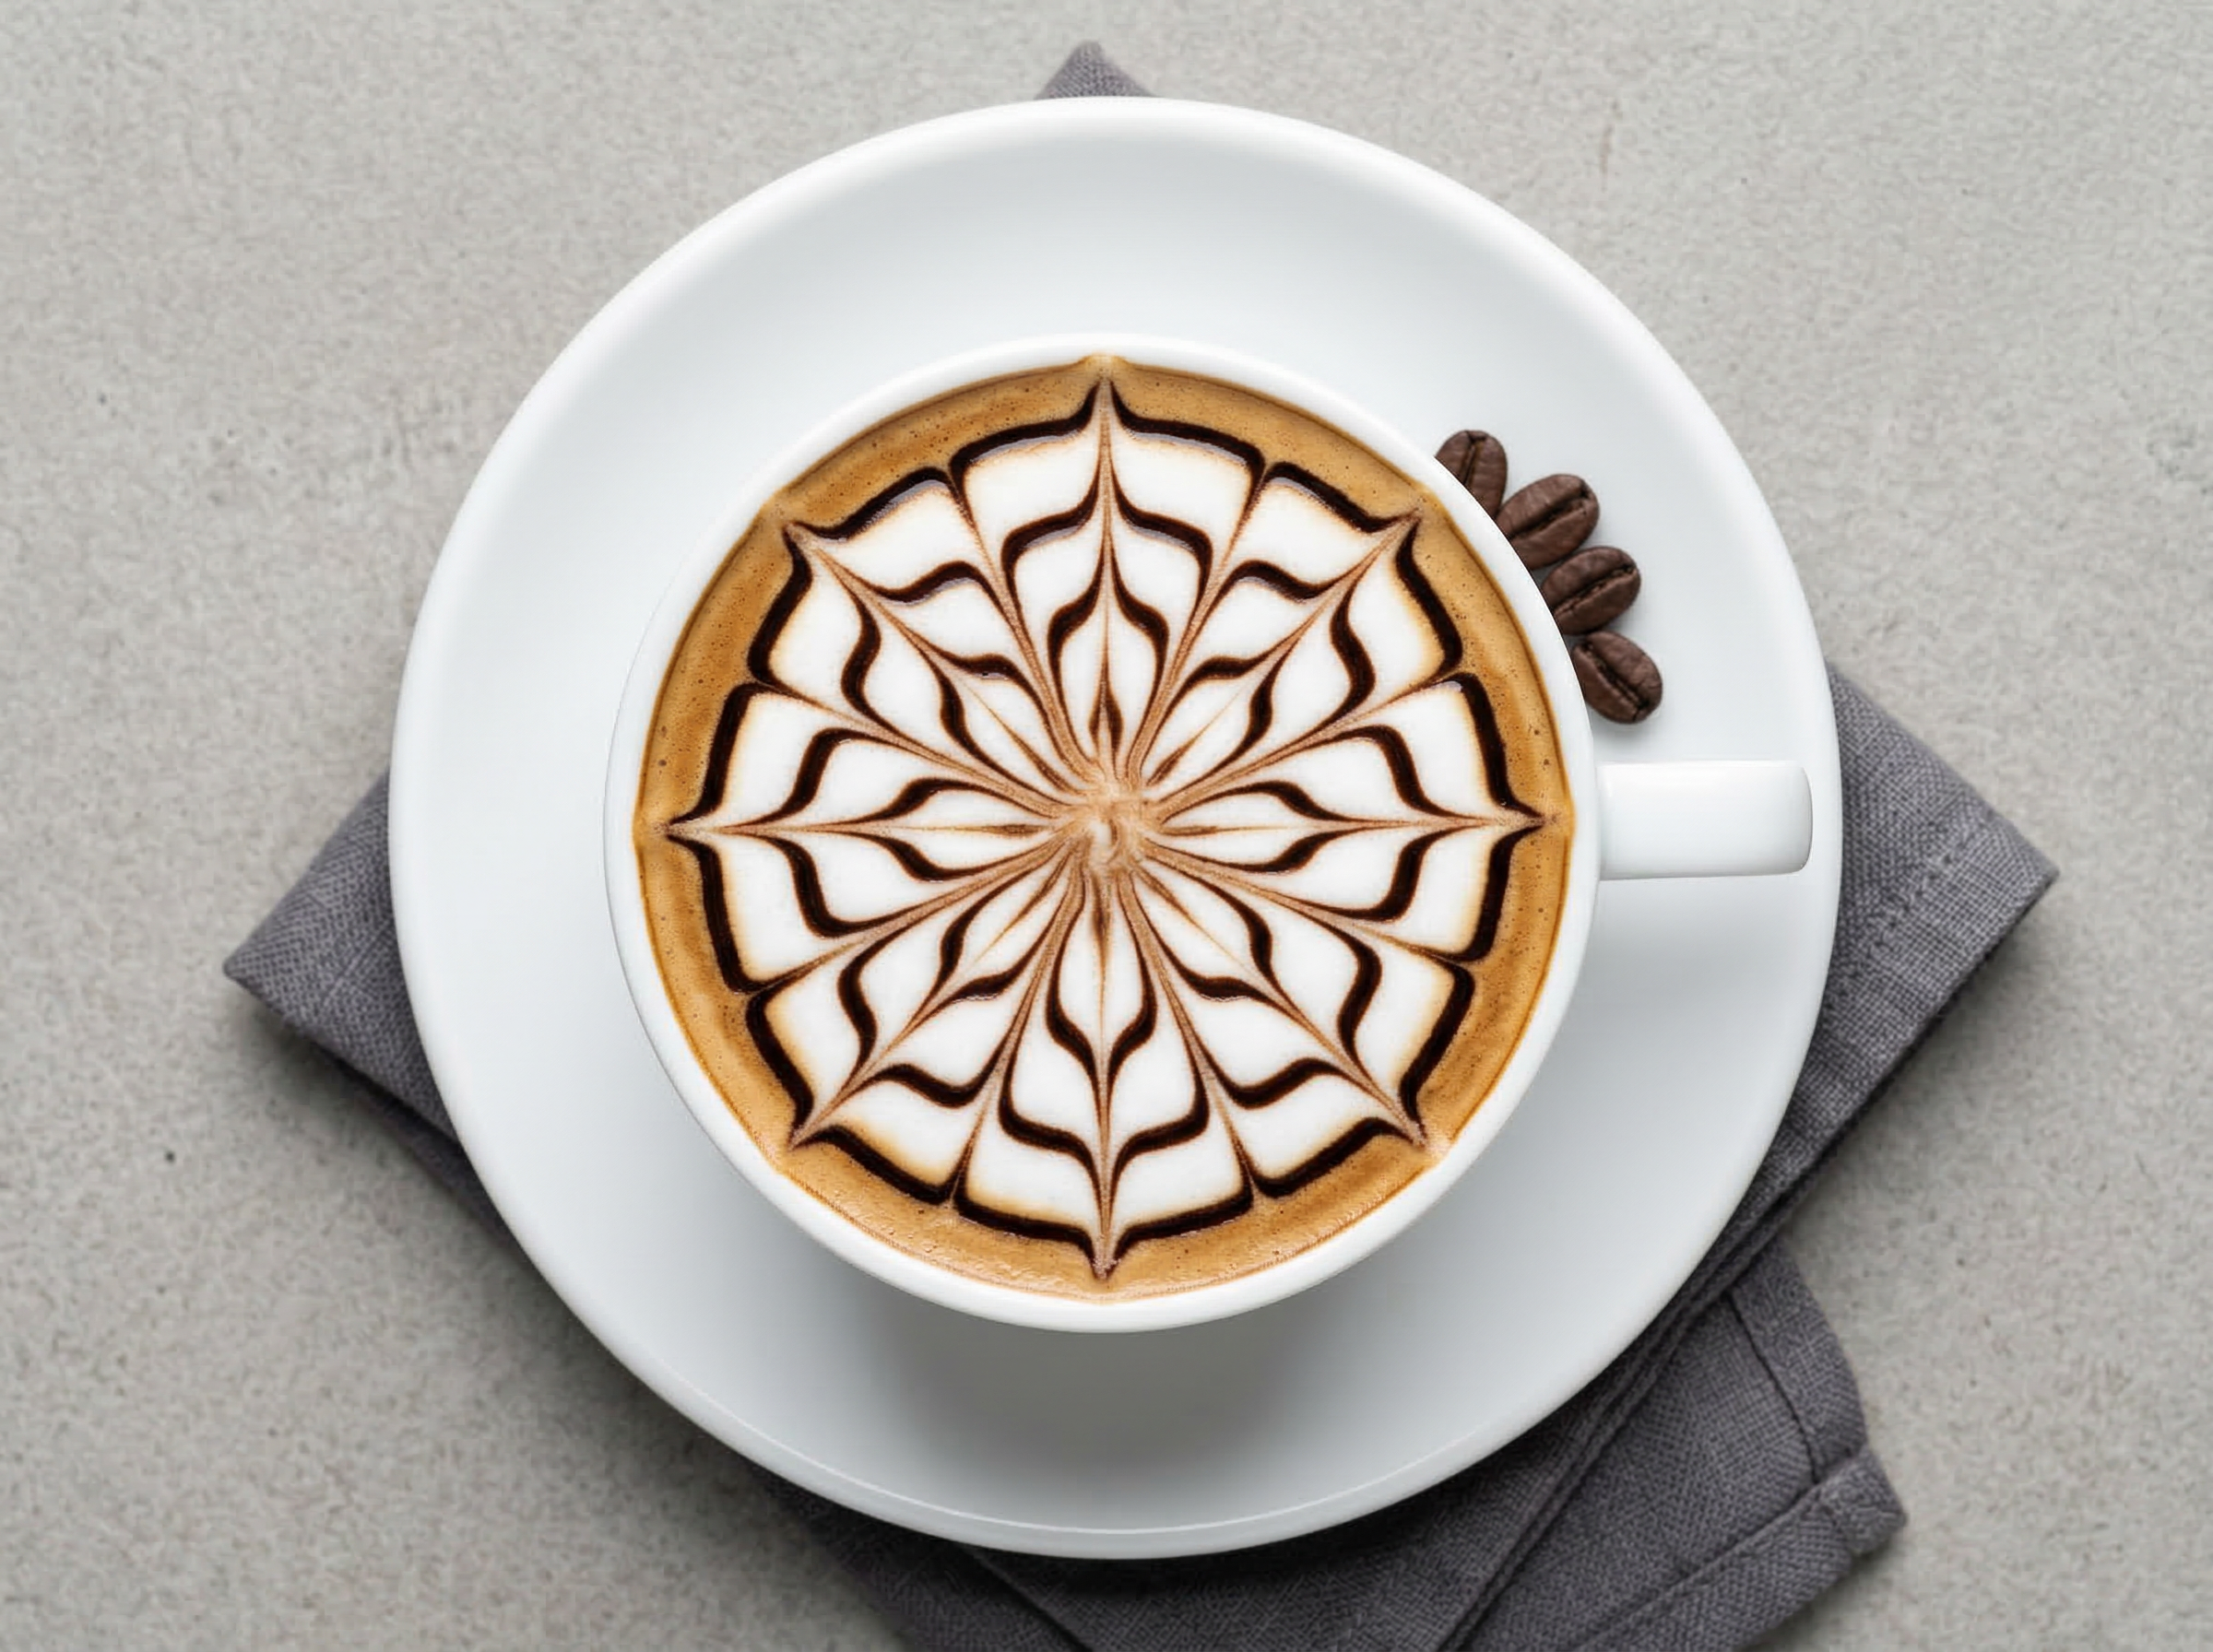
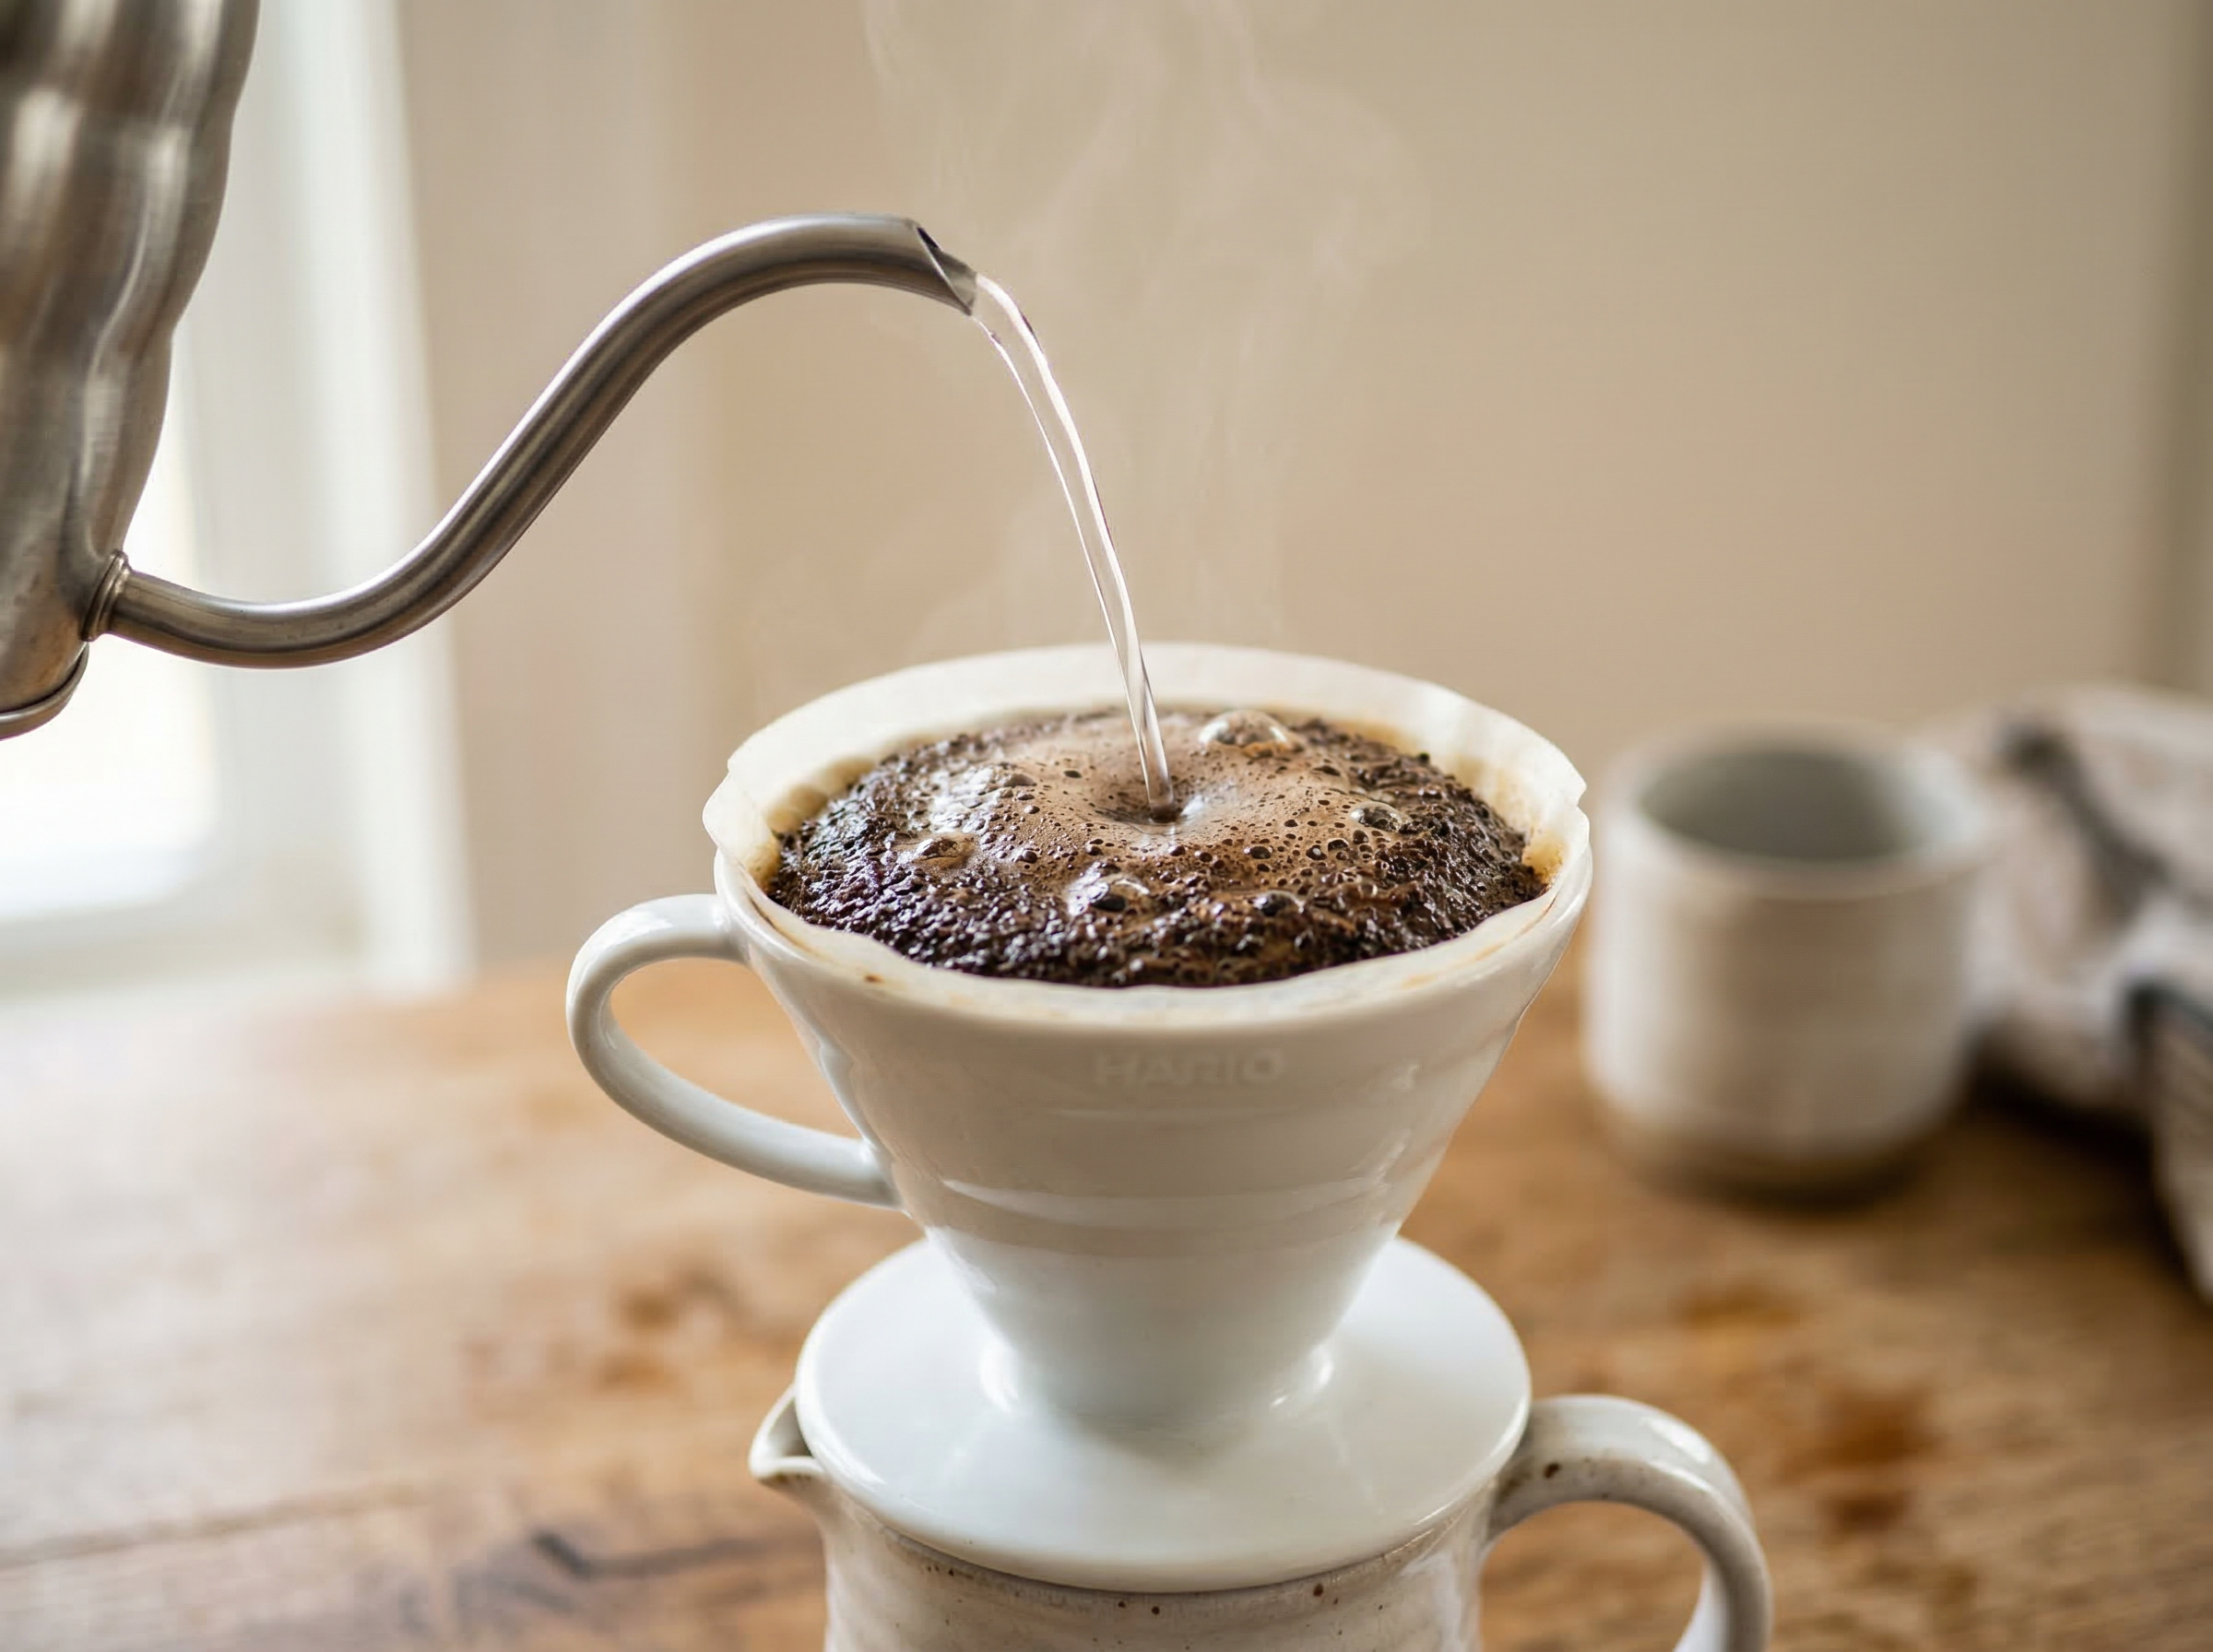
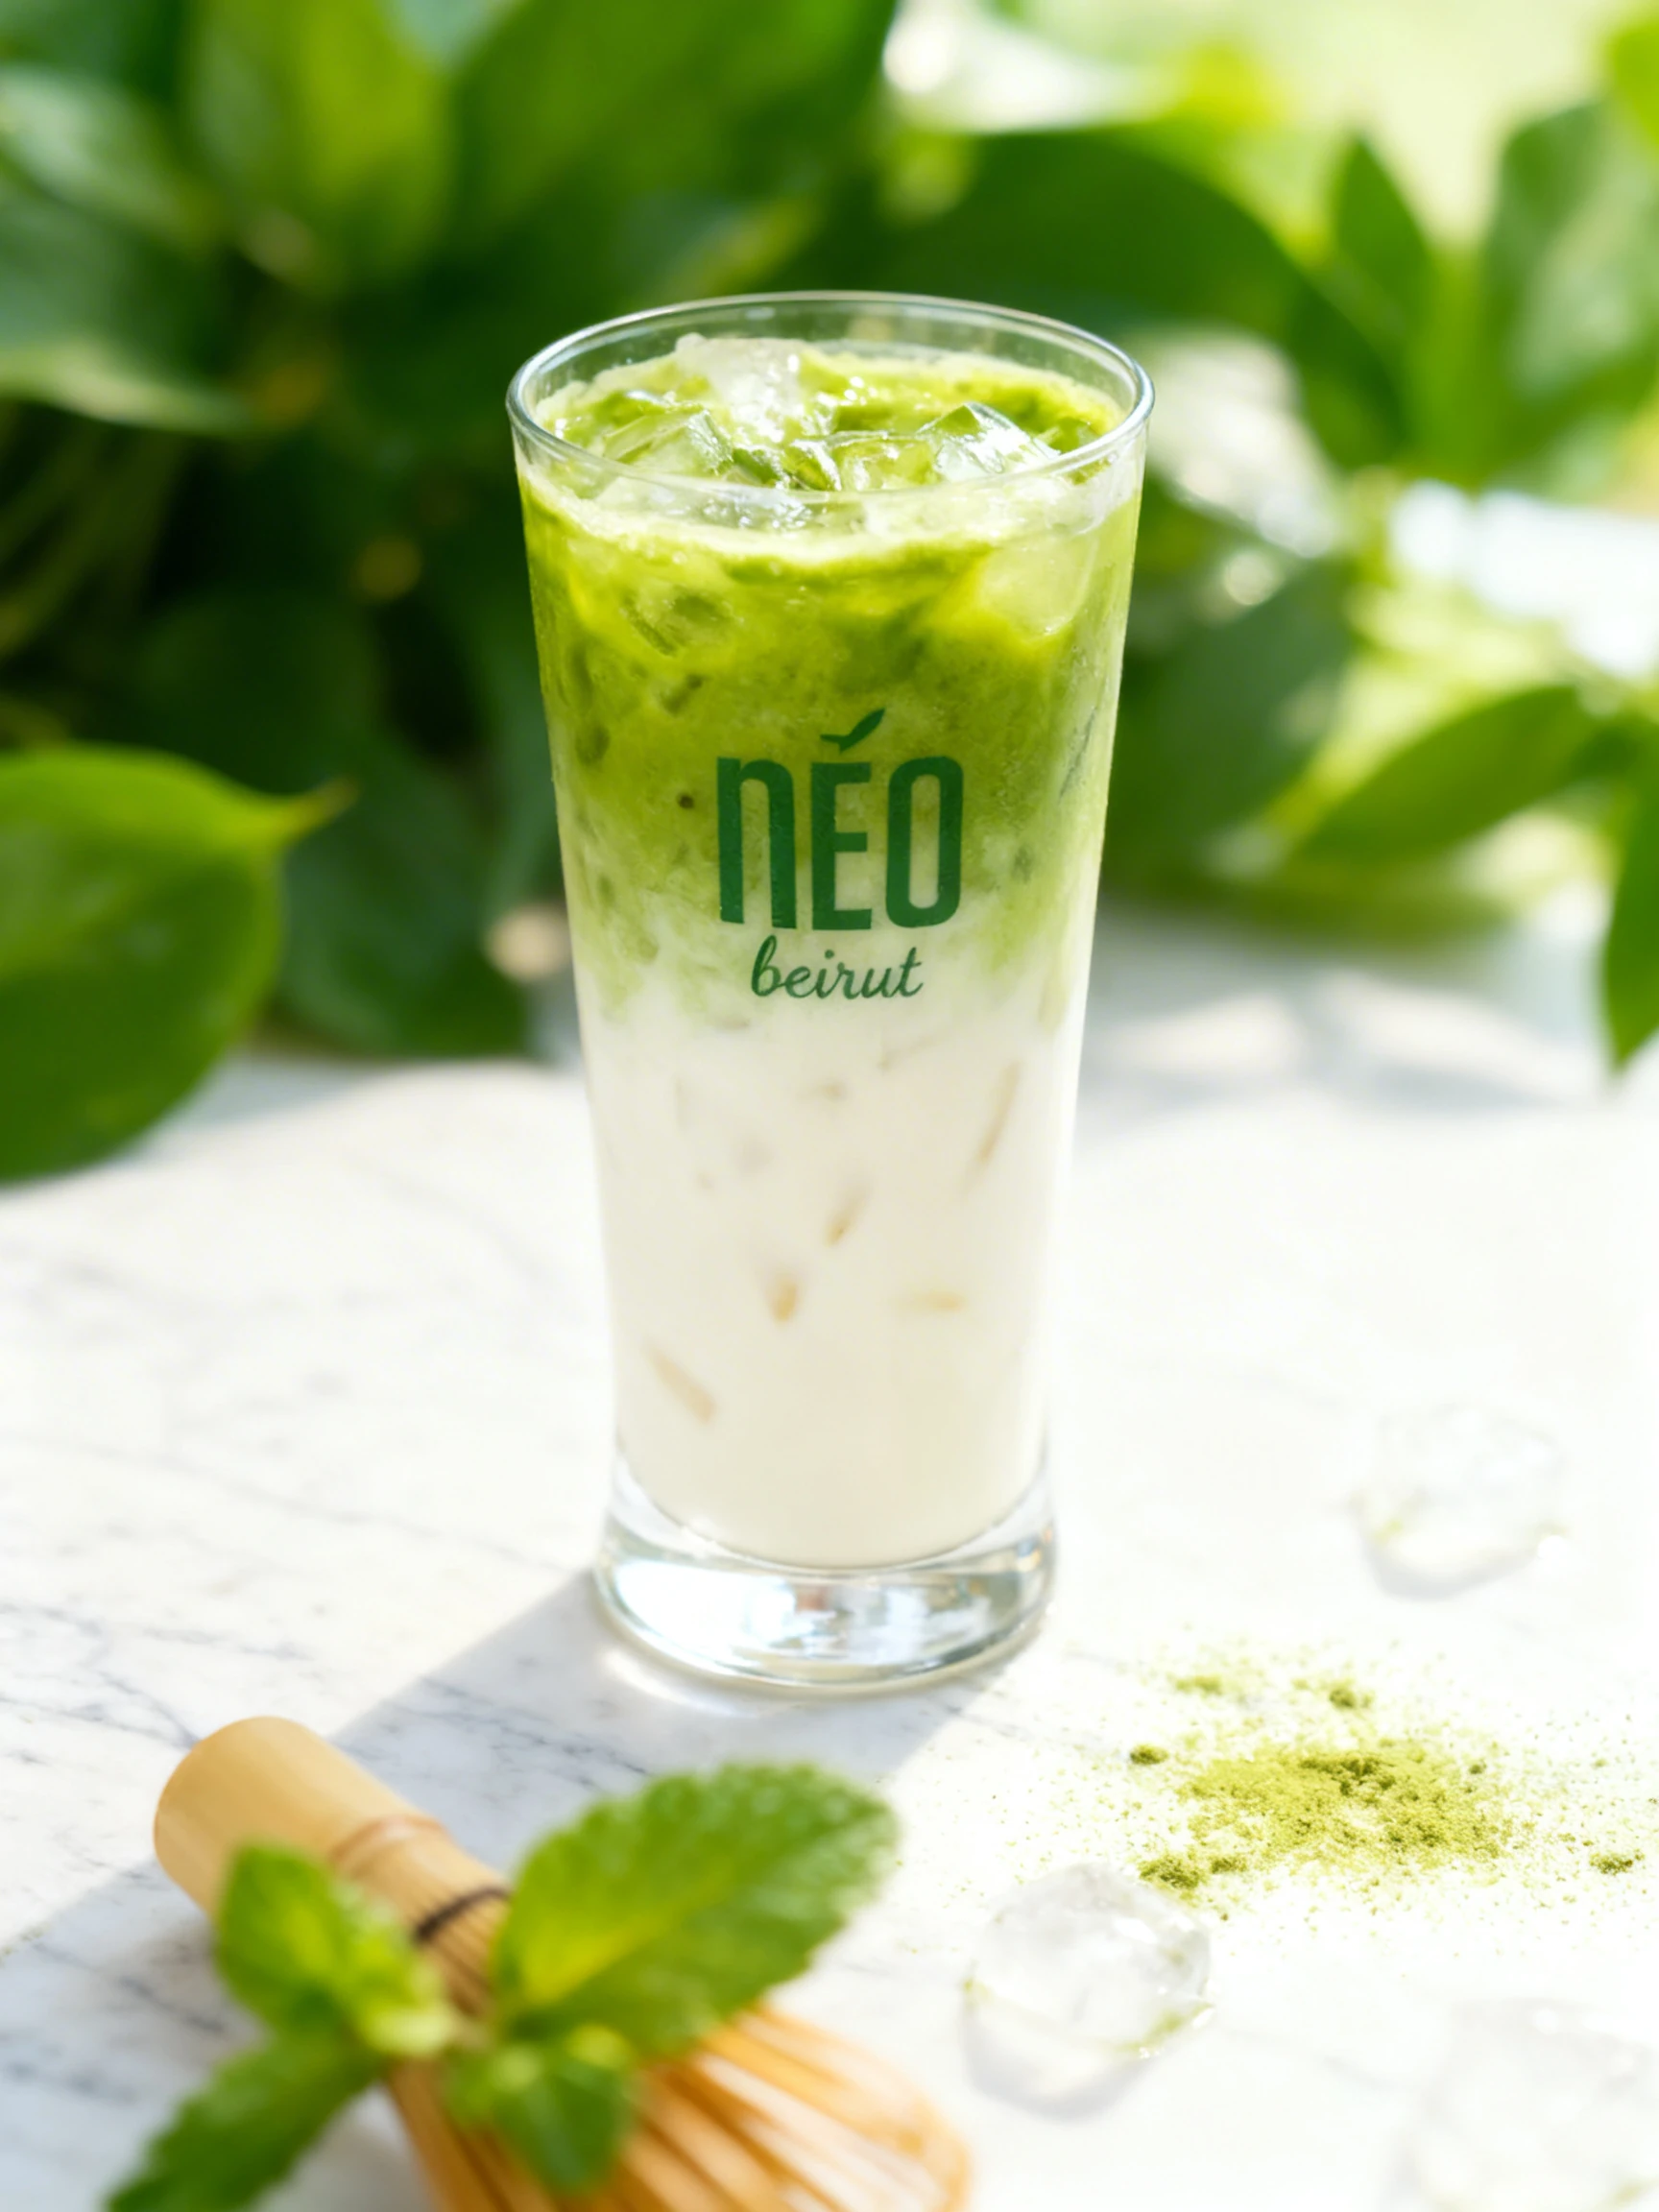
Coffee photography demands precision in timing, exposure, and composition that rivals any other category in food photography. A flat white's latte art - the barista's rosette or heart poured with steamed milk - remains sharp and well-defined for approximately 90 seconds to 2 minutes before the milk foam proteins form a surface film that dulls the design and begins to merge the pattern into the espresso base. A pour-over coffee stream is a moving subject that requires shutter speed control to be rendered as either a sharp thread or a silky blur. Cold brew in a glass develops condensation within 3 minutes in a warm studio environment, which is either a prop asset or a visual problem depending on whether you position it correctly.
This guide covers the full cafe menu - from flat whites and cortados to matcha lattes, cold brew floats, affogatos, and pour-over brewing sequences - with specific timing, exposure, and lighting techniques that produce coffee images compelling enough to drive both delivery app orders and social media saves.
What Makes Coffee & Cafe Challenging to Photograph
Latte art photography presents a compounding set of technical problems that must be solved simultaneously. The art itself has a 90-second to 2-minute window before the milk fat proteins form a surface film that obscures the rosette or heart pattern. Within that window, three technical challenges must be managed: white cup overexposure, surface pattern contrast, and the camera angle requirement.
White ceramic cups are the most common café vessel and the most challenging to expose correctly. The cup exterior reads to the camera as a bright white surface, while the espresso-milk interior reads as a medium tone - the exposure difference between these two surfaces is 2–3 stops, meaning that a correctly exposed interior will blow out the cup exterior and vice versa. Solution: expose for the latte art interior (the critical visual element) and allow the cup exterior to approach but not exceed blown highlights. In post, recover the cup exterior using Highlights -40.
Pattern contrast compounds the exposure problem: rosette definition depends on the contrast between the espresso base (dark) and the milk foam (white). In a correctly exposed image, this contrast is self-evident. In an overexposed image, the milk foam blooms into the espresso base and the pattern loses all definition. Use spot metering on the foam portion of the latte art to set exposure, then lock it before composing the final frame.
Best Lighting for Coffee & Cafe Photography
Coffee photography uses two fundamentally different lighting setups depending on the subject: overhead diffused light for latte art, and side window light for steam and brewing sequences.
For latte art shots, position a large softbox or shaded window directly above the cup at 90 degrees. This creates even, shadowless illumination across the entire latte art surface, which is essential because the pattern is read across the full diameter of the cup. Any directional light from the side creates a hotspot on the near side of the foam and shadow on the far side, disrupting the pattern symmetry. Use a 5-in-1 reflector set to white and hold it at 45 degrees off-axis to add a very gentle secondary light source that opens up any shadow from the cup rim.
For steam photography - a cortado or pour-over with rising steam - the setup inverts completely. Position a side window at 90 degrees to the camera (light directly to camera-left or right, not behind). Steam is visible in side light because the light rays travel parallel to the steam column, illuminating the particles from the side. A dark or matte black background behind the cup maximizes steam visibility against the field.
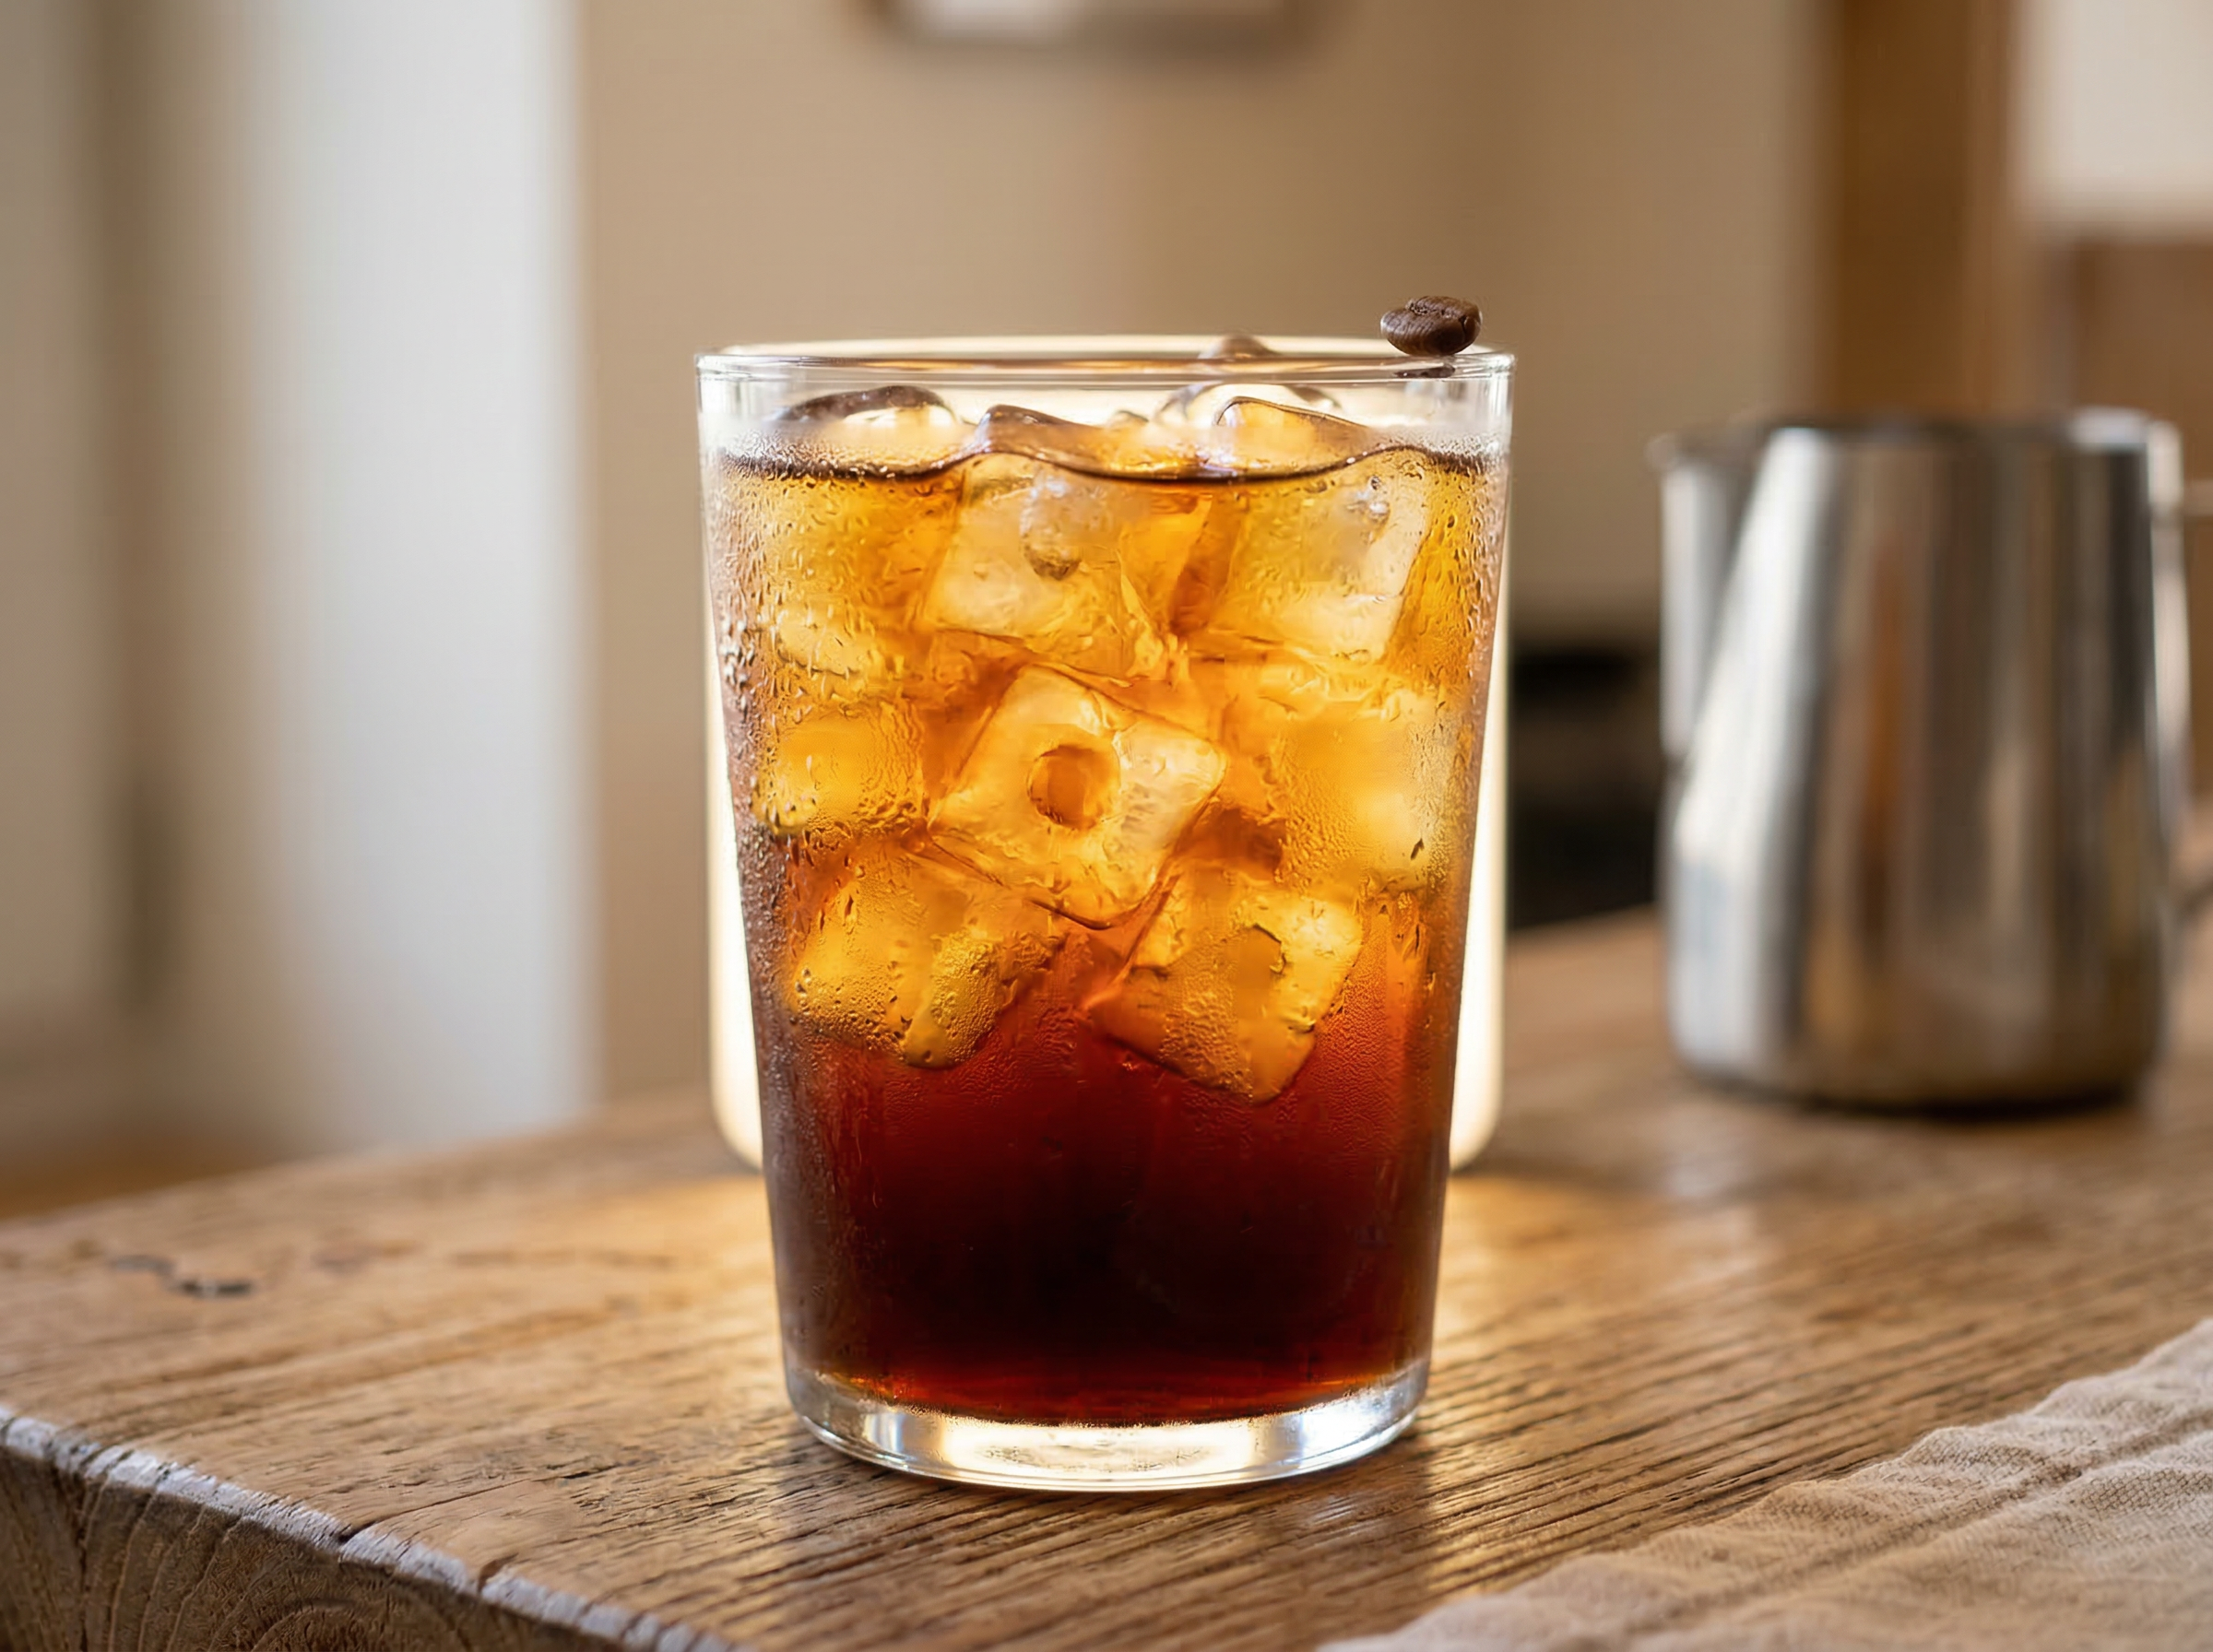
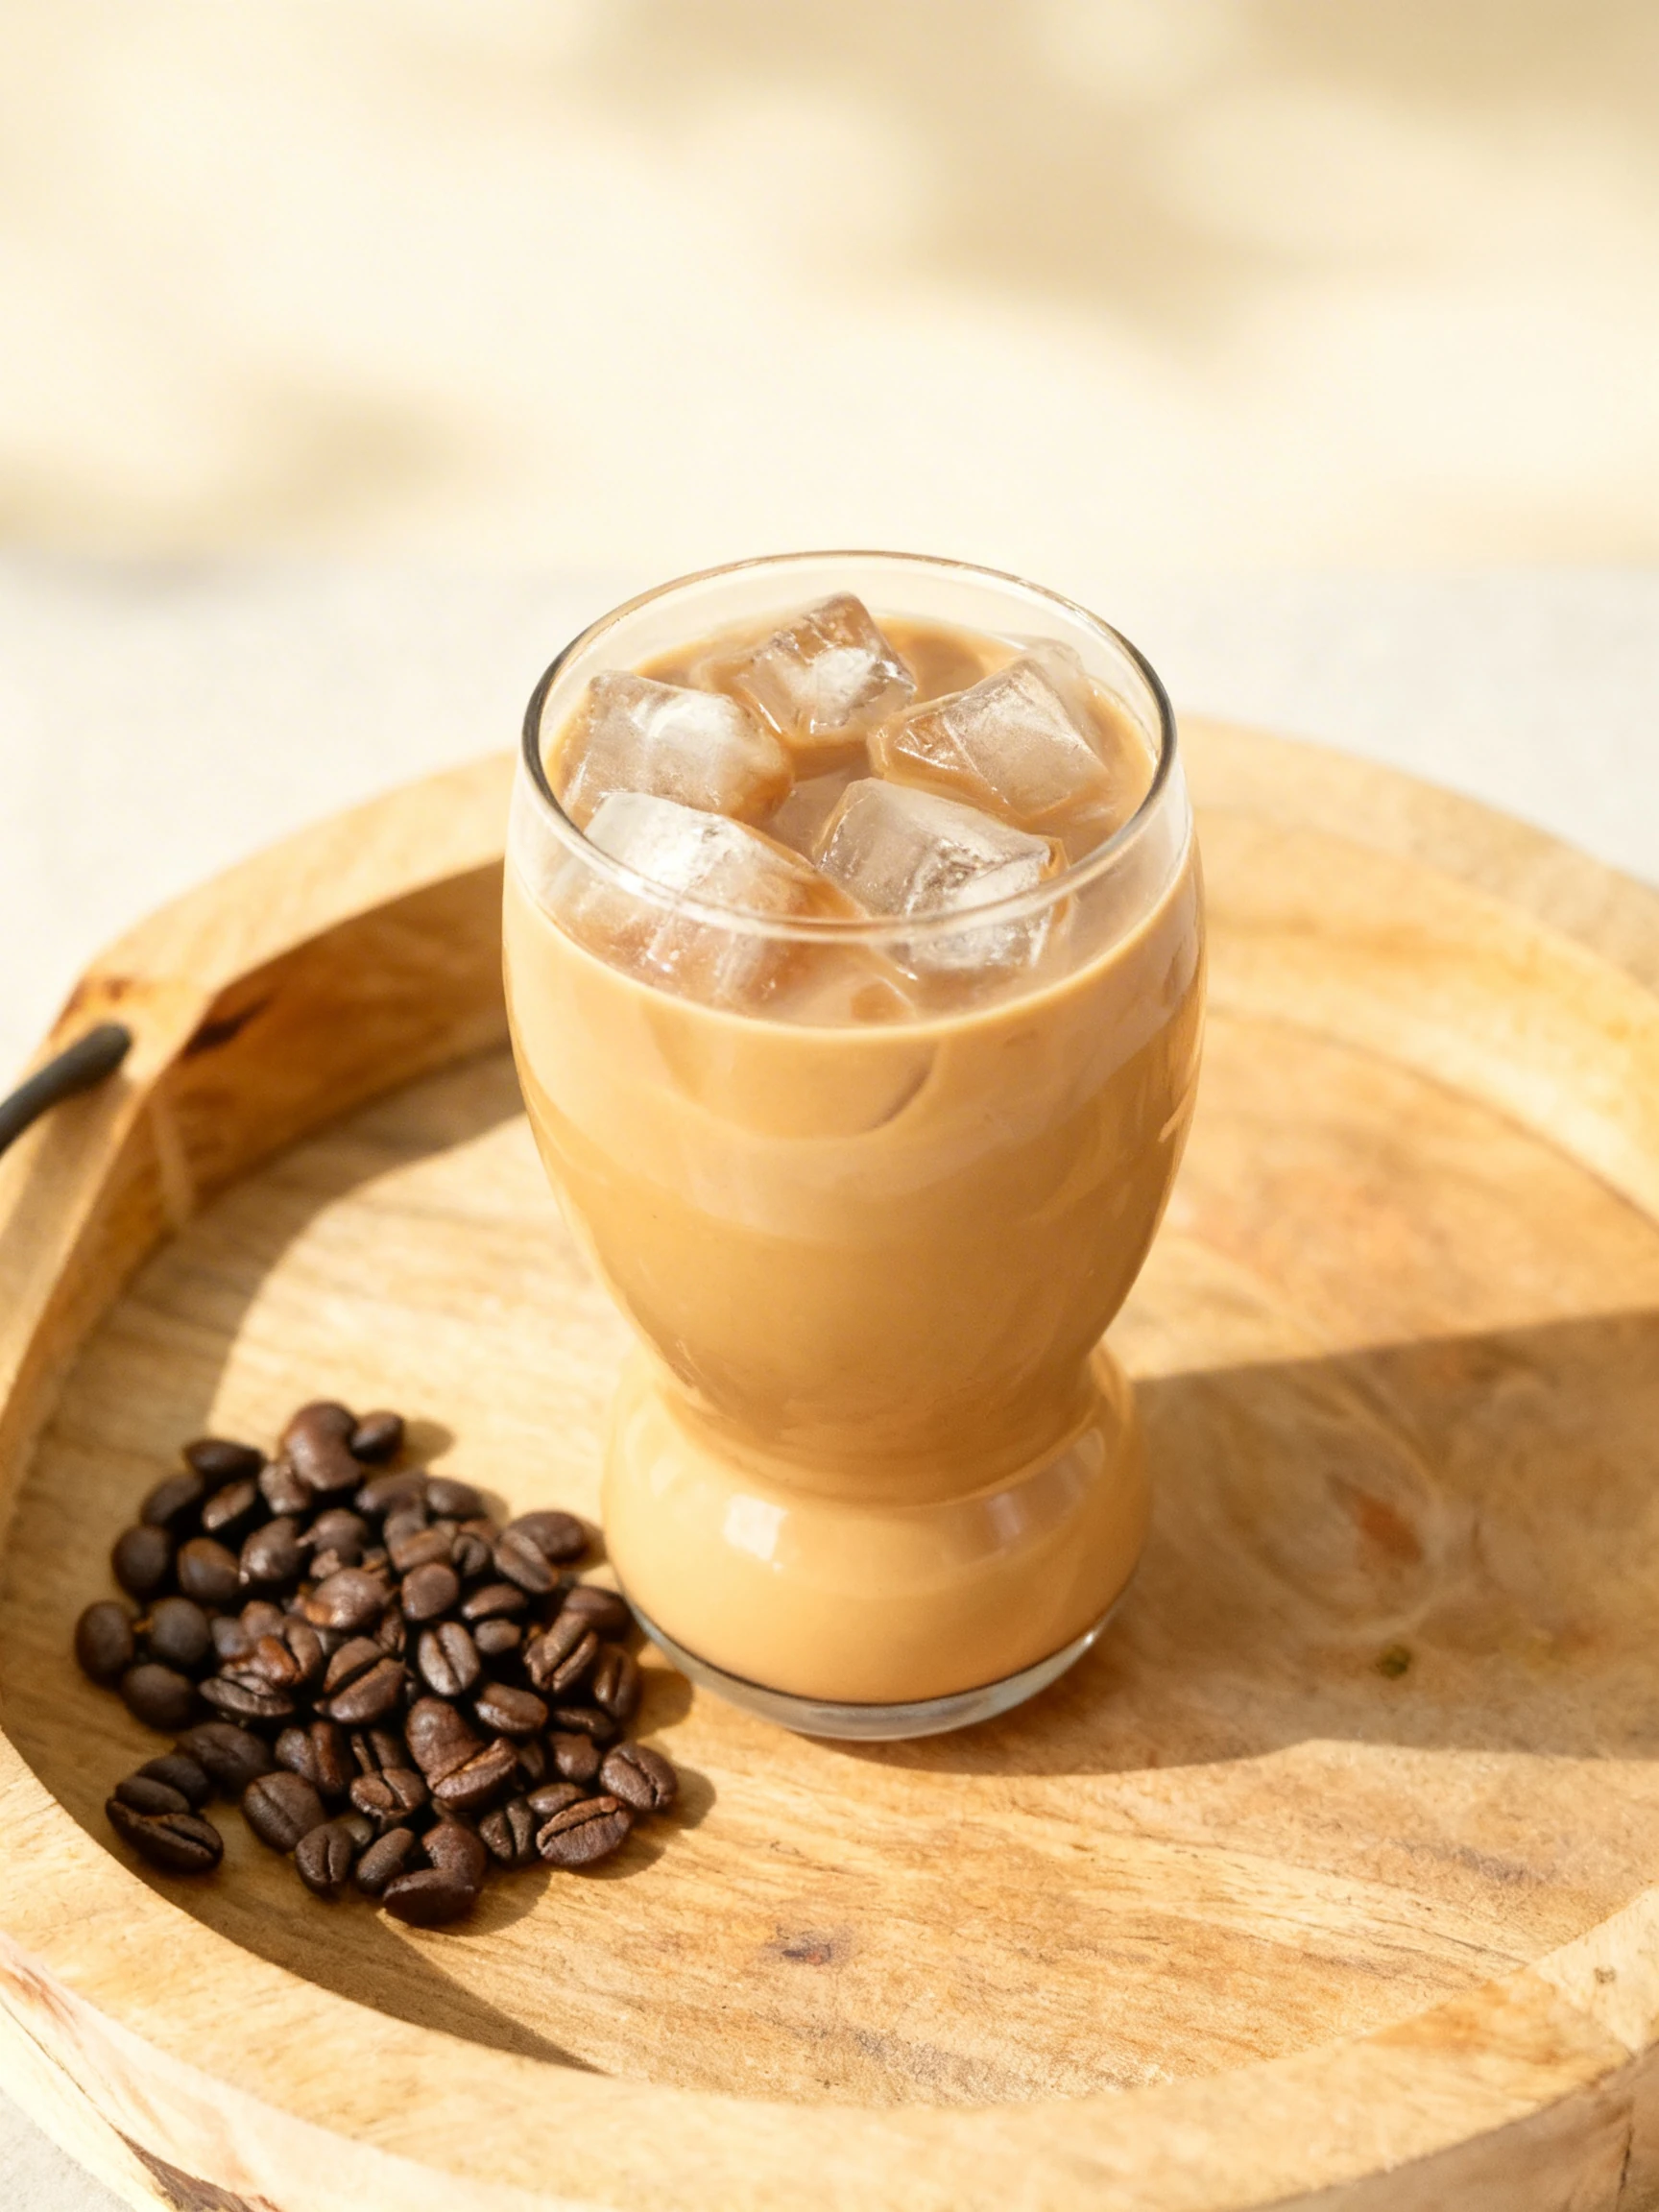
For cold brew in a clear glass or mason jar, use a backlight setup: position a small LED panel behind the glass aimed at the camera to make the ice and liquid transparent. Avoid side light for cold brew in glass - it creates a bright reflection strip on the near glass surface that obscures the interior.
Camera Angles for Coffee & Cafe
Overhead at 90 degrees is the definitive angle for latte art and it is non-negotiable. The entire visual appeal of a rosette, tulip, or heart pattern in a flat white or latte is designed to be seen from directly above - it is a surface design, not a volumetric form. Any angle away from straight overhead begins to foreshorten the pattern and the design becomes increasingly difficult to read. Even a 10-degree tilt from vertical is enough to make a rosette asymmetrical to the camera.
For steam photography and serving context shots (the cup with a saucer, a pastry pairing, or a coffee bean scatter), move to 20–30 degrees from horizontal (a low shooting position). This angle shows the cup's rim depth, the foam surface in slight perspective, and the steam column rising above the cup. The coffee beans scattered on the saucer and any accompanying food elements read clearly in this low perspective.
For pour-over sequences, position the camera at 45 degrees and use a slightly longer lens (85mm) to isolate the gooseneck spout and the stream of water without including the entire brewing setup. The turbulence of the coffee grounds during the bloom (the first water pour) is best captured at 45 degrees from directly in front of the dripper.
For affogato, shoot at 45 degrees immediately after the espresso pour to capture the espresso spreading through the vanilla gelato - this is the dynamic, in-motion element that makes affogato distinctively photogenic.
Food Styling and Props
Coffee food styling depends on vessel selection above almost everything else. The cup is not a prop that supports the coffee - the cup and coffee are a unified visual unit. White or off-white ceramic cups with clean, simple forms are the most versatile and allow the espresso-milk ratio to read clearly against the interior. Artisan ceramic cups with organic forms and muted earth-tone glazes communicate specialty coffee culture authentically.
For flat whites and cortados, place the cup on a ceramic saucer and add a single coffee bean or a small scatter of 3–5 beans on the saucer at the rim position. Do not crowd the saucer - the beans are context, not filling material. A folded linen napkin beneath the saucer adds warmth and prevents the cup from floating on a bare surface.
For cold brew in a glass, use a glass that shows the coffee color clearly (avoid opaque or frosted vessels). Add ice cubes just before shooting and position the glass so condensation droplets on one side are visible in the frame - condensation communicates coldness and freshness. A single coffee bean or sprig of fresh mint placed at the glass rim adds a garnish element without obscuring the beverage.
For matcha lattes, the vivid green of the matcha is the visual subject - use a white or cream ceramic cup to maximize the color contrast. A small bamboo matcha whisk (chasen) placed beside the cup adds cultural authenticity and a textural prop element. A light dusting of matcha powder through a fine sieve across the surface beside the cup (not into the drink itself) creates a context halo.
For affogato, use a clear glass so the espresso-into-gelato pour is visible as a caramel-and-cream collision. Position a small espresso pitcher in the background, slightly out of focus, to communicate the pour moment.
Recommended props
Equipment Guide
A 50mm lens is ideal for overhead latte art shots on a tripod - it provides a natural perspective of the cup without the distortion of wider lenses and covers the full cup diameter without requiring the camera to be positioned so high above that small adjustments become difficult to control. For overhead shots from 18–24 inches above the cup, a 50mm on a full-frame body fills the frame with a standard 6-ounce flat white cup comfortably.
An overhead arm or cross-bar bracket mounted to a C-stand is the most practical rig for overhead coffee photography, especially for a cafe with a consistent menu - it allows you to position the camera and lock it overhead, then swap cups beneath it without readjusting the camera angle between shots.
For steam photography, use a tripod and a remote shutter release. Set shutter speed to 1/250s minimum for visible but sharp steam wisps. For silky, motion-blurred steam (a more artistic effect), slow to 1/30s with the camera on tripod. A small Speedlite or LED panel on a stand to camera-left or right provides the side directional light that makes steam visible without requiring you to work near a window.
For pour-over sequences, use continuous shooting mode (burst) at 1/500s to capture the water stream and bloom turbulence across multiple frames - you will select the single best frame from a burst of 8–10 shots.
Skip the photoshoot — enhance the coffee & cafe photos you already have
The techniques on this page take time to master. MenuPhotoAI applies the same lighting, color, and texture corrections — automatically — to the smartphone photos you already shot. Studio-quality results in 30 seconds.
Try free — 5 credits, no cardCommon Coffee & Cafe Photography Mistakes
Shooting latte art after the 2-minute window when the surface film has formed
A latte art surface film forms as the steamed milk proteins and lipids oxidize at the surface. The film makes the pattern look dull, merged, and low-contrast. This is the most common coffee photography failure mode. Pre-build the entire composition with a prop cup before the real drink is prepared, then replace it with the fresh drink and shoot immediately. Have camera settings locked and frame composed before the barista pours.
Overexposing the white cup exterior while correctly exposing the latte art interior
White ceramic cups and espresso-milk interiors are 2–3 stops apart in brightness, and metering for the interior risks blowing the exterior. Use spot metering on the foam surface of the latte art to set exposure. Allow the cup exterior to clip slightly (within 5–10% of highlight warning) and recover it in post with Highlights -40. The latte art is the visual subject - protect its exposure even at the cost of the cup rim.
Shooting steam with flat frontal light that makes it invisible
Steam is only visible when light strikes it from the side or from behind. Frontal light from the camera position passes straight through the steam without making the particles visible - the result is a cup with no steam even when the drink is visibly steaming to the naked eye. Reposition your light source to 90 degrees from the camera (directly to the side) with a dark background behind the cup to maximize steam visibility.
Letting cold brew condensation dry before shooting, leaving water marks
Condensation on a cold brew glass forms within 2–3 minutes and begins to run and leave vertical water tracks within 5–7 minutes. Either shoot immediately after the drink is prepared (while condensation is fresh and even) or wipe the glass completely clean and accept a drier, cleaner look. Mid-stage condensation with running droplet tracks reads as negligence rather than the "freshly chilled" appeal of clean, even condensation.
Using dark or artisan cups for matcha lattes that obscure the green color
The vivid green of matcha is the defining visual element of a matcha latte - it is what makes the drink instantly recognizable in a thumbnail. Dark ceramics, navy cups, or heavily glazed vessels with complex surface colors compete with and suppress the matcha green. Use a white or pale cream ceramic cup to maximize contrast between the cup interior and the matcha color, ensuring the green reads clearly even at small delivery platform thumbnail sizes.
Editing Tips
Coffee editing centers on the espresso-milk ratio and the latte art contrast. In Lightroom, recover highlight detail in white foam using Highlights -35 to -50 while leaving the mid-tones untouched. Boost Shadows by +15 to open up the dark espresso base without lifting it to grey. For latte art specifically, increase Texture +20 and Clarity +10 to sharpen the pattern edges where milk meets espresso. In the HSL panel, warm the orange channel (+10 saturation, -5 hue shift toward red) to enrich the espresso tone. For matcha lattes, boost green saturation +20 and shift green hue slightly toward yellow (+5) to prevent the matcha from reading as olive-toned. For cold brew, slightly boost blue luminance +10 to enhance the cool, clear quality of the liquid.
Platform-Specific Tips
On Instagram, overhead latte art shots are the highest-performing content format in the coffee category - the symmetrical pattern and circular composition perform exceptionally well in the square and portrait formats that the feed and Explore page favor. A latte art Reel showing the pour in real time generates significantly more reach than a static overhead shot. For DoorDash and Uber Eats, coffee thumbnail images must communicate the specific drink at small size - a flat white, cortado, and latte can all appear identical in a thumbnail if photographed from the same overhead angle. Differentiate by using the cup size, the presence or absence of art, and any accompanying garnish to signal the specific drink type. For print menus, the low-angle steam shot (20–30 degrees from horizontal) reproduces beautifully and communicates warmth and freshness more effectively than the overhead latte art shot, which requires high resolution print to render the pattern detail legibly.
Coffee & Cafe Photo Examples
Real coffee & cafe photos from restaurants using MenuPhotoAI. Tap any category to see the full gallery and the before-and-after view.
Take your Coffee & Cafe photos further with AI
Once you have a solid shot using the techniques above, MenuPhotoAI can handle the finishing work. Our AI removes distracting backgrounds, corrects exposure and white balance, and applies cuisine-appropriate color grading — turning a good smartphone photo into something you'd be proud to put on your menu or delivery app listing. Start with 5 free photos, no credit card required.
Frequently Asked Questions
Skip the photoshoot — enhance the coffee & cafe photos you already have
The techniques on this page take time to master. MenuPhotoAI applies the same lighting, color, and texture corrections — automatically — to the smartphone photos you already shot. Studio-quality results in 30 seconds.
Try free — 5 credits, no cardMore Cuisine Photography Guides
This guide reflects best practices for Coffee & Cafe food photography as of 2026. Techniques may vary based on specific dishes, equipment, and shooting conditions. MenuPhotoAI is an AI food photo enhancement platform.