Photography Guide
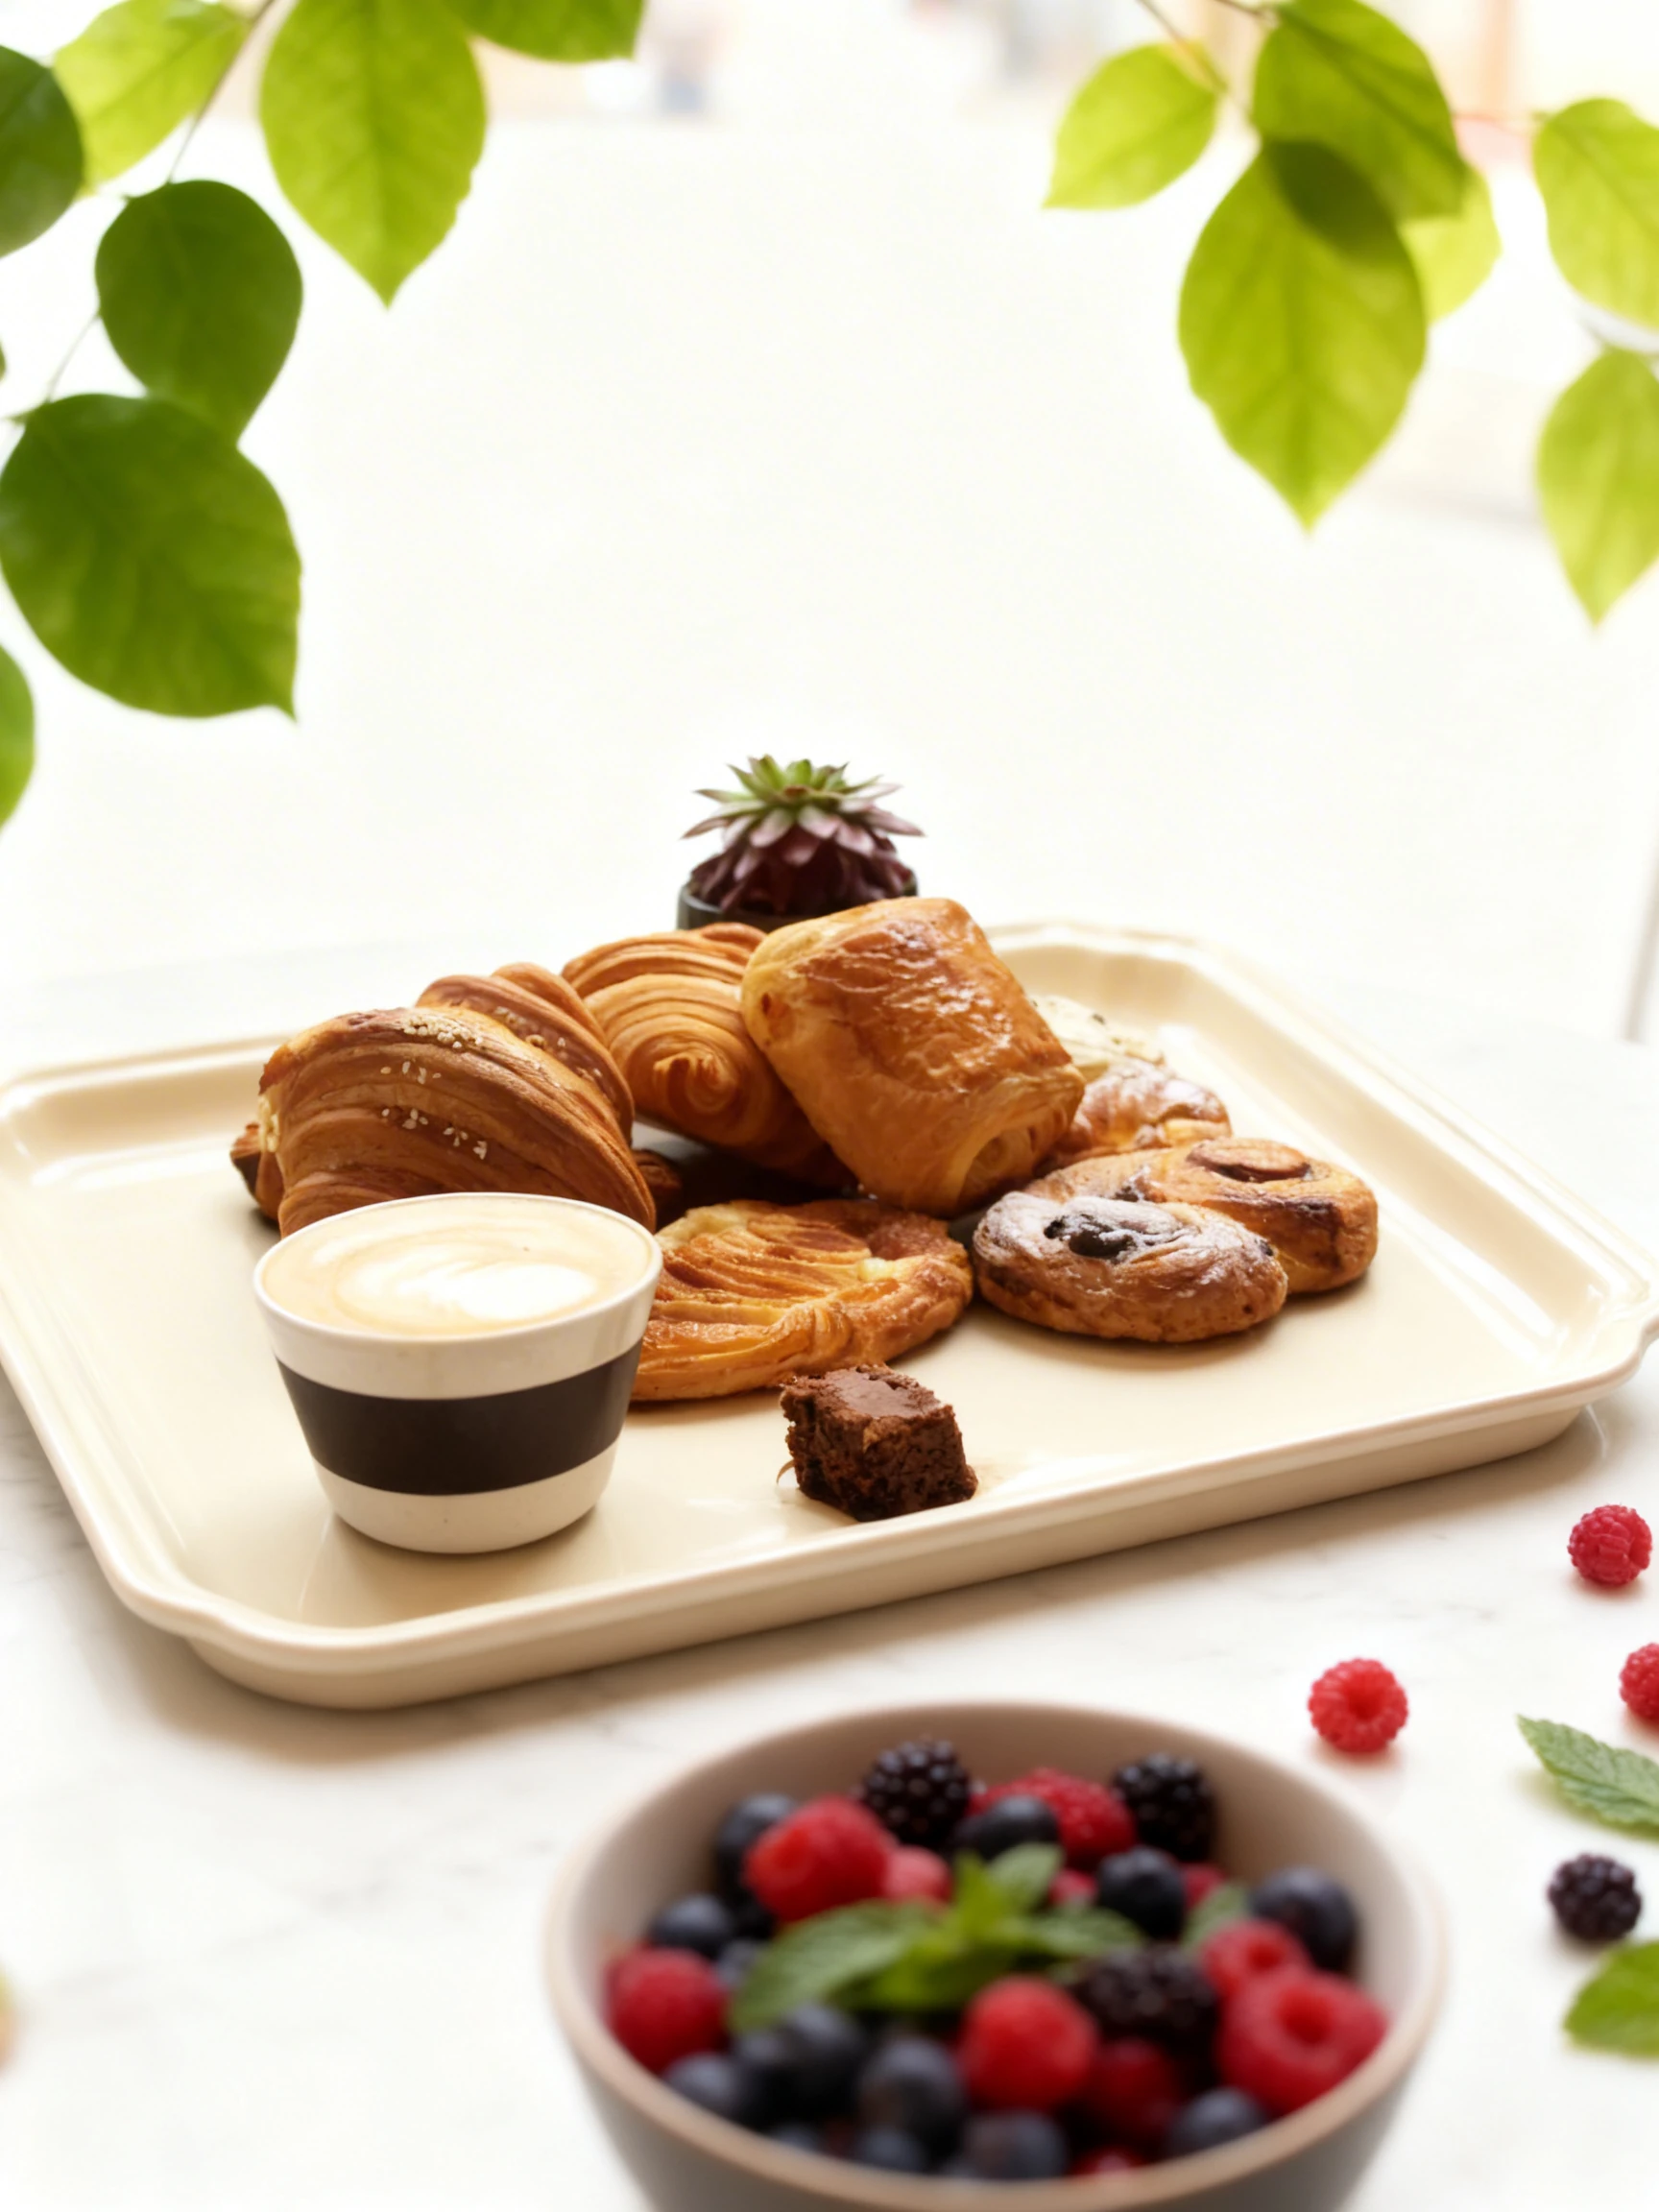
Bakery Food Photography Guide
Cutting a croissant within 15 minutes of baking to show lamination layers before heat and moisture compress them flat.
Primary Angle
45-degree
Lighting
Side raking natural window light to reveal crust texture and crumb structure
Read time
~8 min

Bakery food photography is the art of capturing time-sensitive perfection. A croissant's lamination layers - the defining visual evidence of 72 hours of folding and resting - compress within 15 minutes of leaving the oven as steam redistributes and layers collapse under their own weight. Sourdough's open, irregular crumb structure can only be revealed by a specific cutting technique performed with a serrated knife in a single continuous motion; rushed or repeated cutting collapses the air pockets that make artisan bread distinctive. Steam rising from a freshly baked loaf communicates freshness in a way that no garnish or styling trick can replicate, but it lasts only 45–60 seconds per take.
This guide covers the full artisan bakery menu - from croissants and pain au chocolat to sourdough loaves, cinnamon rolls, kouign-amann, and artisan bread baskets - with specific timing, cutting, lighting, and styling techniques developed specifically for bread and pastry photography. The reward for getting these details right is imagery that communicates craft and freshness in a way that drives both delivery orders and in-store visits.
What Makes Bakery Challenging to Photograph
The croissant lamination shot is the most time-critical challenge in bakery photography. Lamination - the hundreds of alternating butter and dough layers that give a properly made croissant its structural identity - is visible and photographable for only 10–15 minutes after the croissant leaves the oven. After that, residual steam migrates between the layers, the butter that separates them redistributes, and the layers press together into an undifferentiated, fluffy interior that could belong to any enriched bread roll.
The cutting technique compounds the timing problem: cut the croissant too early (within 2–3 minutes of baking) and the layers are still held together by semi-liquid butter and cannot be pried apart for the reveal shot. Cut too late and the layers have collapsed. The window is approximately 5 to 15 minutes post-bake.
Use a sharp serrated knife to cut the croissant horizontally through its equator in a single smooth sawing motion. Gently press the two halves apart - do not pull - to reveal the lamination. Place the cut face of the bottom half toward the camera at 45 degrees so the layers stack vertically in the frame.
Sourdough presents a different challenge: the open crumb structure of a high-hydration loaf (75–80% hydration) is structurally delicate. Cut the loaf with a sharp bread knife in a single continuous stroke - back-and-forth sawing collapses the air pockets. The cut face must be shot within 5 minutes before the exposed crumb begins to dry and the cell walls harden visually.
Best Lighting for Bakery Photography
Side raking light is the single most important lighting principle for bakery photography. Natural window light from one side, positioned at 90 degrees to the camera (i.e., the light source is directly to the left or right of the food rather than behind or in front of it), creates a raking effect that emphasizes every crust texture, crumb cell wall, and flour dusting detail.
For sourdough crumb shots, position a north-facing or shaded window directly to camera-left. The diffused raking light will cast micro-shadows inside each crumb air pocket, making the interior structure look three-dimensional rather than flat. Without this raking side light, a sourdough crumb shot looks like a photograph of bread - with it, it looks like a cross-section of a cathedral.
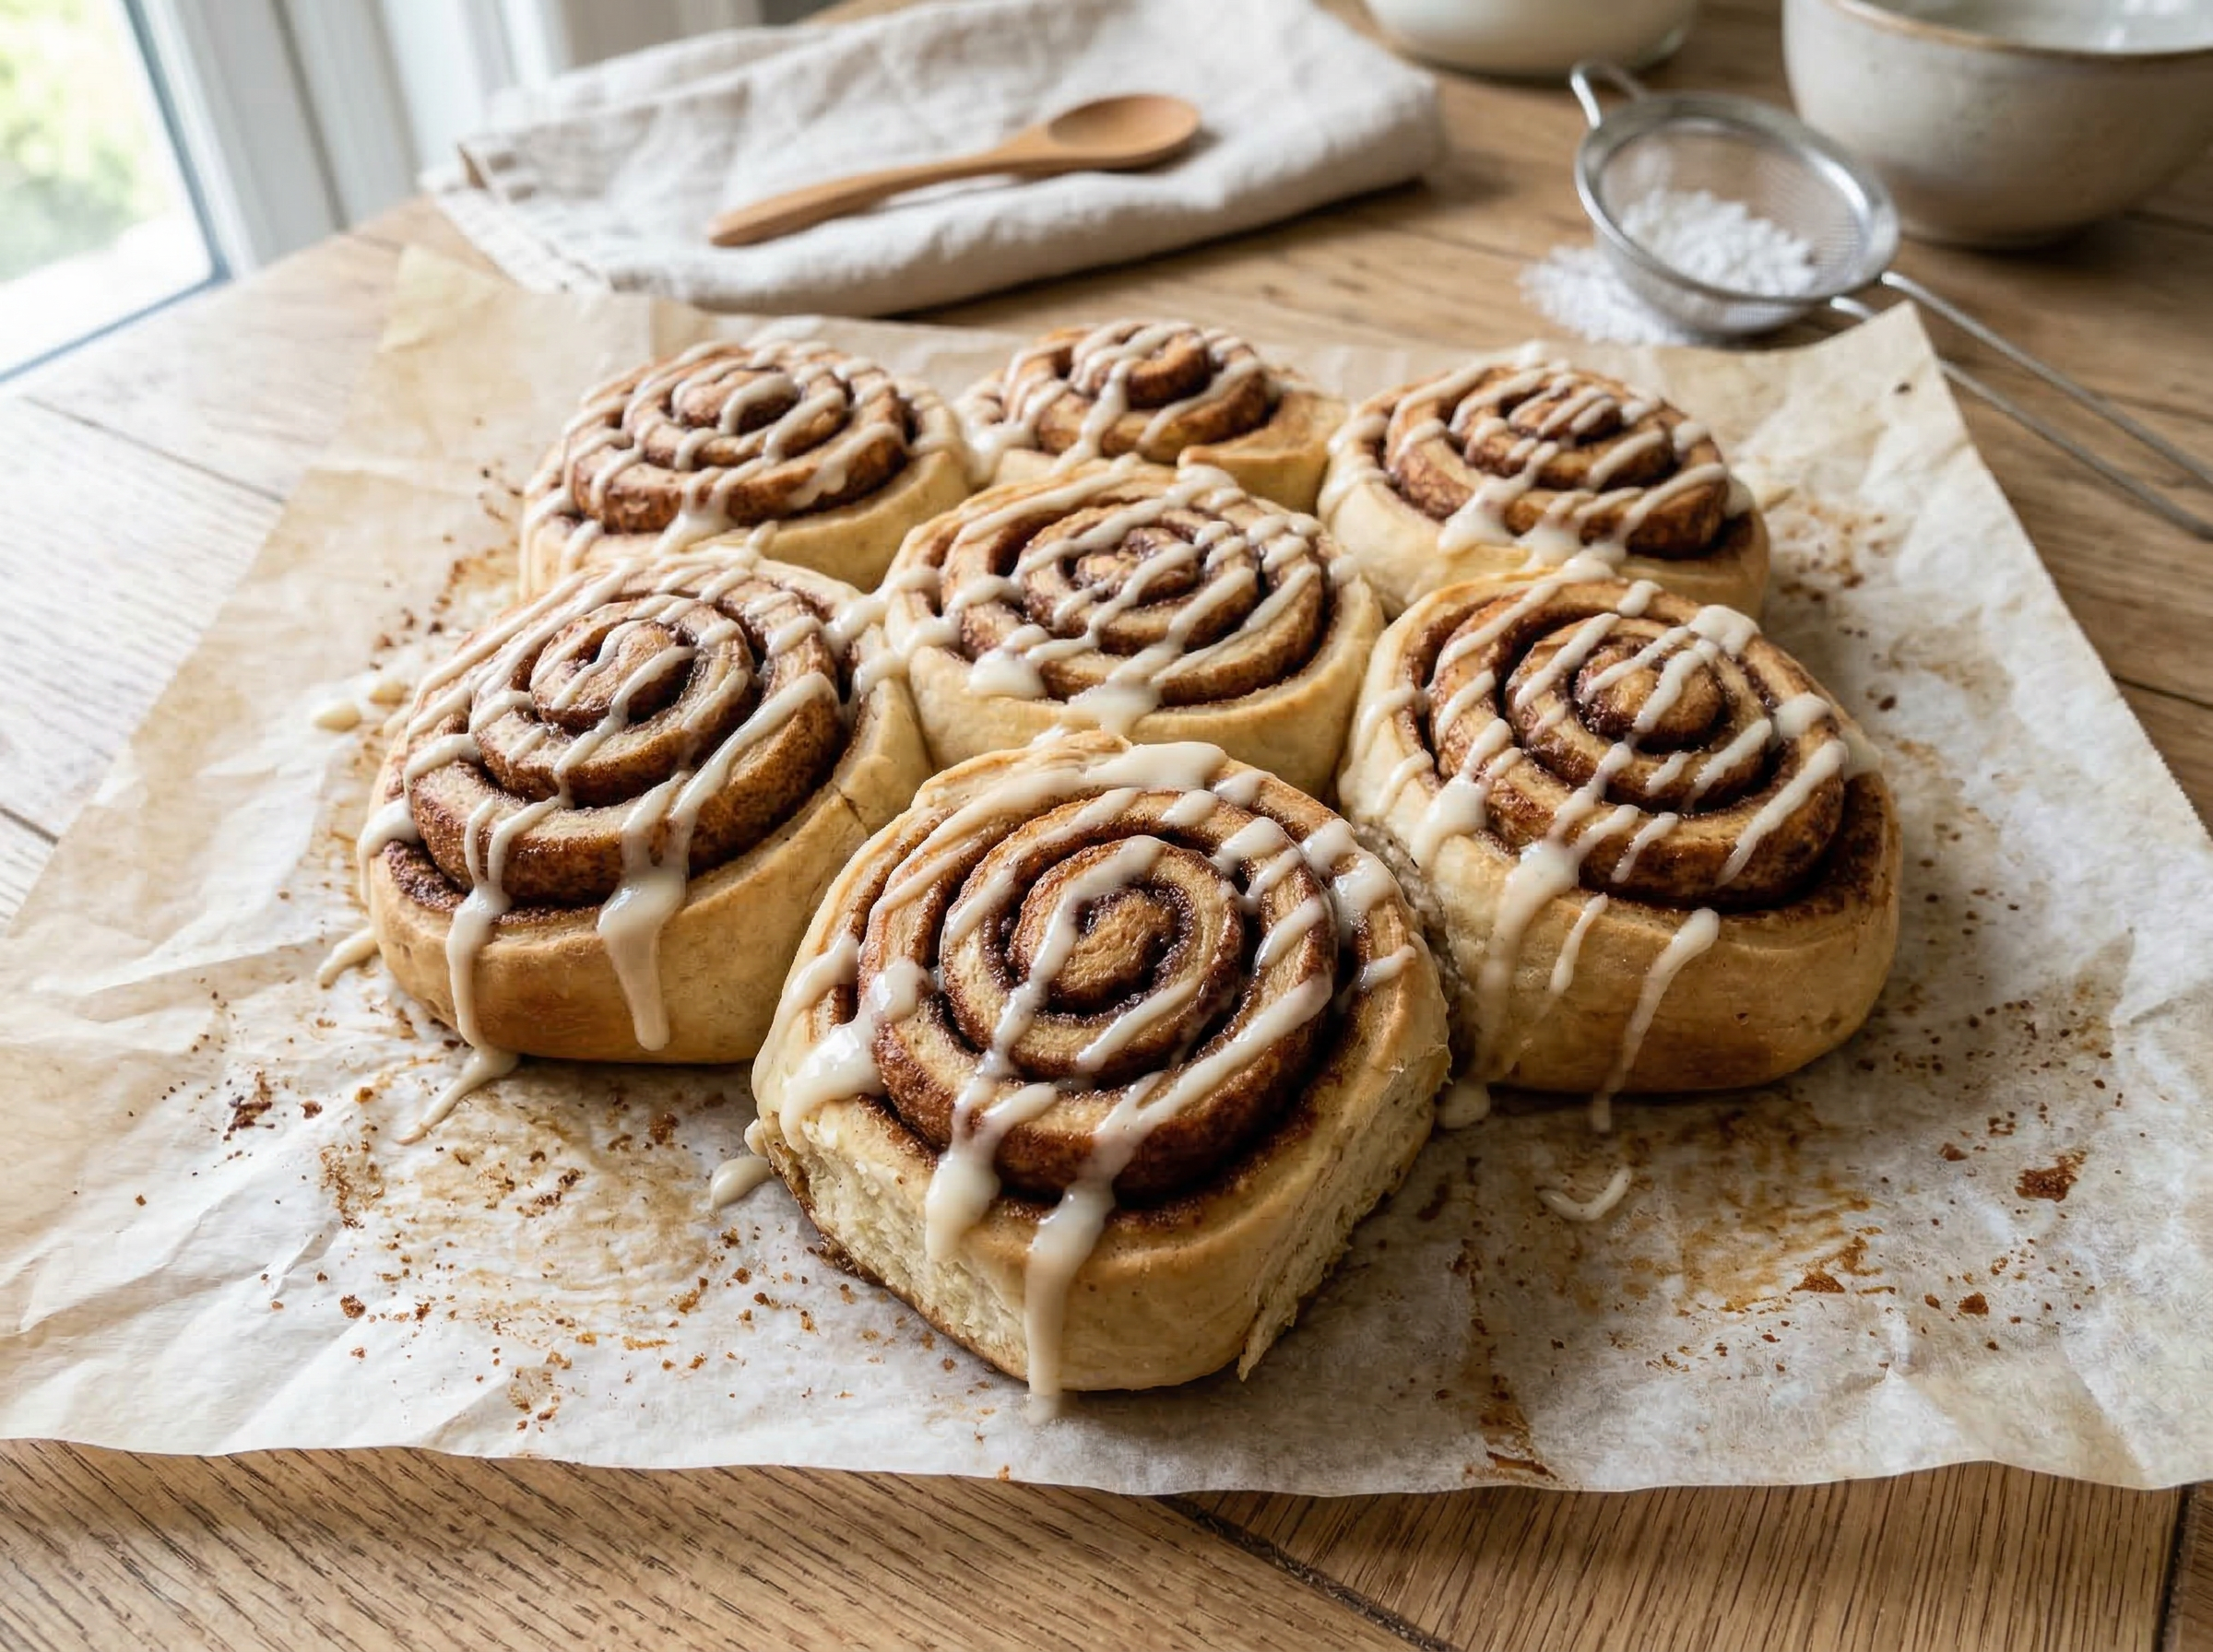
For croissants and cinnamon rolls, side raking light also reveals the lamination ridges along the pastry surface and makes the caramelized sugar on a kouign-amann surface appear like amber glass. Never use flash for bakery photography - the burst of frontal light eliminates the texture shadows that side light creates, producing a flat, commercial-looking image.
For artisan bread basket shots, place the basket at the window edge so the loaves closest to the window are brighter and the loaves at the back fall into soft shadow - this gradient creates depth and prevents the flat, catalog appearance of evenly lit bread baskets.

Camera Angles for Bakery
The 45-degree angle is the workhorse of bakery photography because it shows both the top surface (crust, scoring patterns, flour dusting) and the cross-section face (crumb structure, lamination layers) simultaneously - two pieces of information that tell the complete story of an artisan baked good.
For croissants, position the cut half with its lamination face at 45 degrees toward the camera. The curved croissant horn should arch upward and to the left (for a right-lit setup) so the caramelized crust catches the window light along its topmost curve.
For sourdough loaves, the crumb shot is best as a straight-on angle (0 degrees, camera at the same height as the loaf equator) where the cut face fills the frame completely. This allows the crumb structure to be read in full detail. A 45-degree angle of the whole uncut loaf reveals the scoring pattern on the crust and the ear (the ridge that forms where the score opens during baking).
For cinnamon rolls, shoot from directly overhead to show the spiral structure unwinding from the center. The frosting drip pattern also reads best from overhead. For kouign-amann, a 45-degree angle reveals both the caramelized base (place the kouign-amann upside down on a wire rack after flipping from the pan) and the layered interior of a cut slice.
Food Styling and Props
Bakery food styling is built on communicating craft, warmth, and freshness through minimal but deliberate props. The most powerful styling tool in bakery photography is flour: a light dusting of flour through a fine sieve across the surface beneath a sourdough loaf or across a cutting board signals freshness and handmade character in a universally readable visual language. Apply flour dusting to the background surface only - not directly onto the bread, as this reads as unbaked.
For croissants and pain au chocolat, arrange on a wire cooling rack rather than a plate - the rack communicates "just out of the oven" and allows light to pass through the prop, creating a lighter, airier image base. A folded linen bread cloth in muted linen or cream tones draped partially under the rack adds warmth without competing with the pastry.
For sourdough loaves, place the cut loaf with its cut face forward on a wooden board, with 2–3 whole slices fanned slightly in front of it. A bread knife with a wooden handle resting across the bottom corner of the board adds context and a human element. A small open mason jar of jam or softened butter placed slightly behind and to the right adds a color accent (red jam against the beige bread tones) and completes the serving story.
Cinnamon rolls should be arranged in a 2x2 or 2x3 grid on parchment paper (not a metal pan, which reads as industrial). Pull one roll slightly out of the grid toward the camera for a hero focal point. A light drizzle of cream cheese frosting applied immediately before the shot with a squeeze bottle communicates freshness and appetite appeal.
Recommended props
Equipment Guide
A 50mm prime lens is the most useful lens for bakery photography because its natural perspective renders bread and pastry shapes without the barrel distortion of wide angles that can make a sourdough loaf look like a balloon. For crumb detail shots, step up to a 100mm macro - the longer working distance keeps the camera from casting shadow on the cut face, and the macro capability lets you fill the frame with individual crumb cell walls for extreme texture detail.
A tripod is essential for sourdough crumb shots, where the camera must remain fixed while you cut and position the loaf. A ball head with a pan lever allows quick angle adjustments between takes. Use a remote shutter release or 2-second self-timer to eliminate any camera shake from the mirror box.
For steam capture, you will need a shutter speed of 1/250s or faster and a backlight source (window or LED panel behind the loaf) to make steam visible. Steam lasts 45–60 seconds per take; after that, you must reheat the loaf (30 seconds in a 200°C oven) to generate fresh steam. Pre-heat the oven before the shoot and keep it on throughout the session for steam resets.
Skip the photoshoot — enhance the bakery photos you already have
The techniques on this page take time to master. MenuPhotoAI applies the same lighting, color, and texture corrections — automatically — to the smartphone photos you already shot. Studio-quality results in 30 seconds.
Try free — 5 credits, no cardCommon Bakery Photography Mistakes
Cutting croissants too late after baking when lamination layers have collapsed
The lamination layers of a croissant are visible for 10–15 minutes after baking before steam migration and gravity press them together. Waiting until the croissant has fully cooled before cutting for photography eliminates the primary visual detail that distinguishes an artisan croissant from a mass-produced one. Cut at 5–12 minutes post-bake and shoot immediately after the cut reveal.
Using a non-serrated knife for sourdough crumb shots that crushes the air pockets
A chef's knife pressed down through a sourdough loaf compresses the crumb cells before the blade passes through them, producing a dense, compressed cross-section face. A sharp serrated bread knife drawn in a single continuous stroke cuts through the cell walls cleanly without pressure, preserving the open crumb structure. The difference between these two cutting methods is the difference between a compelling crumb shot and an ordinary bread photo.
Shooting bread with flash that eliminates all crust and crumb texture
Flash produces a flat, frontal light that fills in every shadow and texture crevice in bread and pastry. The result is accurate color but zero dimensionality - the crust appears smooth and the crumb appears uniformly white. All of the textural complexity of artisan bread is communicated through the shadow detail created by raking side light, which flash completely destroys. Use only natural window light or a directional LED panel for bakery photography.
Arranging cinnamon rolls on a metal pan that reads as industrial kitchen equipment
Metal baking pans communicate production-scale baking, not artisan craft. Even if the rolls were baked in a metal pan, transfer them to parchment paper or a wooden board for photography. The parchment paper continues the artisan, handmade narrative while providing a neutral off-white background that contrasts with the brown roll surfaces and white frosting.
Dusting flour directly onto bread for styling when it reads as unbaked
Flour dusted directly onto a baked loaf or pastry reads visually as raw, unbaked dough - a significant appetizing failure for food that should communicate warmth and readiness. Apply flour dusting only to the background surface (board, counter, linen cloth) beneath and around the bread, where it functions as a contextual styling element rather than a surface treatment on the food itself.
Editing Tips
Bakery editing should preserve the warm, golden tones of crust while revealing the cool interior of crumb. Set white balance toward warm (add 150–200K from the camera's measured setting). In the HSL panel, boost yellow and orange saturation by +10 to +15 to enrich crust color; boost yellow luminance by +5 to prevent crust from appearing muddy. Apply Texture +25 and Clarity +15 globally, then use a brush to paint Texture +40 specifically onto the crust surface and crumb face - this is where the textural detail matters most. For pain au chocolat, add a Radial Filter over the chocolate centre with Exposure -0.3 and Saturation +10 to deepen the chocolate color without affecting the pastry shell.
Platform-Specific Tips
On Instagram, the sourdough crumb shot is one of the most-saved images in the bakery category - bread enthusiasts save them as references and aspirational goals, driving high save rates that the algorithm rewards with extended reach. Post crumb shots in portrait format (4:5) so the crumb face fills maximum screen space. For Uber Eats and DoorDash delivery platforms, the croissant and cinnamon roll thumbnail formats outperform sourdough loaf shots - delivery customers are looking for individual items they can order, not whole loaves. Use a single hero croissant on a clean linen background as your menu thumbnail, ensuring the golden-brown crust color is accurate at small sizes. For print menus, the artisan bread basket overhead is an excellent section header image - it communicates variety and abundance at a glance and its warm tones reproduce faithfully in CMYK. Avoid steam shots in print, as the translucent steam effect disappears entirely in offset printing.
Bakery Photo Examples
Real bakery photos from restaurants using MenuPhotoAI. Tap any category to see the full gallery and the before-and-after view.
Take your Bakery photos further with AI
Once you have a solid shot using the techniques above, MenuPhotoAI can handle the finishing work. Our AI removes distracting backgrounds, corrects exposure and white balance, and applies cuisine-appropriate color grading — turning a good smartphone photo into something you'd be proud to put on your menu or delivery app listing. Start with 5 free photos, no credit card required.
Frequently Asked Questions
Skip the photoshoot — enhance the bakery photos you already have
The techniques on this page take time to master. MenuPhotoAI applies the same lighting, color, and texture corrections — automatically — to the smartphone photos you already shot. Studio-quality results in 30 seconds.
Try free — 5 credits, no cardMore Cuisine Photography Guides
This guide reflects best practices for Bakery food photography as of 2026. Techniques may vary based on specific dishes, equipment, and shooting conditions. MenuPhotoAI is an AI food photo enhancement platform.