Photography Guide
BBQ & Grilled Food Photography Guide
Capturing the smoke plume and brisket fat sheen within their combined 2-minute window before both dissipate and dry.
Primary Angle
45-degree
Lighting
Dramatic side hard light or moody low-key with backlight for smoke
Read time
~8 min
BBQ and grilled food photography operates under pressure that few other cuisines impose. Texas brisket must be sliced and shot within minutes before the fat render sheen dries to a matte surface. Smoke from a smoked chicken or pulled pork platter is visible for roughly 90 seconds before it disperses - and if you miss it, there is no recreating it on set without a smoke machine. St. Louis ribs need to be shot with their bark intact, which means handling them minimally and never using tongs that crush the crust. The visual language of BBQ is primal and satisfying: deep mahogany bark, fat-marbled cross-sections, glistening smoke rings, and the blackened char of a properly grilled corn ear. Getting these details right requires mastering dramatic lighting that emphasizes texture over brightness, precise timing that no amount of post-processing can substitute, and a prop vocabulary that communicates craft - butcher paper, cast iron, wood blocks - without looking like a set.
What Makes BBQ & Grilled Challenging to Photograph
The smoke photography challenge is the most unforgiving constraint in BBQ food photography. When a platter of smoked brisket, ribs, or pulled pork comes off the smoker, there is roughly a 90-second to 2-minute window where visible smoke rises from the meat surface. After that, the smoke dissipates completely and cannot be recreated without a handheld smoke machine - a tool that produces visually different, thinner smoke that reads as artificial to experienced viewers. To capture smoke effectively, you must have your composition fully set before the meat arrives: camera on tripod, angle locked, aperture and shutter speed confirmed (1/250s or faster to freeze smoke movement), and a backlight source positioned behind the food. Smoke only photographs well with backlight - it requires a light source directly behind the subject aimed at the lens to make the particles visible against the dark background.
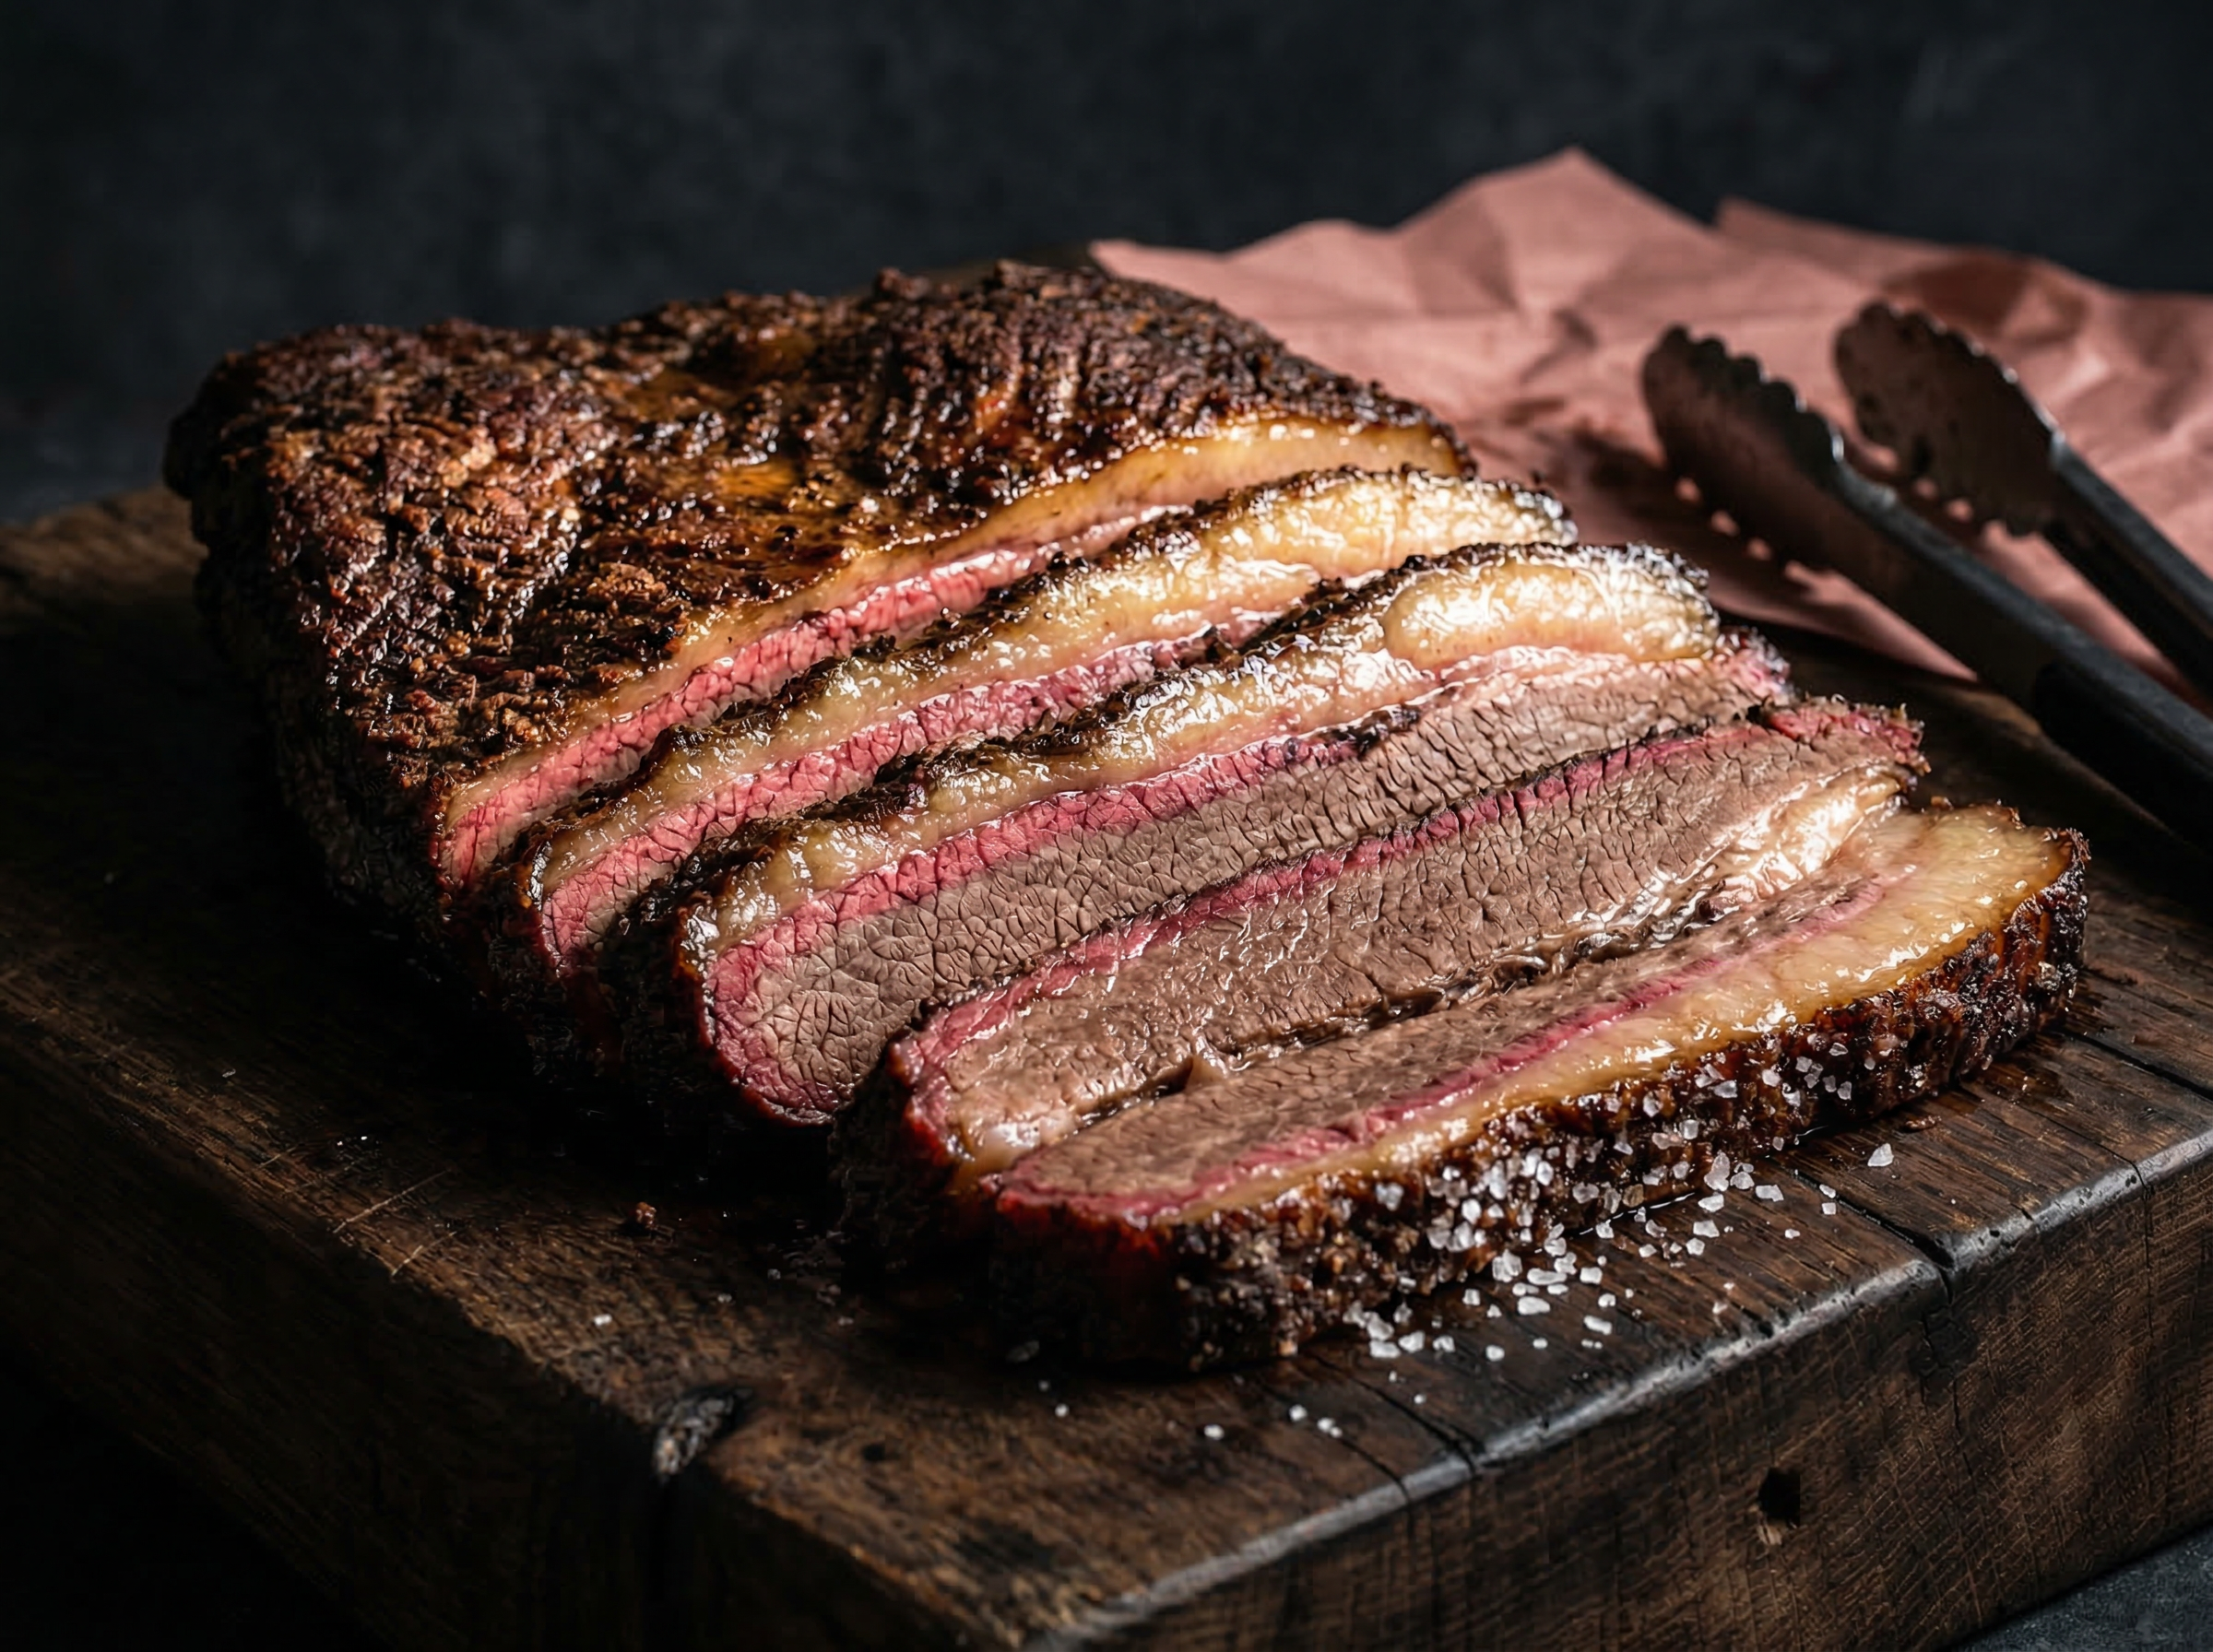
The second time-critical element is brisket slicing. Texas brisket fat cap sheen lasts 2–3 minutes after slicing before the rendered fat oxidizes and goes matte. Slice the brisket on set using a sharp slicing knife (not a serrated bread knife, which tears), fan the slices immediately, and shoot within the first 2 minutes.
Best Lighting for BBQ & Grilled Photography
BBQ food demands dramatic, directional lighting that mimics the firelight and wood-smoke atmosphere of the pitmaster's craft. A single hard light source - either a bare strobe, a window with a black flag blocking the fill side, or a small LED panel without a diffuser - positioned at camera-left at roughly 30 degrees above the food creates the raking side light that makes bark texture dimensional and throws shadow into the muscle grain of a brisket slice.
For smoke photography, the setup inverts: place your key light behind the food, aimed toward the camera (flagged to prevent direct lens flare), and use a dark or matte black background. The backlight makes smoke particles glow and become visible against the dark field. Without backlight, smoke is nearly invisible on camera even when dense to the naked eye.
For a BBQ platter with ribs, brisket, and sides, use a modified Rembrandt setup: one hard side light plus a very weak fill (1:6 ratio) to retain some shadow detail in the darker meat areas. Avoid flat, even softbox light for BBQ - it erases the char texture that makes bark compelling and makes the entire platter look like a reference photograph rather than an appetizing image.
Camera Angles for BBQ & Grilled
Texas brisket slices are most compelling at 45 degrees with the fat cap positioned upward so the marbling and fat render are both visible in the same frame. Fan 5–7 slices in a slight offset, with the front slice fully visible and subsequent slices staggered behind. This angle simultaneously shows the smoke ring (the pink band just below the bark surface), the fat cap, and the muscle grain.
St. Louis rib racks are best at 35 degrees - low enough to show the bone length running horizontally across the frame and high enough to see the bark surface on the top face. Position the rack with the bones pointing toward the camera at a slight diagonal to create leading lines. Pull 2–3 individual rib bones away from the rack slightly to suggest abundance and ease of eating.
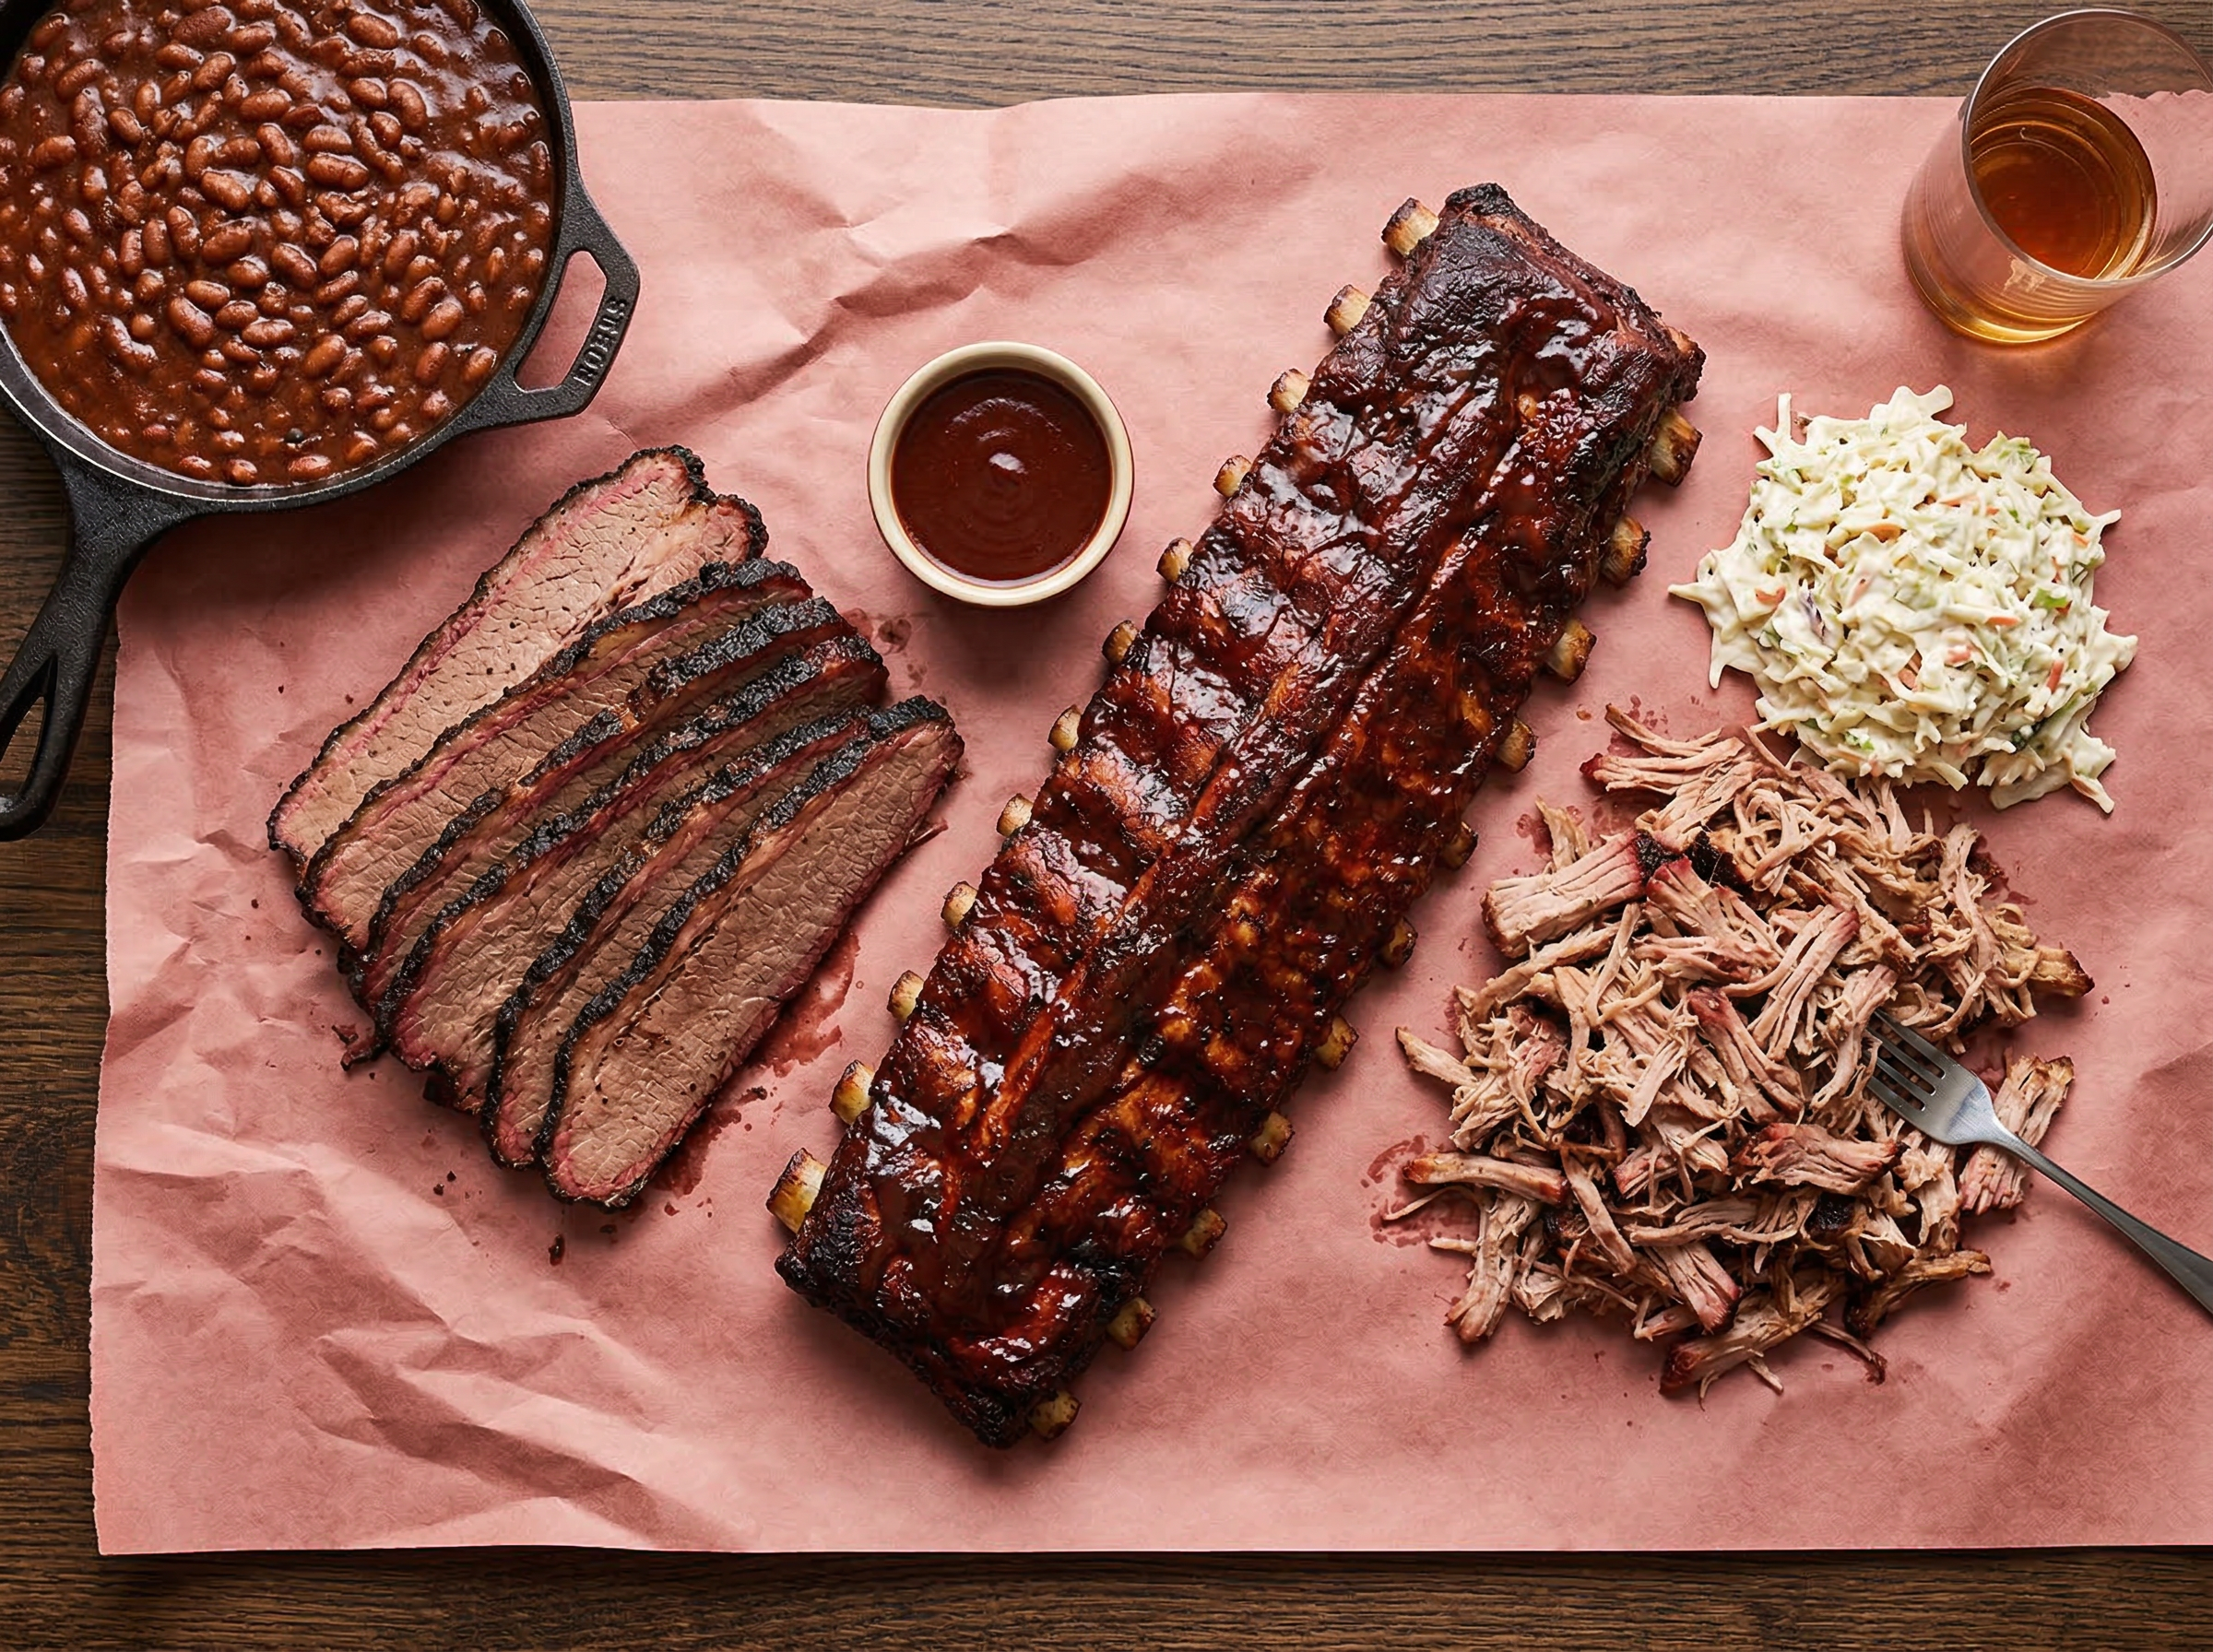
For a full BBQ platter spread, use overhead at 90 degrees: the wide spread of brisket, ribs, pulled pork, coleslaw, and beans reads best from directly above, where each item occupies a clear zone of the frame. Use butcher paper as the base - it doubles as a functional prop and background texture.

Food Styling and Props
BBQ food styling is about suggesting craft and abundance without fussiness. The props do heavy lifting here: unroll a sheet of pink butcher paper and let it wrinkle organically under the meat - do not smooth it flat. Place a cast iron pan at the back of the frame holding baked beans or mac and cheese. Rest a pair of metal tongs across the frame edge, slightly out of frame - this implies the cook is present and active.
For brisket, fan the slices with the fat cap up and add a small pinch of coarse kosher salt along the bark edge of the front slice, which reads as seasoning and also catches the raking side light to create small specular highlights. Do not add sauce to brisket on set unless it is a sauced brisket recipe - sauce hides the bark and suggests poor-quality meat to BBQ enthusiasts.
Pulled pork should be mounded loosely with visible shreds, not packed into a neat ball. Use two forks to pull a small portion away from the mound toward the camera to create a visual entry point. A small side cup of BBQ sauce placed off-center adds color contrast without touching the meat.
For grilled corn, blacken the kernels evenly on a grill before the shoot and brush with compound butter immediately before the shot. The melting butter creates visual movement and shine. A whiskey glass or small mason jar of amber liquid in the background adds warmth and communicates the full BBQ experience.
Recommended props
Equipment Guide
A 50mm lens is the workhorse for BBQ photography - it handles the 45-degree angle on brisket and rib shots without the compression artifacts of longer lenses or the distortion of wide angles. For overhead BBQ platter shots, an 85mm on a camera positioned high on a step ladder gives a more natural perspective than a 35mm stretched overhead.
For smoke photography, set shutter speed to 1/250s or faster - slower shutter speeds blur smoke into a white haze that reads as steam rather than smoke. Use a tripod with a ball head that allows quick angle adjustments between smoke takes, because the first take is almost always a camera position refinement and the second or third is where you get the usable frame.
A Speedlite or small LED panel on a stand behind the food is sufficient for smoke backlight - position it 18–24 inches behind the meat aimed at the camera, and flag the top of the light with a black card to prevent it from hitting the lens directly. Use a matte black foam board as a background to make smoke visible against the dark field. A heat-resistant silicone glove is essential for repositioning cast iron and brisket quickly after it comes off the smoker.
Skip the photoshoot — enhance the bbq & grilled photos you already have
The techniques on this page take time to master. MenuPhotoAI applies the same lighting, color, and texture corrections — automatically — to the smartphone photos you already shot. Studio-quality results in 30 seconds.
Try free — 5 credits, no cardCommon BBQ & Grilled Photography Mistakes
Missing the smoke window by not pre-setting your camera
Smoke dissipates in 90 seconds to 2 minutes. Arriving on set to adjust composition after the meat is plated means shooting smokeless food. Pre-build your composition completely - camera angle, exposure, lighting - before the food arrives. Do a full dry-run with an empty plate. When the meat arrives, shoot immediately and adjust composition only between subsequent takes.
Shooting brisket under flat softbox light that erases bark texture
Bark is the most valuable visual element of smoked brisket - the dark, deeply textured crust that takes 12+ hours to develop. Flat, even softbox light treats bark like a dark surface to be exposed correctly and eliminates the shadow that makes texture visible. Use a single hard side light raking across the bark surface to make every crevice and smoke particle dimensionally visible.
Adding BBQ sauce to brisket or ribs that should be shot dry
Texas brisket is traditionally served without sauce, and adding sauce on set to "improve" the look signals to BBQ-literate viewers that you are hiding poor bark quality. Dry-rubbed bark with coarse salt garnish always photographs more authentically than sauced meat. If the dish is served sauced, apply sauce minimally with a pastry brush and shoot immediately before it runs and pools.
Compressing pulled pork into a neat mound that reads as processed
Pulled pork that has been packed into a ball or pressed into a ring mold looks like a factory product, not hand-pulled BBQ. Always mound pulled pork loosely, then use two forks to pull a small portion away from the main mound toward the foreground. Individual pork shreds visible in the foreground communicate the hand-pulled texture that customers are paying for.
Photographing ribs too close to the frame edge, cutting off bone tips
A rib rack shot where the bone tips are cut off by the frame edge feels cramped and incomplete. The bone tips are structural to the composition - they provide horizontal leading lines that carry the viewer's eye across the frame. Position the rack diagonally so full bones are visible from tip to meat, and give at least a 10% margin around the rack edges before cropping.
Editing Tips
BBQ editing should deepen the dark tones without crushing them into pure black. In Lightroom, lift Shadows to +15 to recover detail in bark crevices, then pull Blacks down to -20 to restore depth. Boost Clarity by +25 to +35 - this is the single most effective slider for making bark and char texture read as dimensional. In the HSL panel, boost orange saturation by +20 and red saturation by +15 to enrich the mahogany bark tones. Shift orange hue slightly toward red (+5) to deepen the color. Desaturate green by -30 if any green sides (coleslaw, pickles) are reading too bright relative to the meat. Smoke editing: increase Dehaze slightly (-10 to -15 in Lightroom) to make smoke more visible in the final frame.
Platform-Specific Tips
On Instagram, the brisket fan-slice shot with dramatic side lighting is a consistent high-performer in the BBQ category - the marbling detail and smoke ring are highly saveable content. Reels showing the brisket slice in motion (the fat jiggle test) drive exponential reach compared to static posts. For DoorDash and Uber Eats, the BBQ platter overhead is the most effective menu image because it shows variety and value - customers ordering delivery want to see everything they get. Individual hero shots of brisket or ribs work well for modifiers (adding sides, upgrading portions). On print menus, the 45-degree brisket slice shot reproduces beautifully in offset printing because the rich dark tones in CMYK carry the mahogany bark color accurately. Avoid the overhead smoke shot in print - smoke is a translucent effect that loses all legibility in print reproduction and risks looking like a defect.
BBQ & Grilled Photo Examples
Real bbq & grilled photos from restaurants using MenuPhotoAI. Tap any category to see the full gallery and the before-and-after view.
Take your BBQ & Grilled photos further with AI
Once you have a solid shot using the techniques above, MenuPhotoAI can handle the finishing work. Our AI removes distracting backgrounds, corrects exposure and white balance, and applies cuisine-appropriate color grading — turning a good smartphone photo into something you'd be proud to put on your menu or delivery app listing. Start with 5 free photos, no credit card required.
Frequently Asked Questions
Skip the photoshoot — enhance the bbq & grilled photos you already have
The techniques on this page take time to master. MenuPhotoAI applies the same lighting, color, and texture corrections — automatically — to the smartphone photos you already shot. Studio-quality results in 30 seconds.
Try free — 5 credits, no cardMore Cuisine Photography Guides
This guide reflects best practices for BBQ & Grilled food photography as of 2026. Techniques may vary based on specific dishes, equipment, and shooting conditions. MenuPhotoAI is an AI food photo enhancement platform.